
Node-RED is a popular drag-and-drop programming tool for industrial applications. Using Node-RED, you can easily connect different devices, sensors, and software to automate industrial manufacturing processes.
Because of its ability to connect hardware devices with cloud services, Node-RED has become the tool of choice for IIoT applications.
In Node-RED, we have this thing called a node. A Node-RED node is a block that has already been programmed for a specific task. For example, you can have a node that sends a message, reads data from a sensor, or turns a machine on or off. You connect these nodes together to build a workflow. Using this workflow, you can easily automate an industrial process without writing a lot of code. That’s why we call Node-RED a drag-and-drop programming tool. You drag these nodes and drop them into the programming environment. Then, you connect them, and that gives you an easy-to-use program to automate your industrial process.
In this article, you will learn about the different types of nodes we have in Node-RED and how to use them. But before we get into all of that, you first need to install Node-RED on your computer if you haven’t already. You can use this step-by-step guide on the Node-RED website to do that.
Ok… let’s get started.
Nodes are available in the Node palette on the left side of the screen, and you can use them by dragging and dropping them onto your workspace.
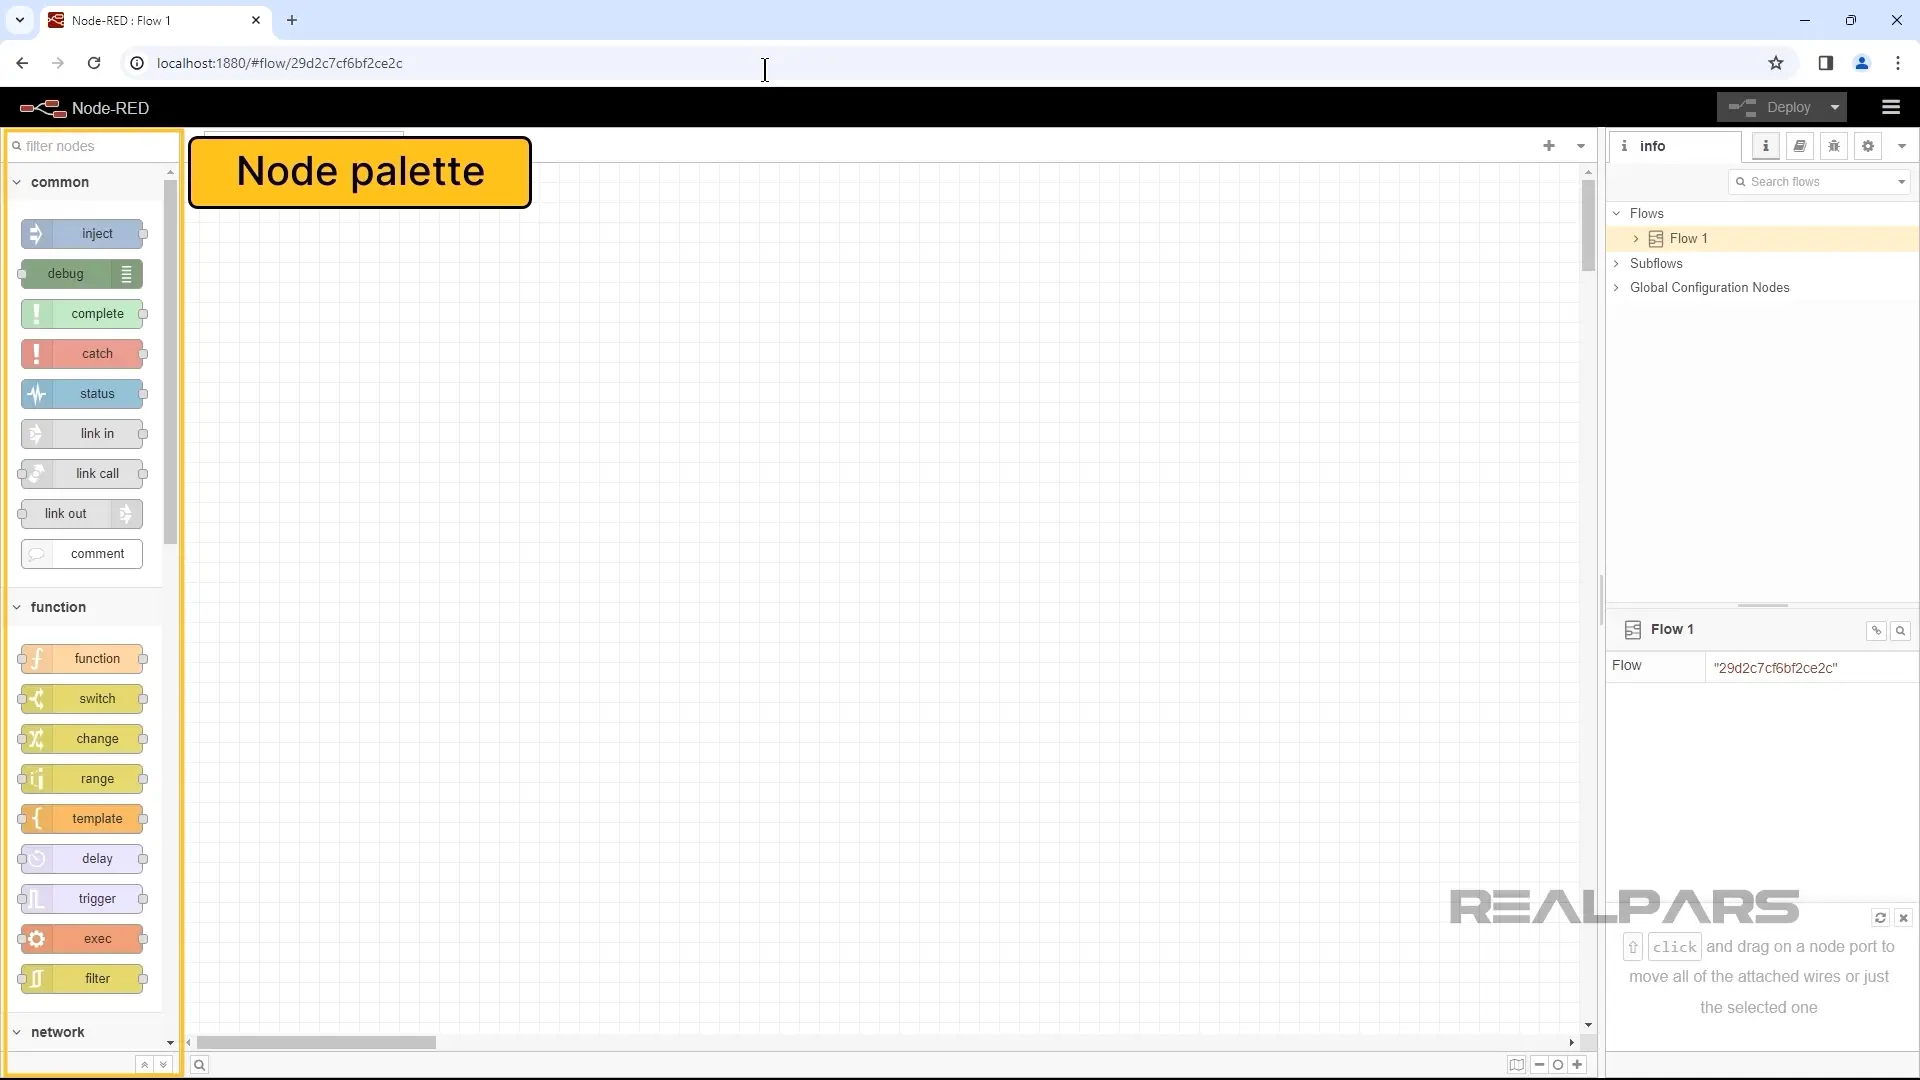
As I mentioned, you can create a workflow by connecting different nodes. A node can receive a message from the previous node, process it, and send it to the next node in the flow. There are actually a lot of nodes for different purposes.
OK…Now let’s talk about some of the basic nodes available on Node-RED.
Basic nodes
Common nodes
There are some basic nodes that are commonly used in Node-RED projects.
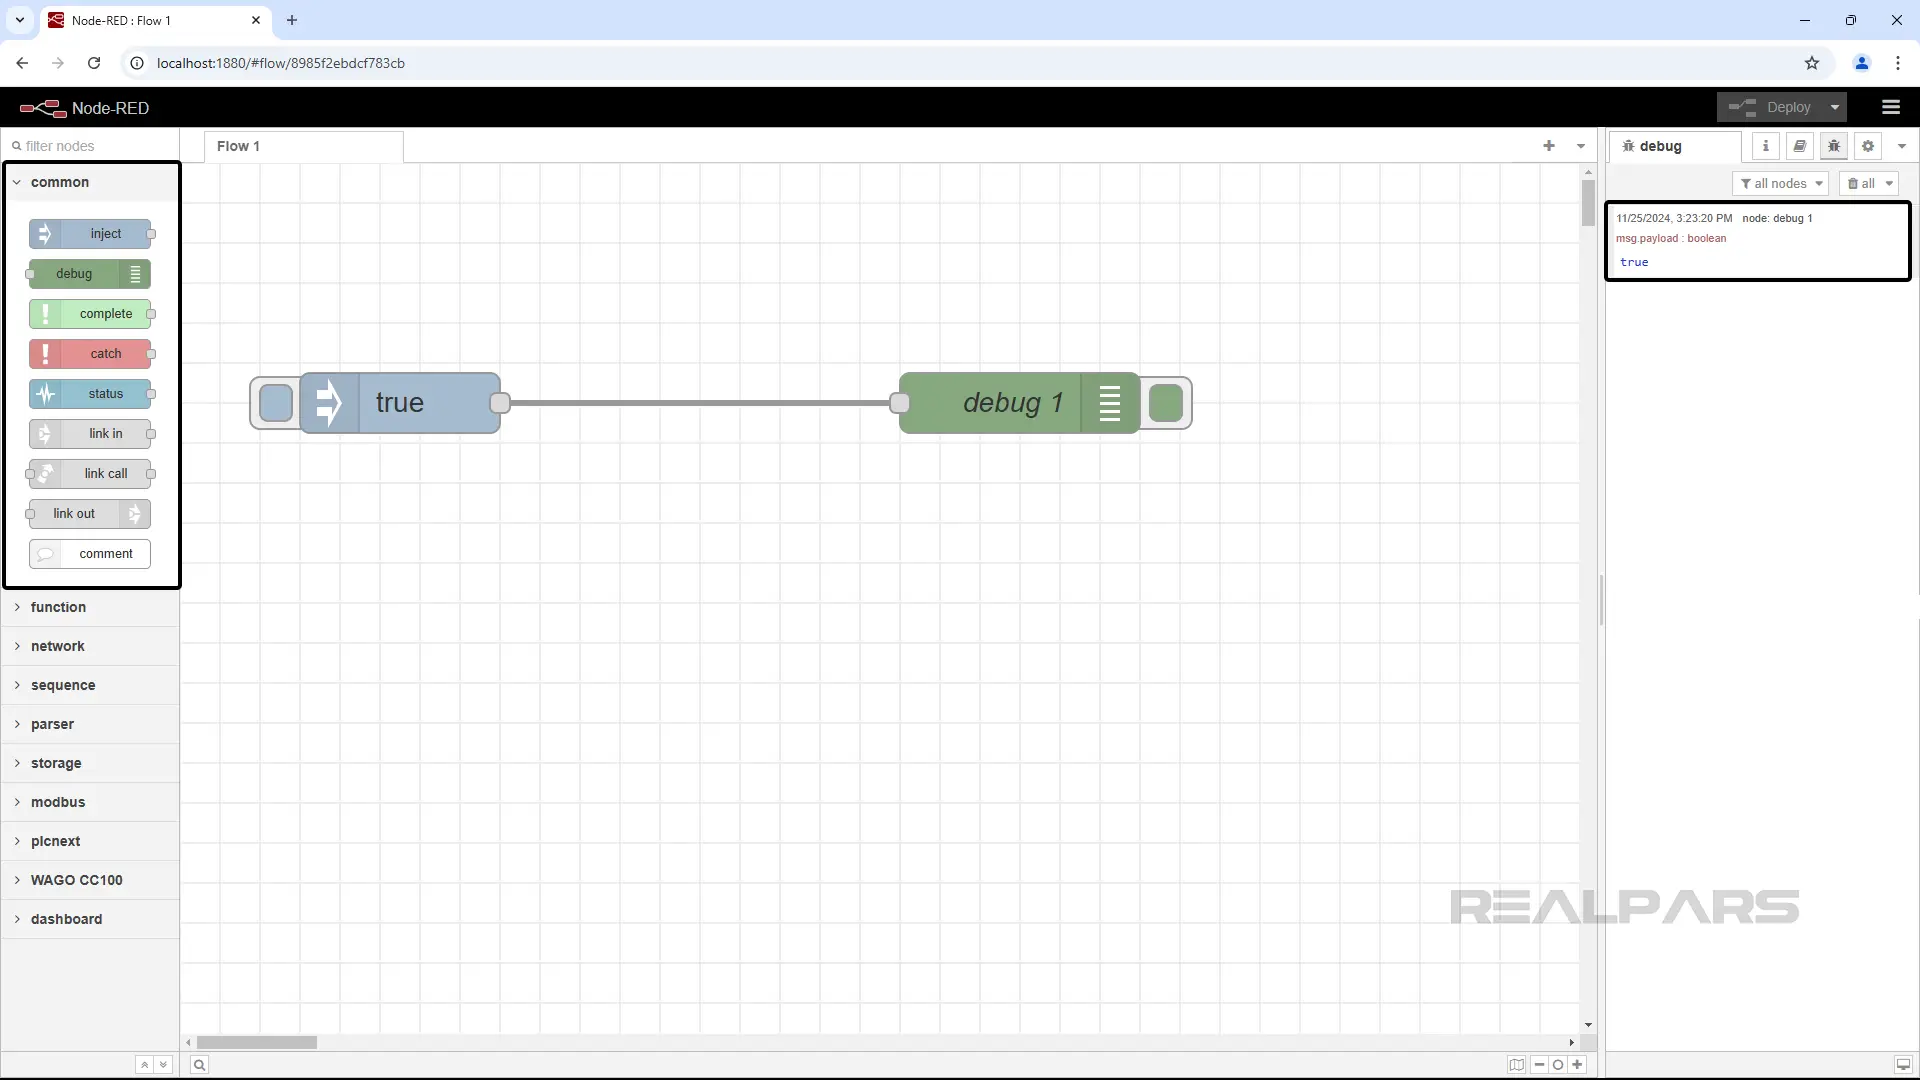
An Inject node is a node that injects a message into a flow manually or at regular intervals. The message payload can be of various types, such as strings, JavaScript objects, etc.
A Debug node is a node that displays the message properties in the debug sidebar tab. By default, it shows msg.payload, but it can be configured to display any property.
Here, we have a simple example of a Node-RED flow with an inject node that sends the value of True to the debug node, and the debug node shows that value in the debug sidebar tab.
Function nodes
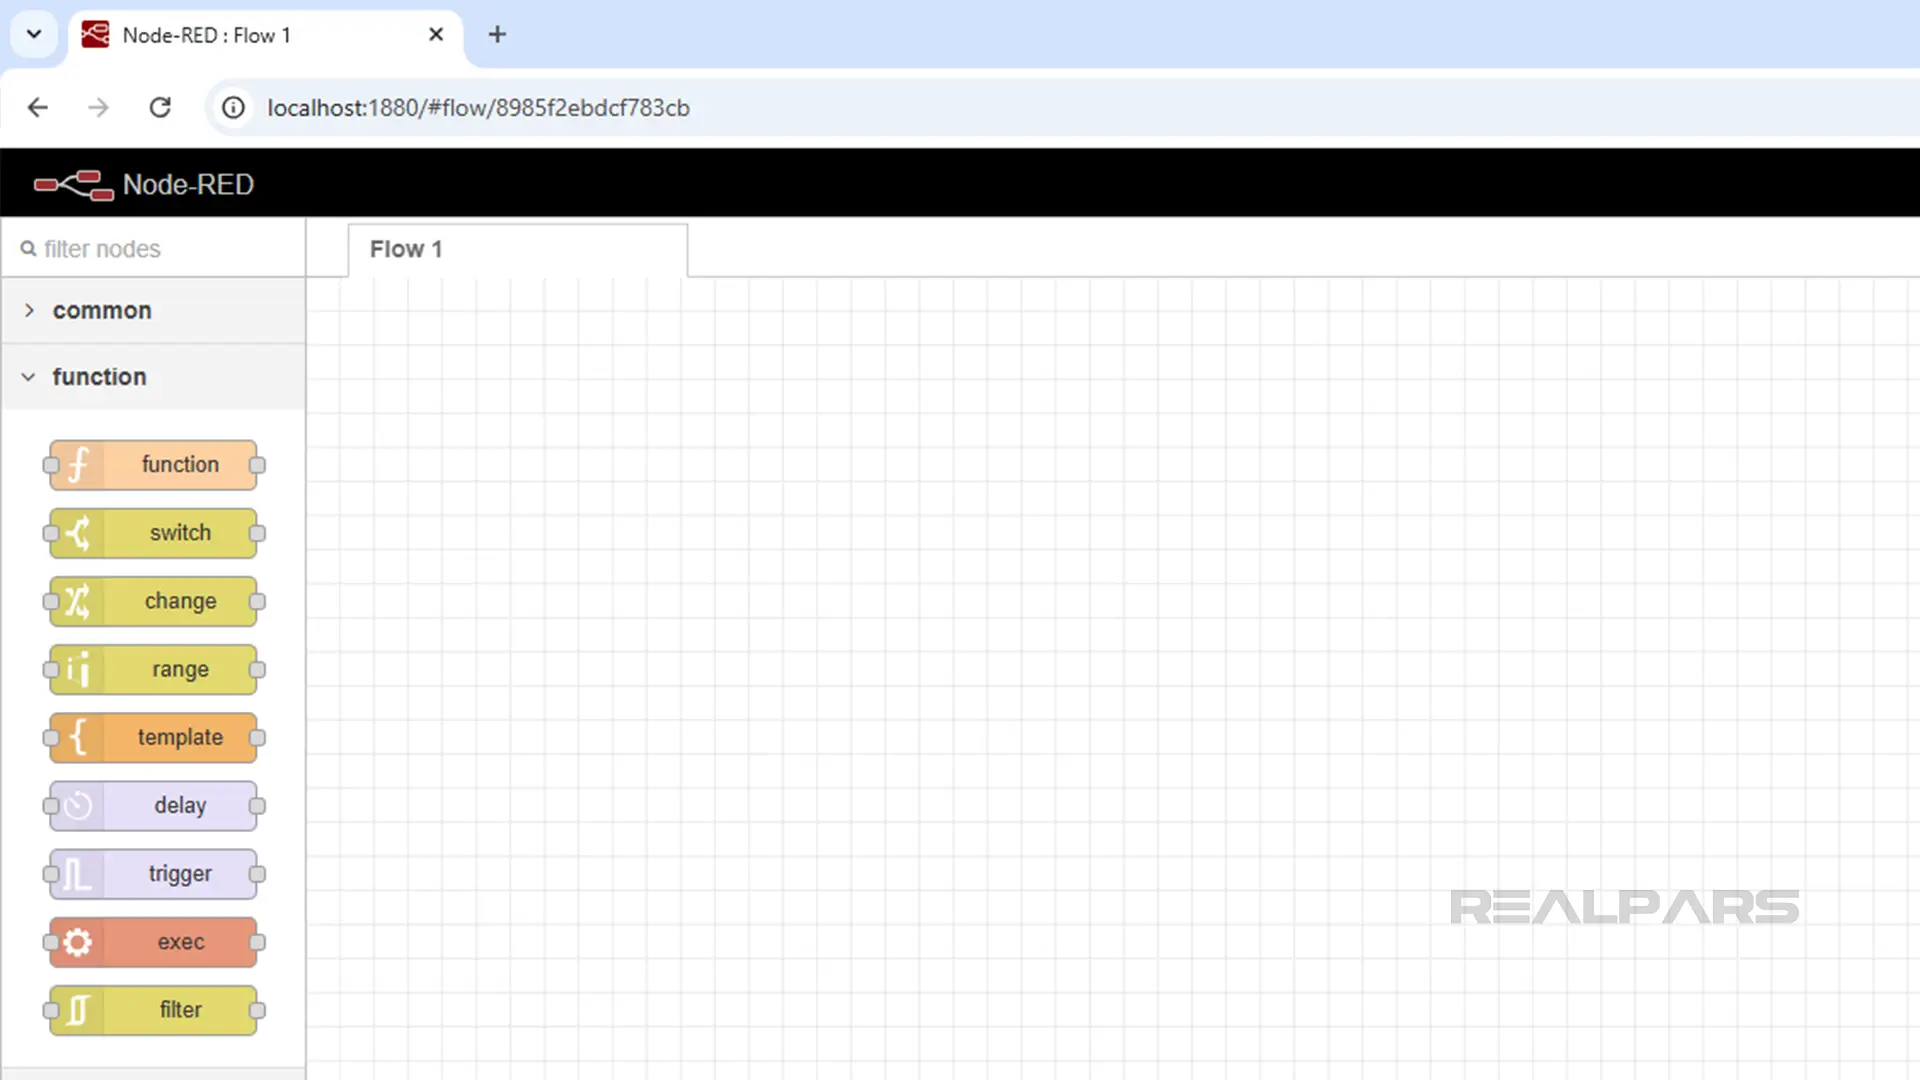
Function nodes allow you to process and modify incoming messages by applying custom logic. For example, the Function node receives a message from the previous node and applies a specific JavaScript code on it. We can say it reads data from the previous node and uses that data in the code.
Network nodes
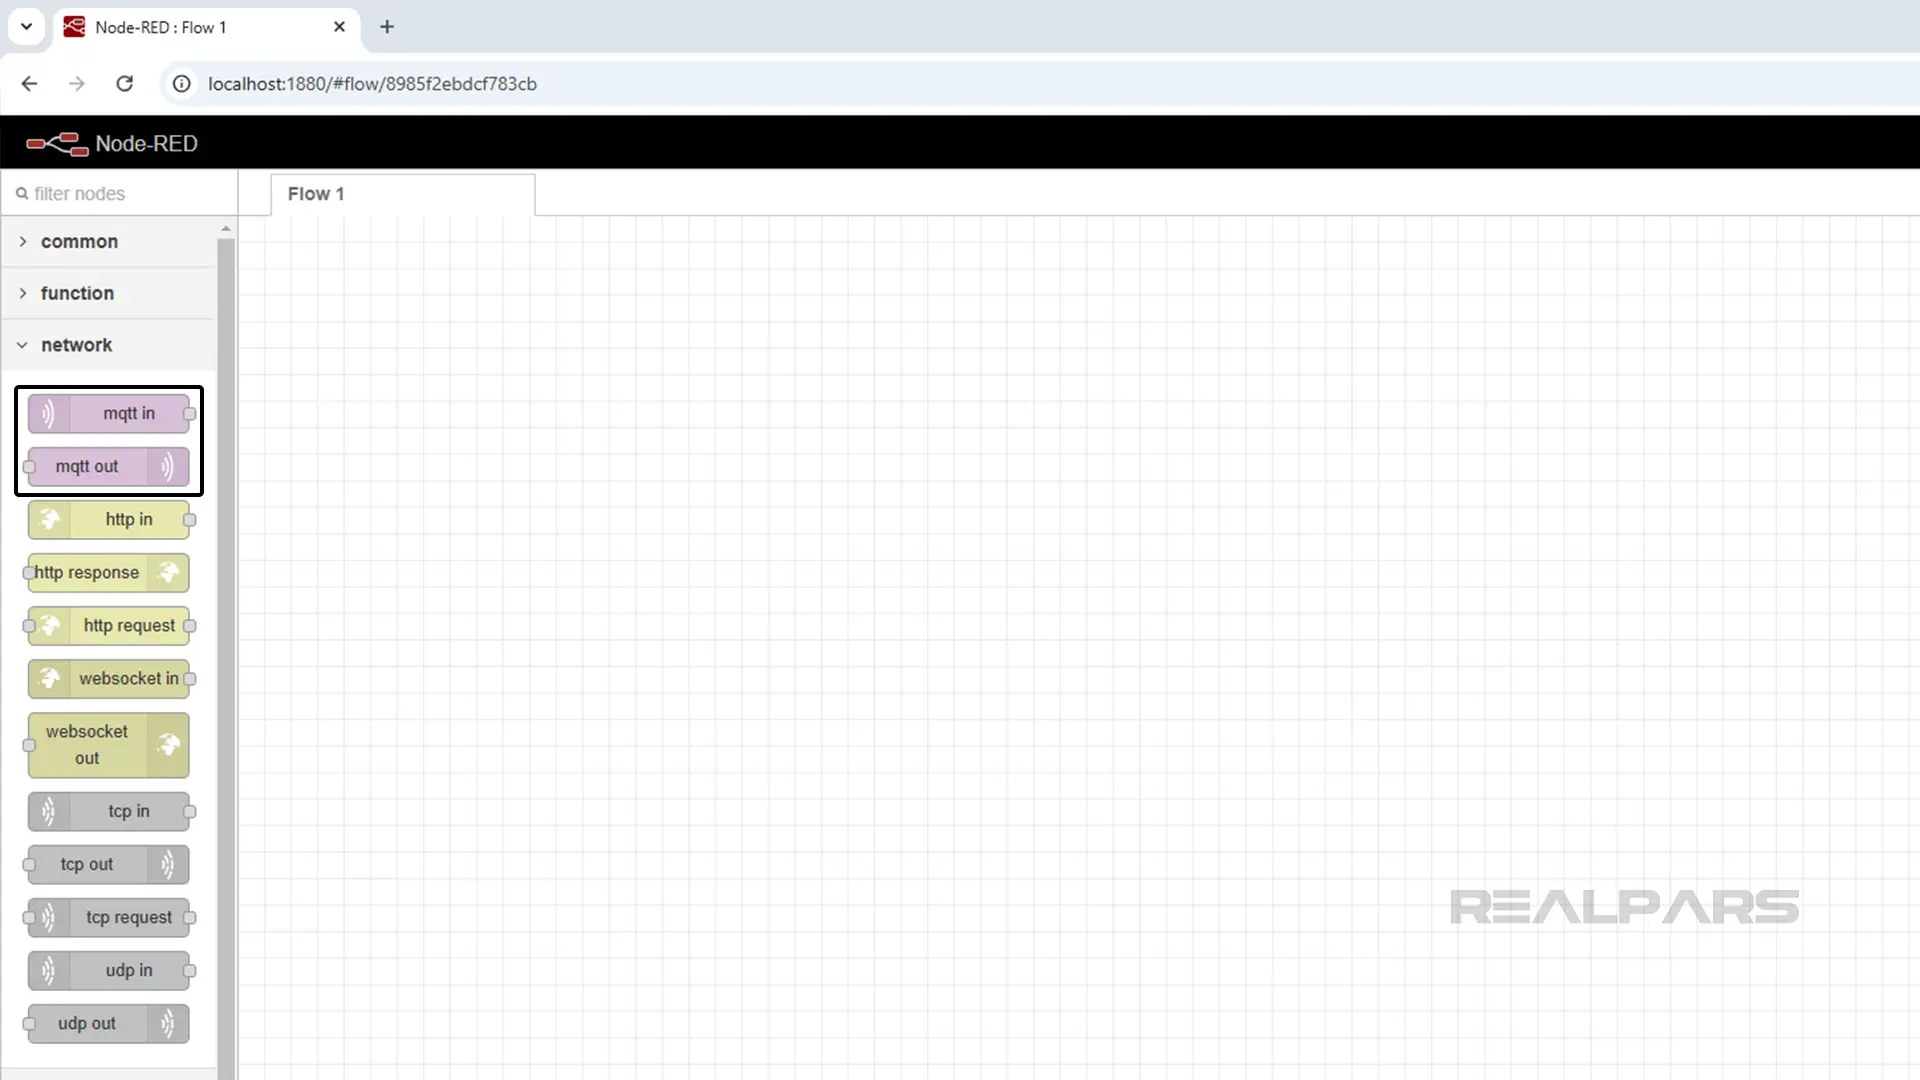
Network nodes connect devices and systems, enabling data exchange across a network. One of the most useful nodes in IIoT is MQTT.
If you’re not familiar with MQTT, it’s a messaging protocol used to send and receive data between different devices. It has two main parts: the broker and the clients. Clients send (publish) data to the broker and receive (subscribe) data from it. In other words, the broker acts as a central hub between the clients.
The mqtt in node connects to an MQTT broker and subscribes to messages.
The mqtt out node connects to an MQTT broker and publishes messages.
If you want to learn more about using MQTT nodes in your projects, we suggest checking out our course IIoT Essentials: Node-RED & MQTT on PLCnext Technology. This course explains MQTT in action with a practical example of publishing and subscribing to messages from a Mosquitto broker.
How is Node-RED used in real-world applications?
Now that you’re familiar with some of the most commonly used Node-RED nodes, you may be wondering how Node-RED is actually used in real-world applications. To answer that, let’s turn to the 2023 Node-RED Community Survey.
In 2023, Node-RED ran a community survey. The goal of the survey was to gain a better understanding of who is using Node-RED, how they are using Node-RED, and to collect general feedback from the Node-RED community.
A total of 780 individuals completed the survey. This dataset gives a good representation of the general Node-RED community.
Let’s look at the results of the survey to understand who is using Node-RED and how they are using it.
Community Survey Results
Usage capacity
The first question in the survey asked people what capacity they use Node-RED in.
Just over 40% of people use Node-RED in a professional capacity. The remainder use Node-RED for personal and educational use.
It may seem surprising that more people use Node-RED for personal than professional use, but Node-RED is very popular for home automation since it makes it easy to connect various smart devices together.
Professional roles
The follow-up question asked people who use Node-RED in a professional capacity what their role at work was.
It's not surprising to see that the majority of Node-RED users work in technical roles like software developers, industrial engineers, and system architects.
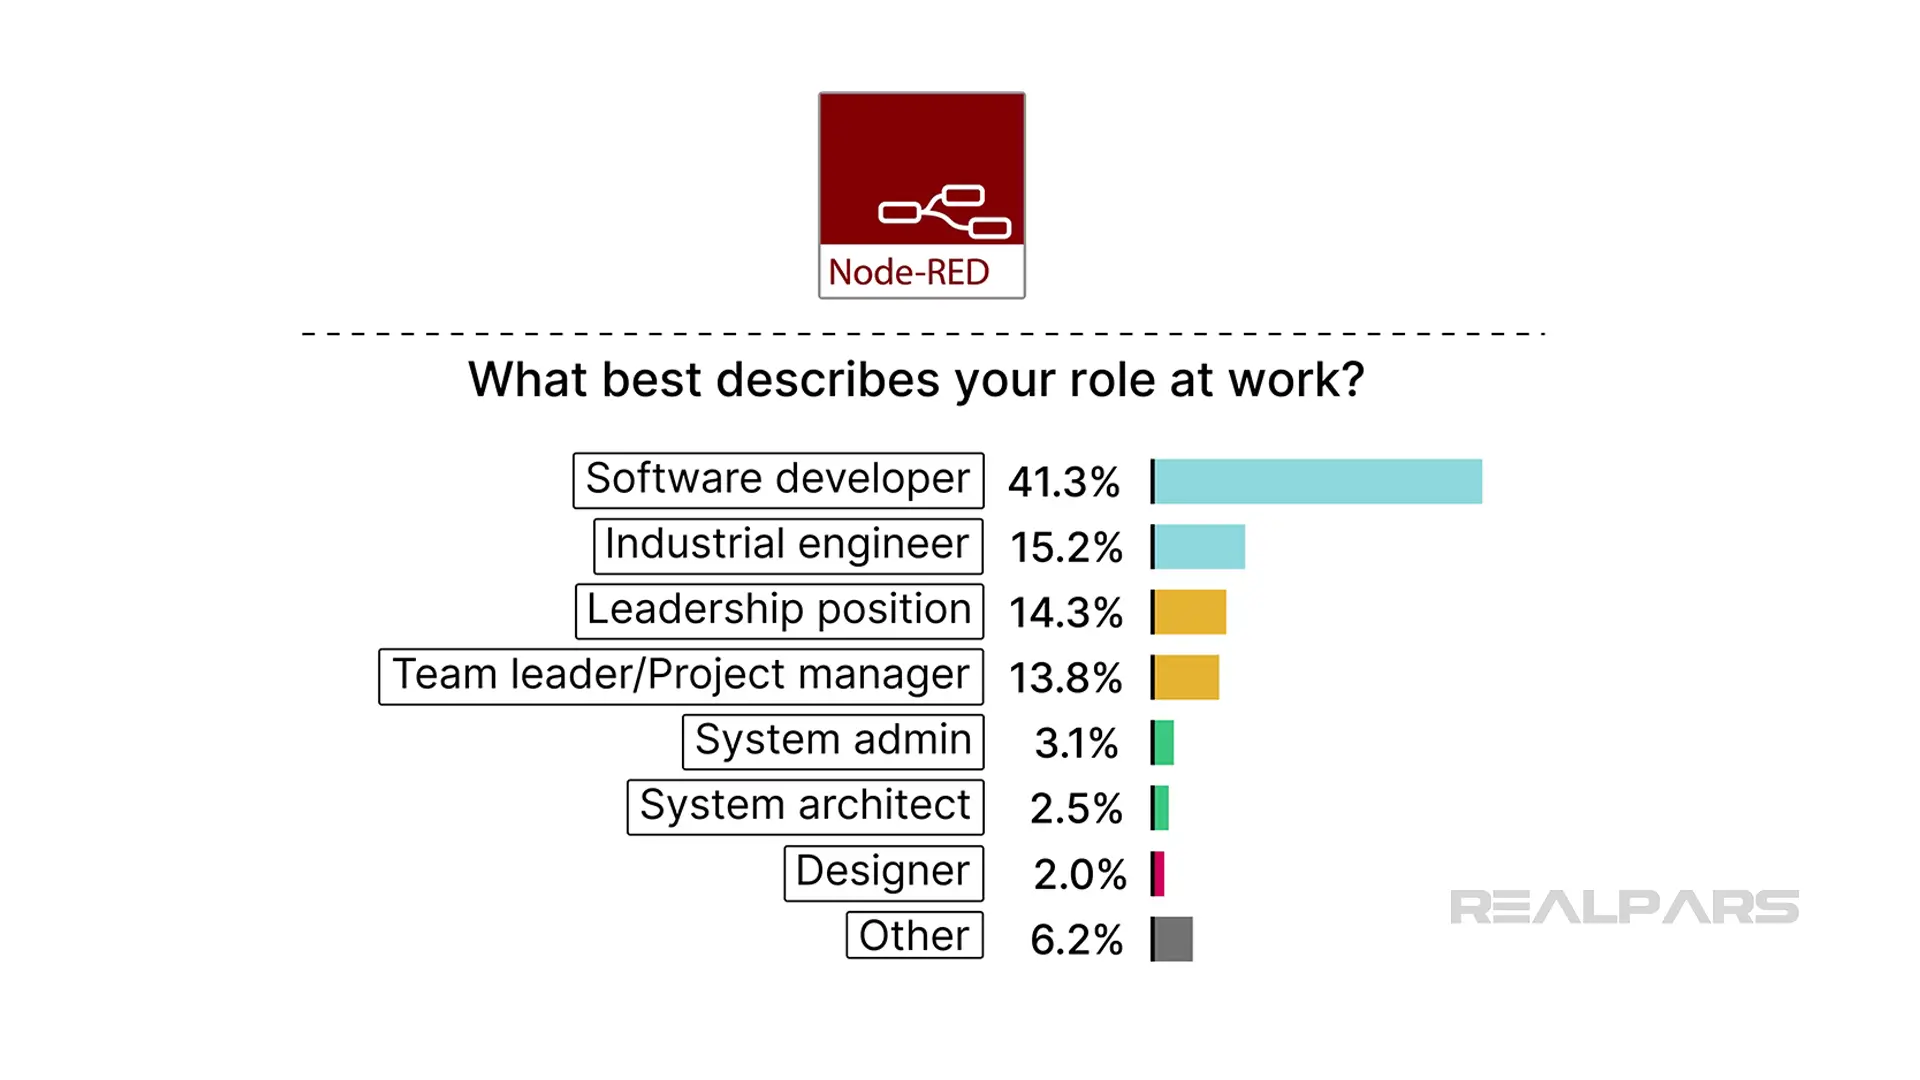
However, it is important to note that non-technical roles like team leaders and project managers use Node-RED as well. This is mostly because it is a graphical programming tool that is easy to learn for non-technical people.
Industry use
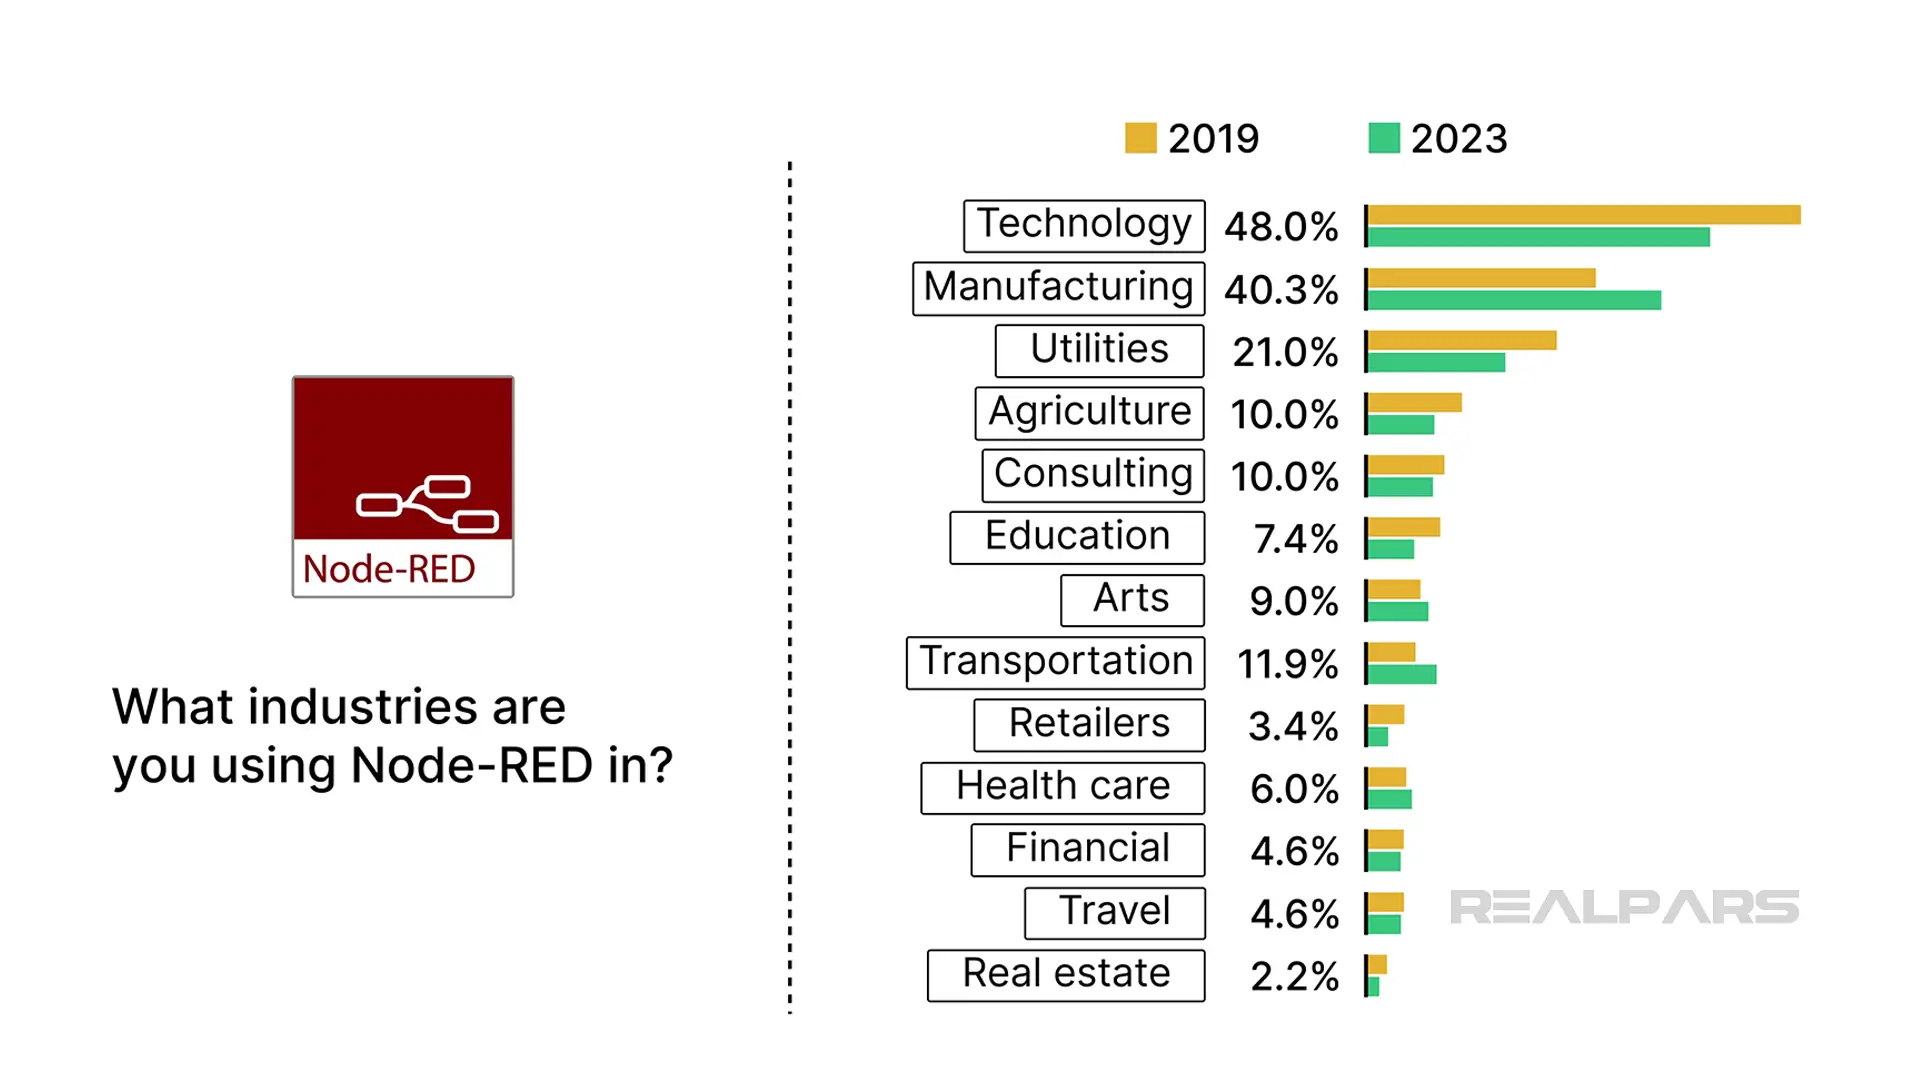
The survey also revealed that Node-RED is mainly used in the tech industry with 48% of professionals who use Node-RED working in technology.
The second largest industry in the survey is manufacturing at 40%.
When comparing the 2023 survey with the previous survey in 2019, we see that the proportion of people using Node-RED in the manufacturing industry is increasing. This indicates that Node-RED is gaining acceptance for industrial applications.
Application areas
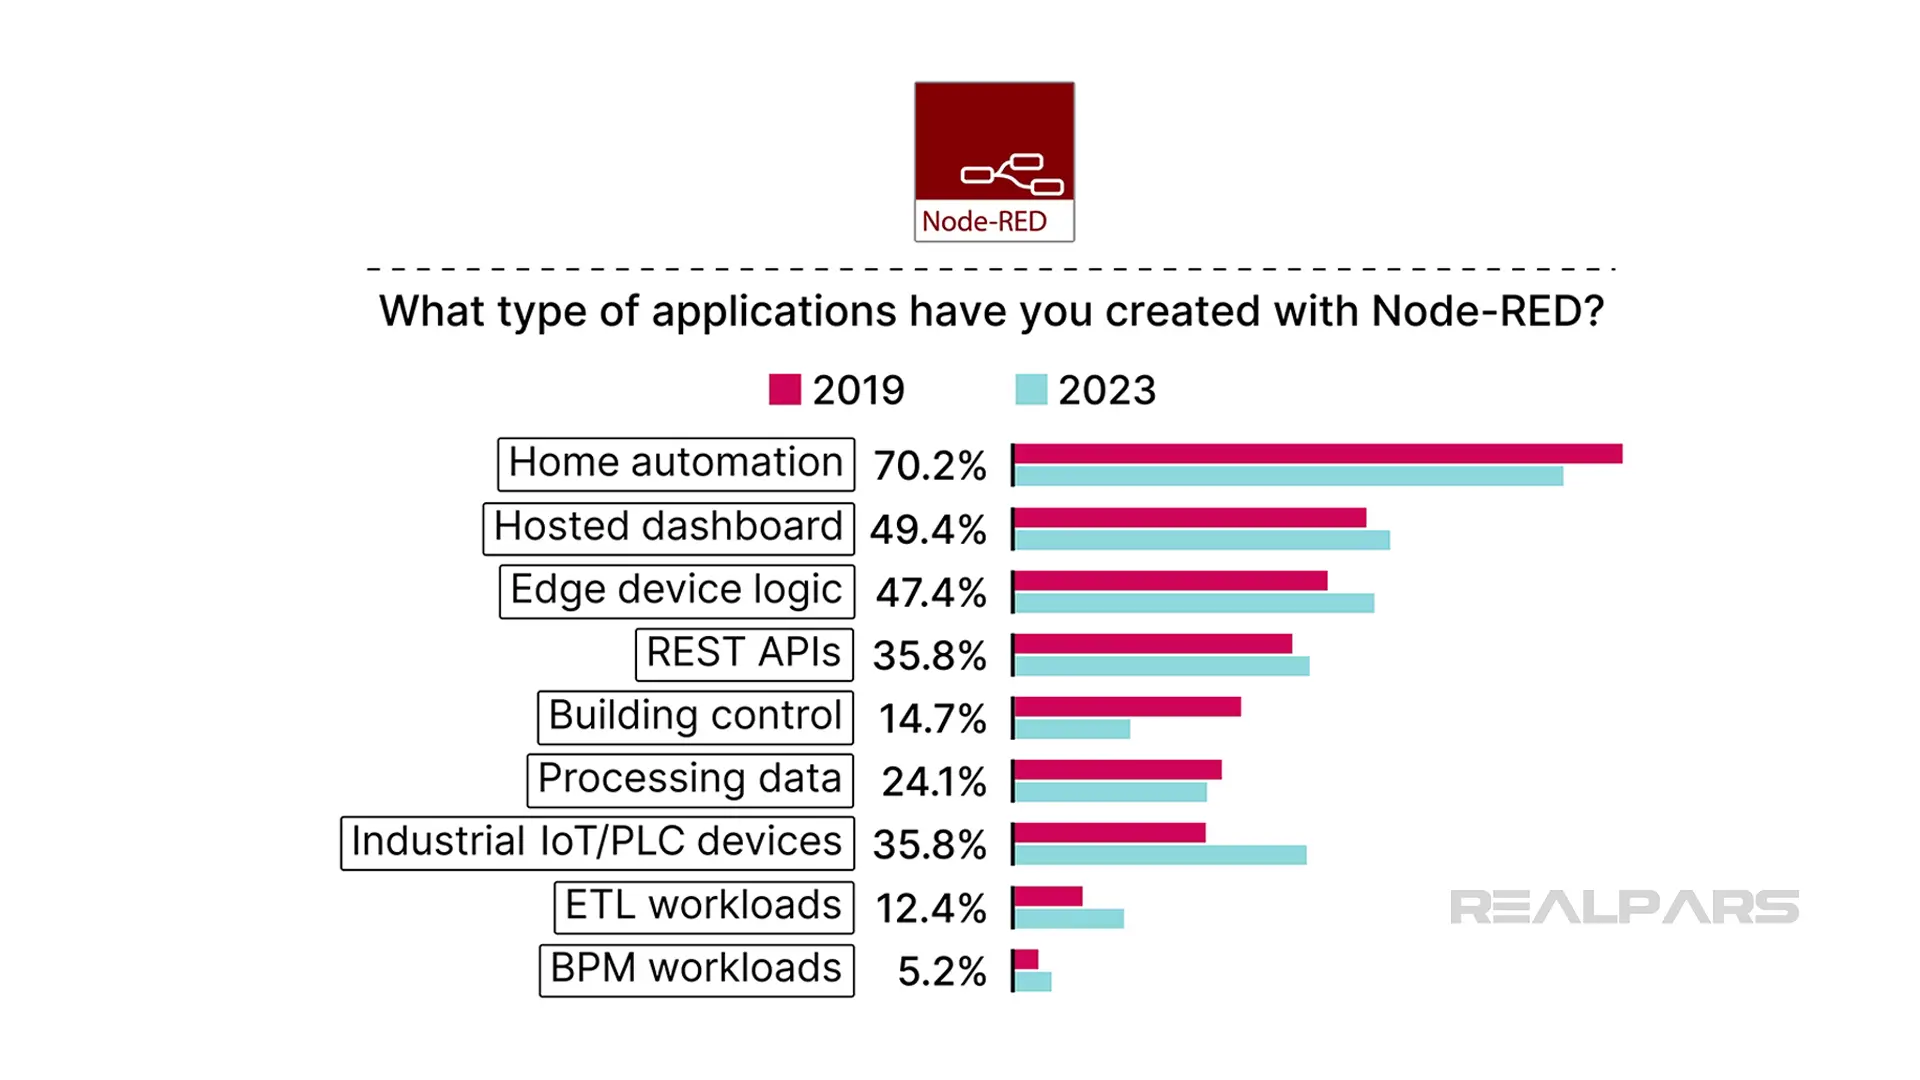
Next, the survey asked people what they use Node-RED for.
The primary use of Node-RED is home automation, with 70% of respondents stating that they have created home automation applications with Node-RED.
Moving past home automation, we can see that Node-RED is being applied for industrial automation applications too like hosted dashboards, building control, processing data, PLC devices, and Edge Device Logic, where data is collected from a local device like a PLC, transformed in some way, and forwarded to a cloud provider.
Deployment environments
When asked where people run Node-RED, the number of people who reported using Node-RED on an industrial PC or PLC is small but growing when compared to the results of the previous survey.
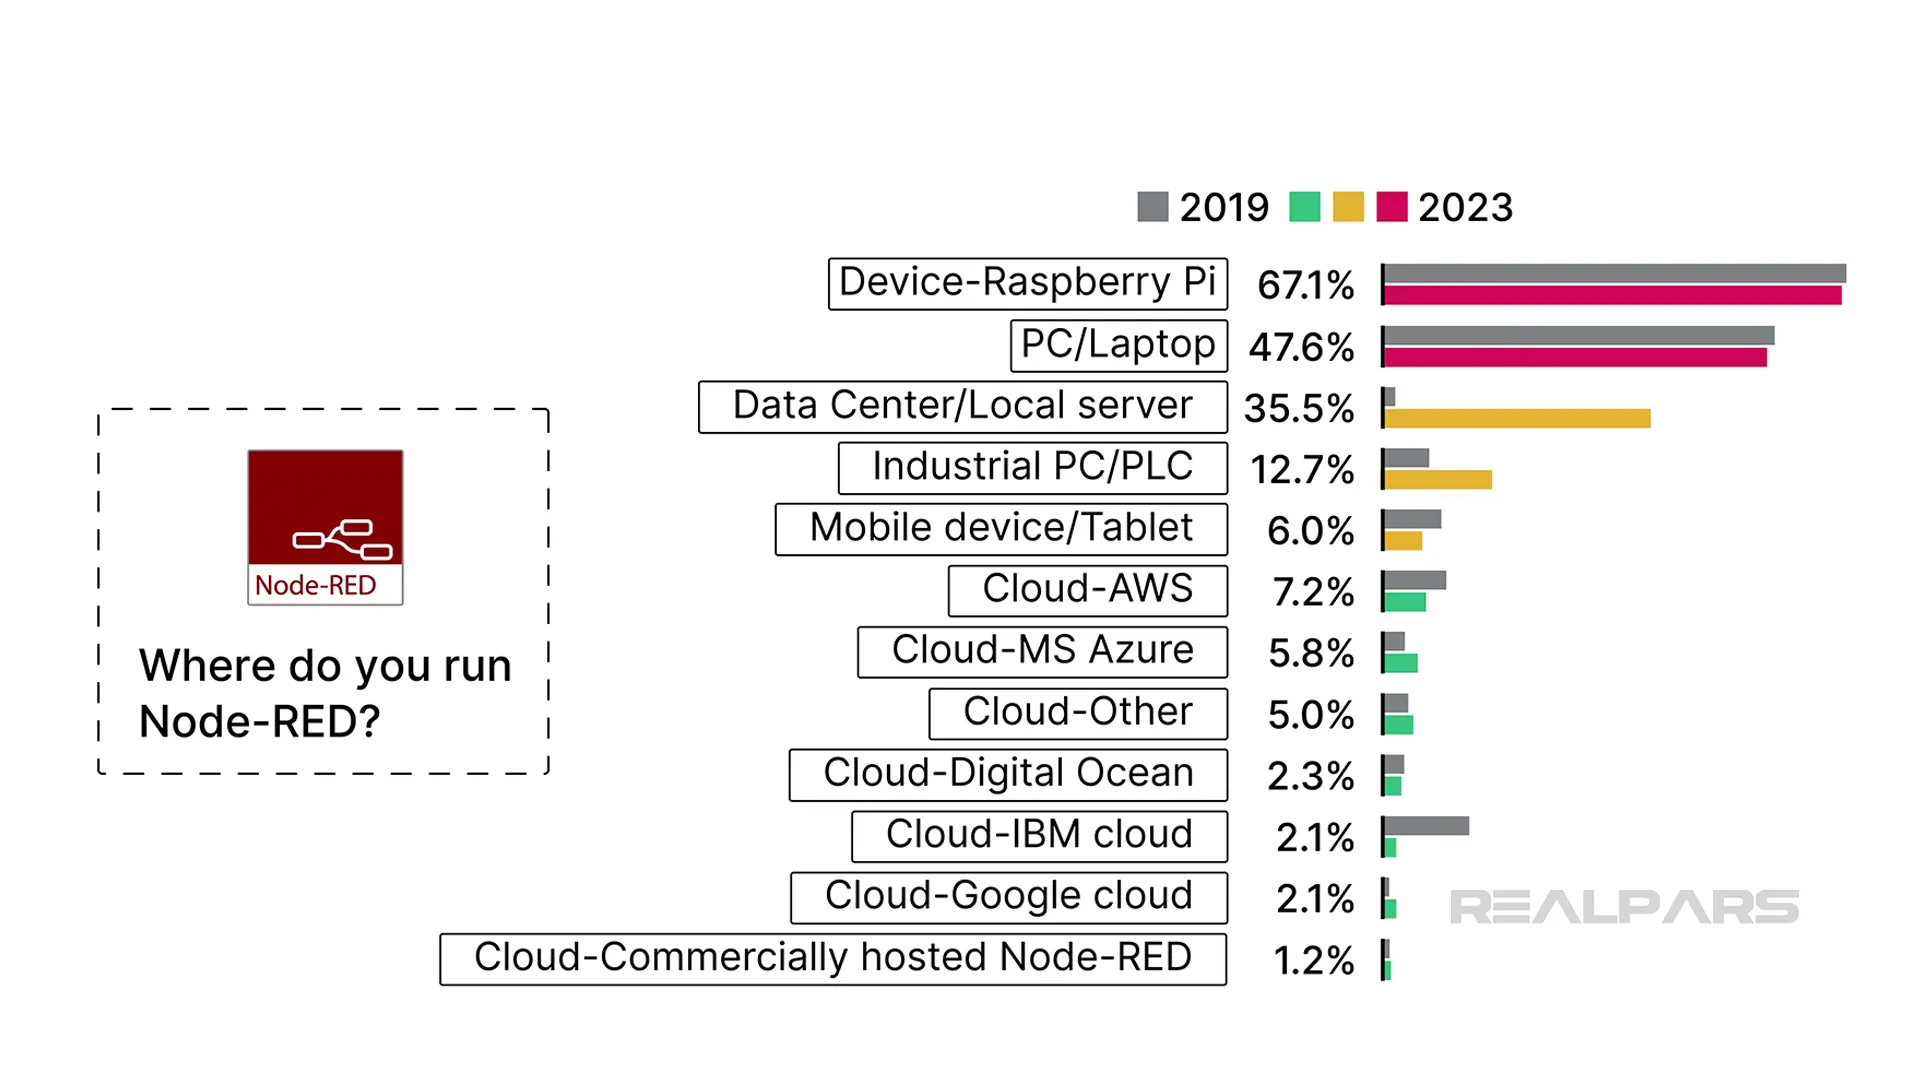
This growth may be driven by PLC manufacturers integrating IT technology into their products. For example, WAGO’s CC100 PLC is a Linux-based PLC that you can install Node-RED on.
Messaging technologies
When we look at messaging technologies used with Node-RED, we can see the influence that the manufacturing industry is having.
Although MQTT remains the most popular messaging technology that is used with Node-RED, common industrial communication protocols like Modbus and OPC UA are becoming increasingly popular.
These communication protocols may be used to collect data from a PLC in a Node-RED application.
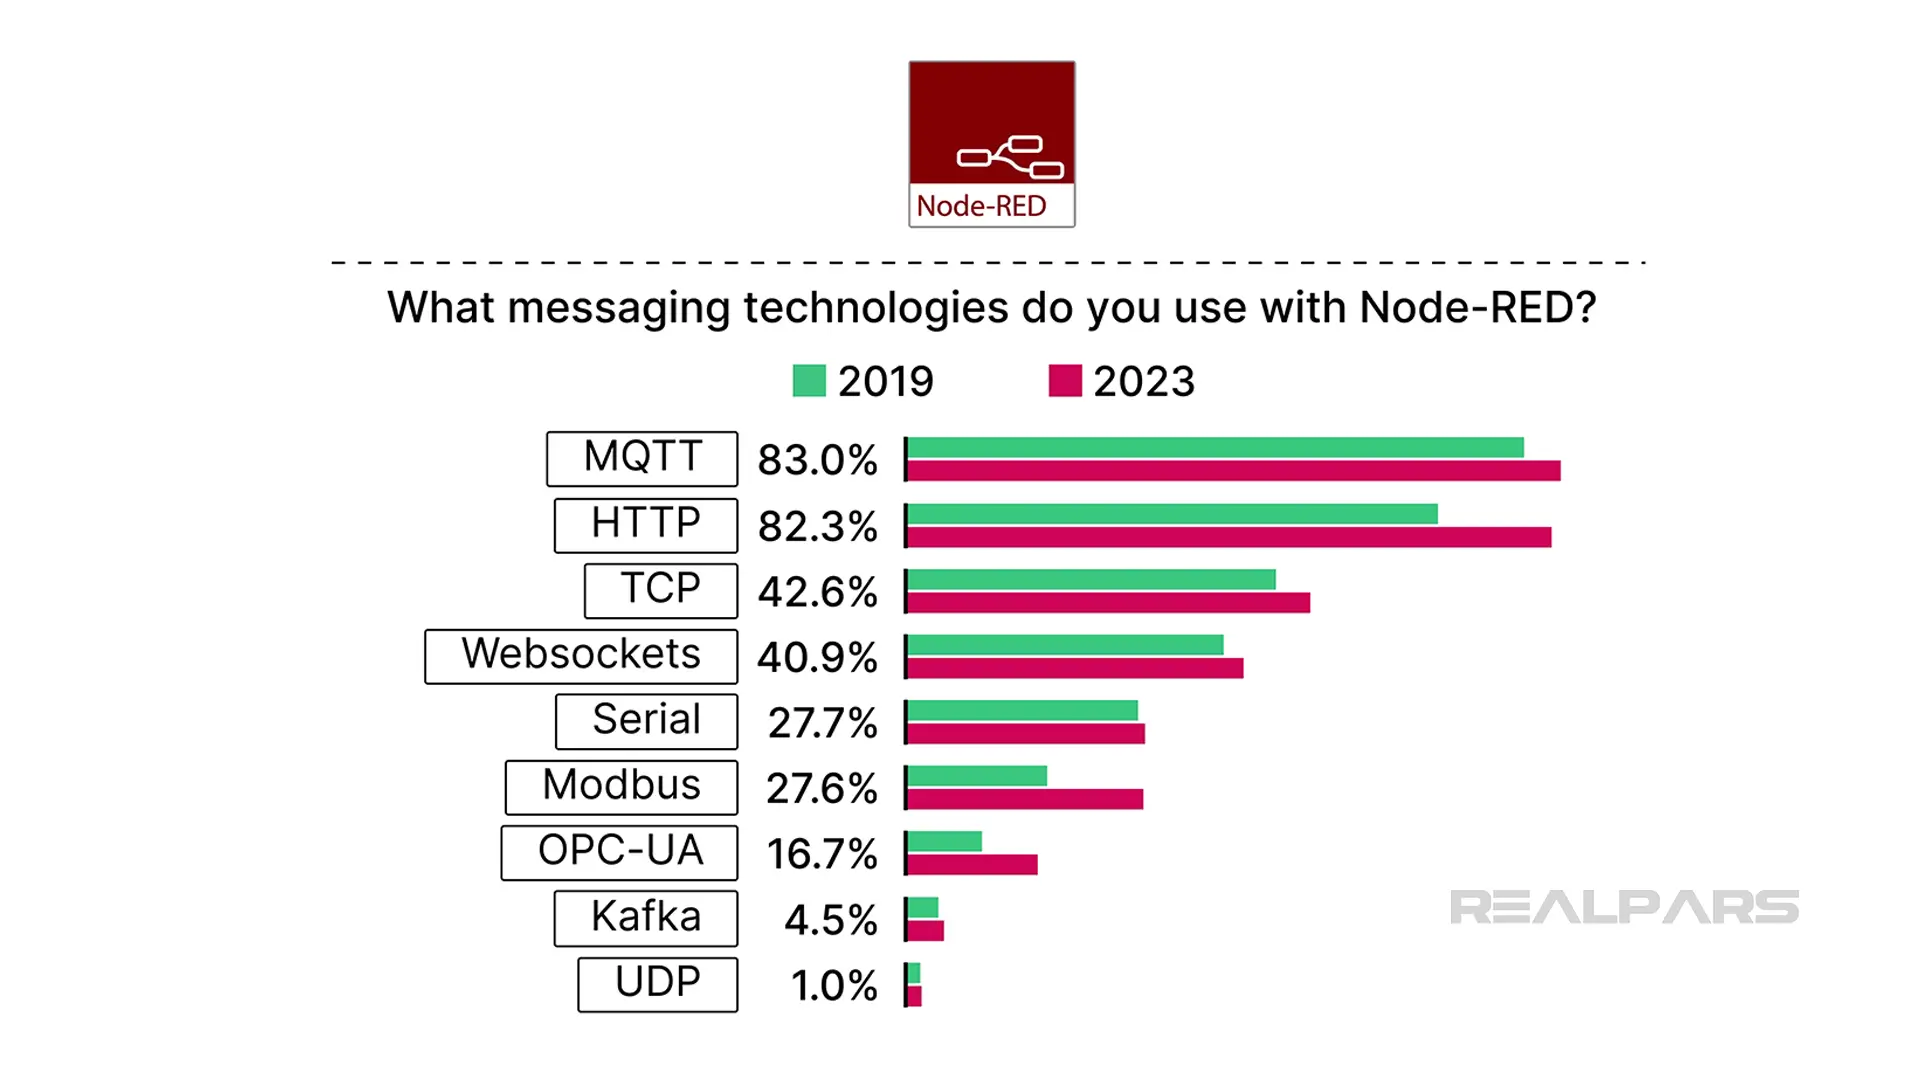
The survey results show that Node-RED is increasingly being used for industrial applications such as dashboards, data processing, PLC connectivity, and edge computing. We can also see the growing use of industrial communication technologies such as MQTT, Modbus, and OPC UA.
But how do you actually build these types of applications in Node-RED?
In many cases, you’ll need additional nodes that aren’t included in Node-RED by default. So, before looking at some industrial examples, let’s see how you can install them.
How to install additional nodes
In addition to the default nodes, there are some other nodes that you can install and use for specific use cases. There are two different ways to do this.
Manage palette option
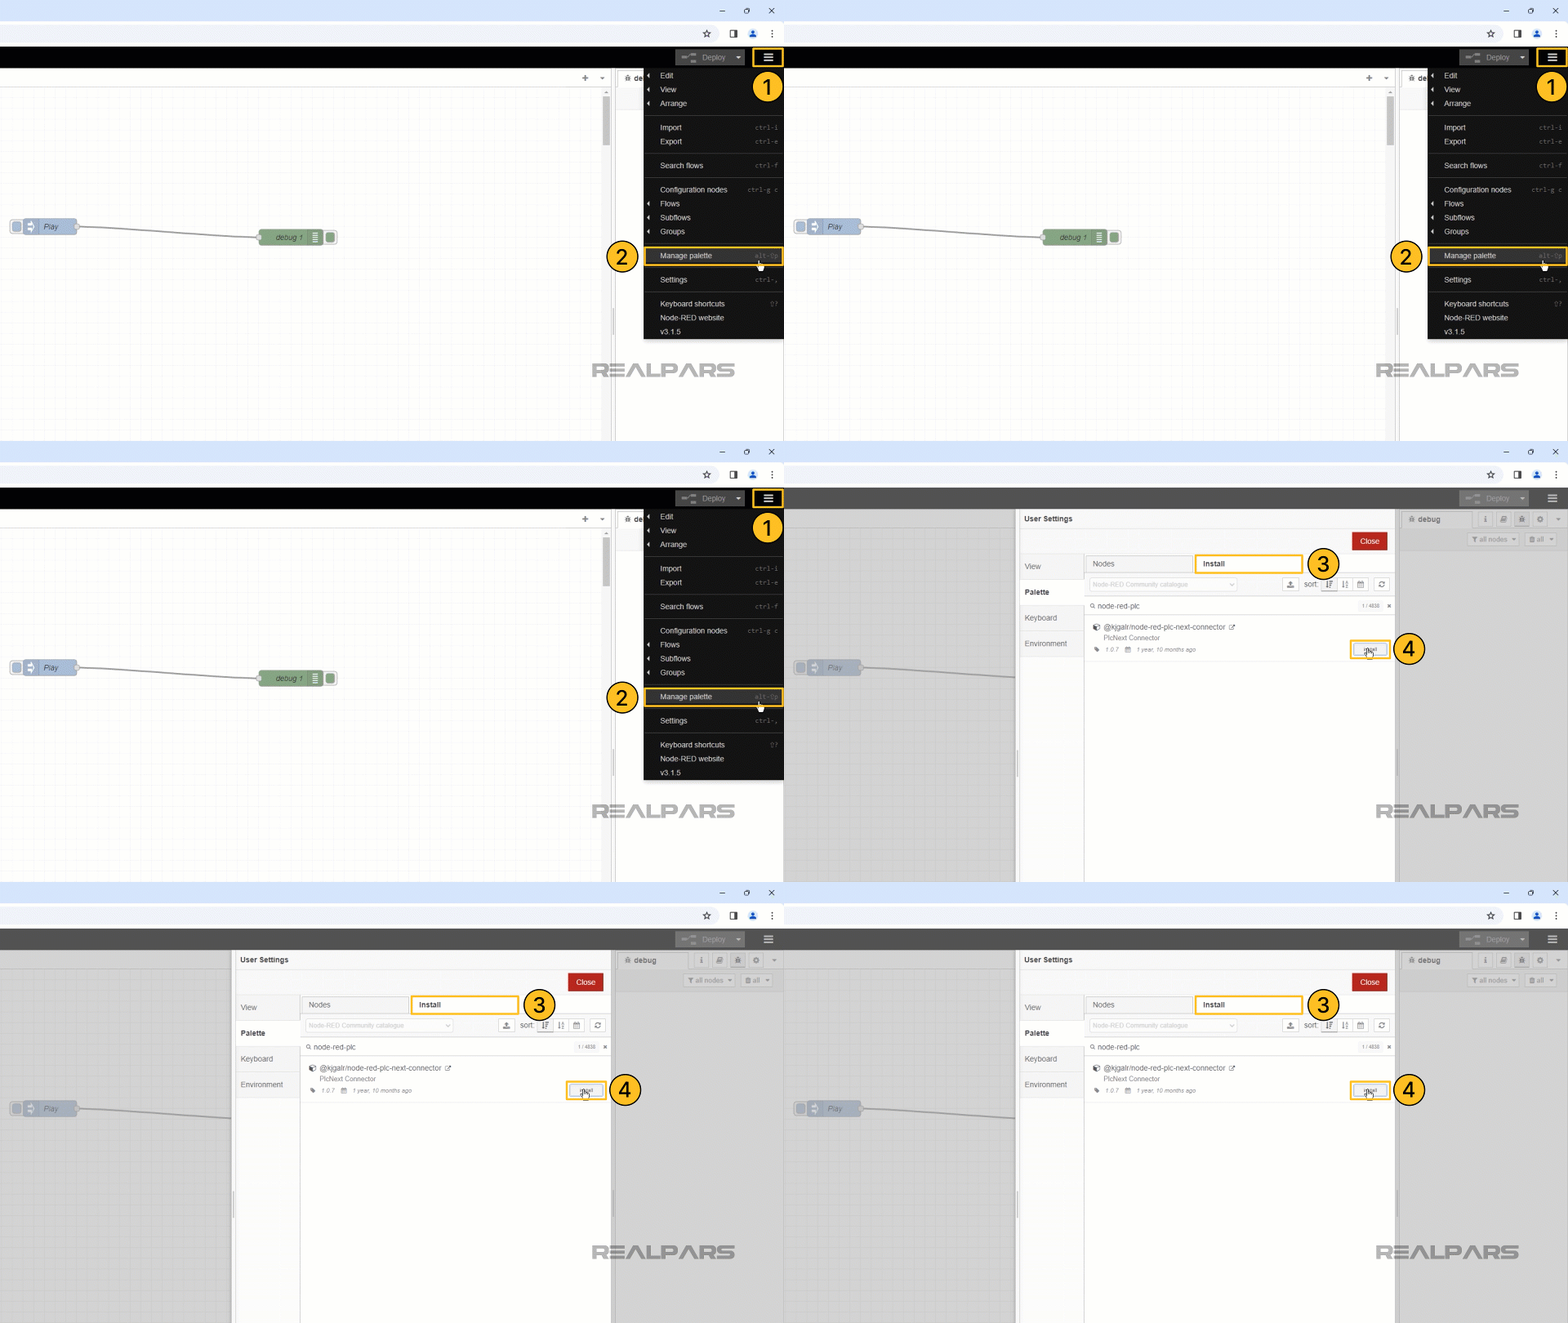
The easiest way to install Node-RED nodes is to use the Manage palette option. In the Node-RED editor, you can click on the menu and choose Manage Palette. In the Install tab, you can search for the node you need and click Install. After the installation is complete, the nodes will be available on the node palette.
Installing with npm
The second way is to install the nodes in your Node-RED configuration folder inside the node-red directory. (by default, $HOME/.node-red) You can use the npm install command.
The nodes will be available after restarting the Node-RED application.
Examples of industrial nodes
As we mentioned earlier, there are also a lot of nodes that you can use to interact with specific controllers. For example, there are nodes available to use with WAGO and PLCnext PLCs. Let’s look at each one in depth.
WAGO nodes
To interact with a WAGO PLC, you need to install its nodes in Node-RED. After that, you can read data from the inputs of the PLC or write data to its outputs. That’s amazing! You can use a graphical programming tool to extract your PLC’s data quickly and even send it to the cloud with related nodes.
For example, to write data to an output of a WAGO CC100 PLC, you can install its related package and use the related node.
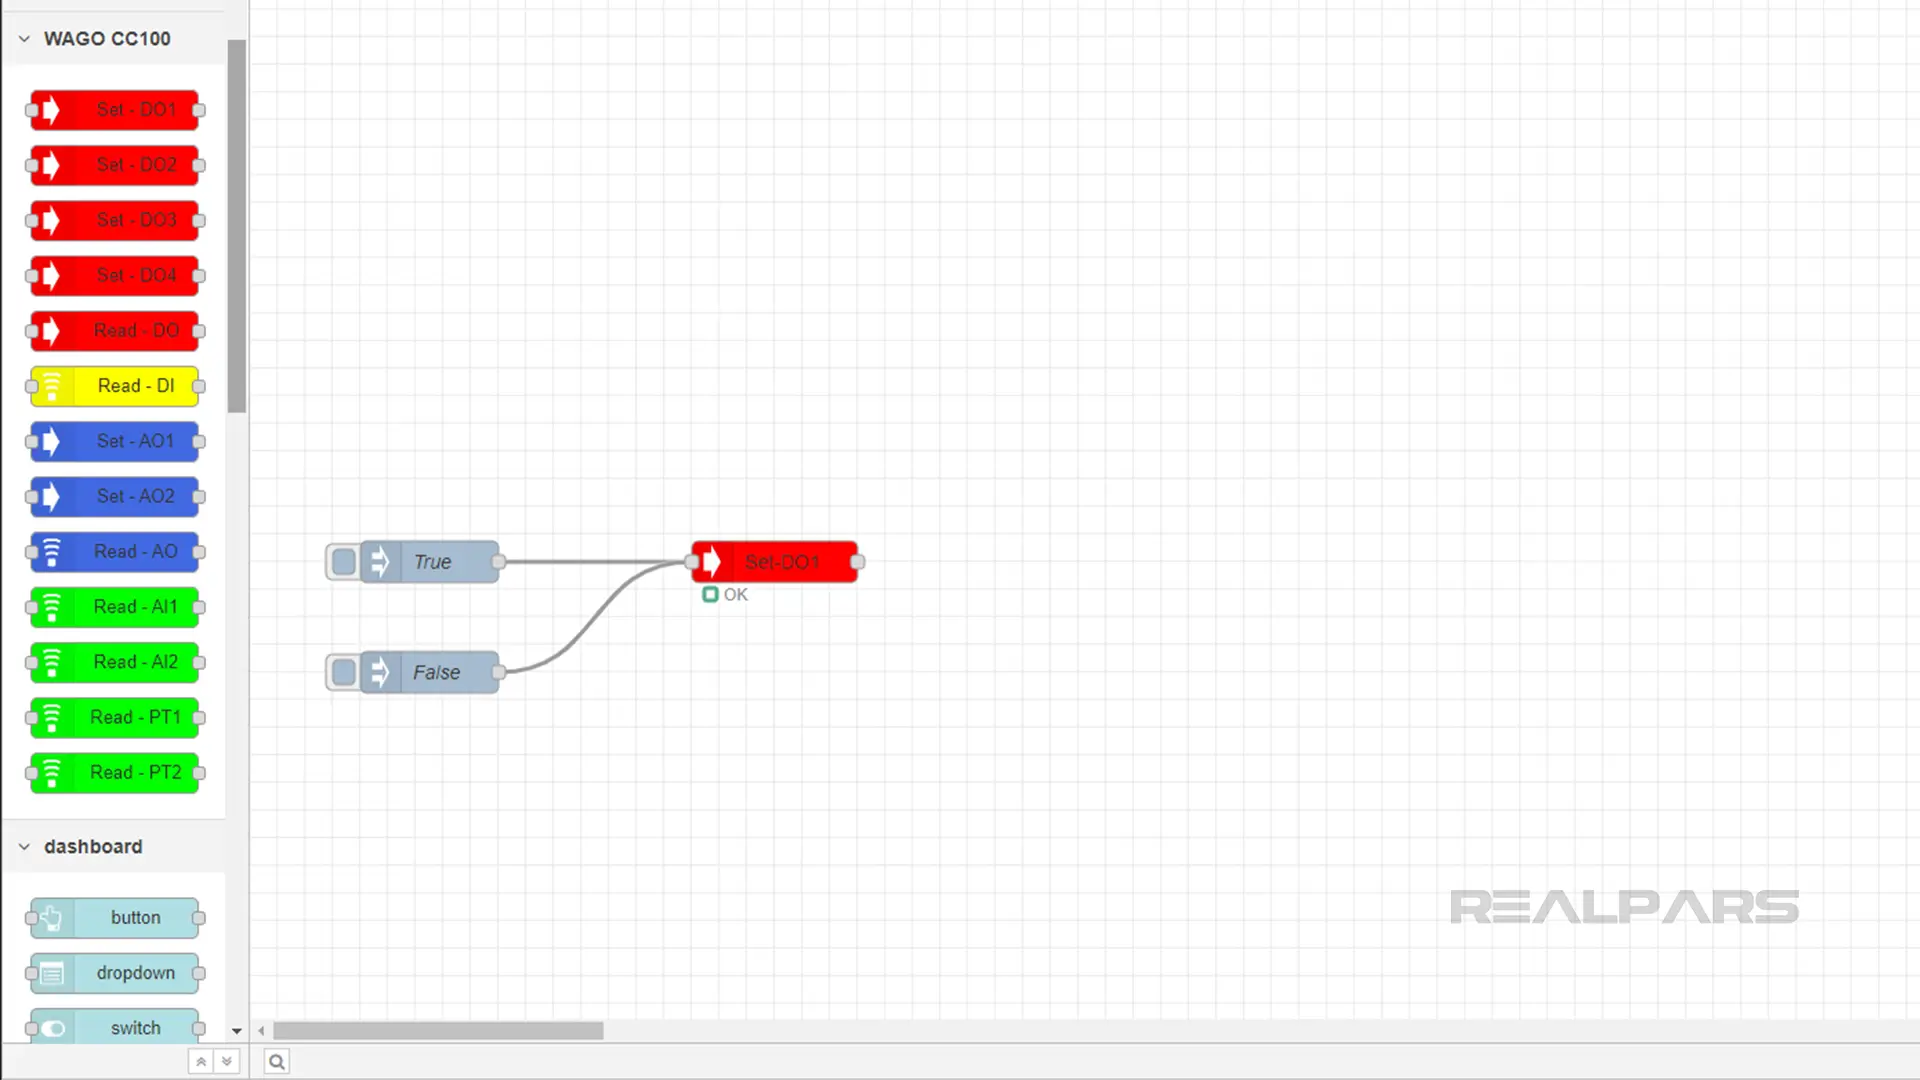
However, each node needs some configuration to work properly. If you’d like to learn how to use and configure these nodes to interact with your PLCs, check out our course, Node-RED with WAGO PLCs. In this course, we explain everything in detail, using a real-world example of controlling the WAGO CC100 I/Os. Plus, you’ll receive a certificate of completion from WAGO, which you can proudly add to your LinkedIn profile, as shown here.
PLCnext nodes
Another example of nodes is PLCnext nodes, which you can install and use in your projects. These nodes are designed to interact with Phoenix Contact PLCnext controllers.
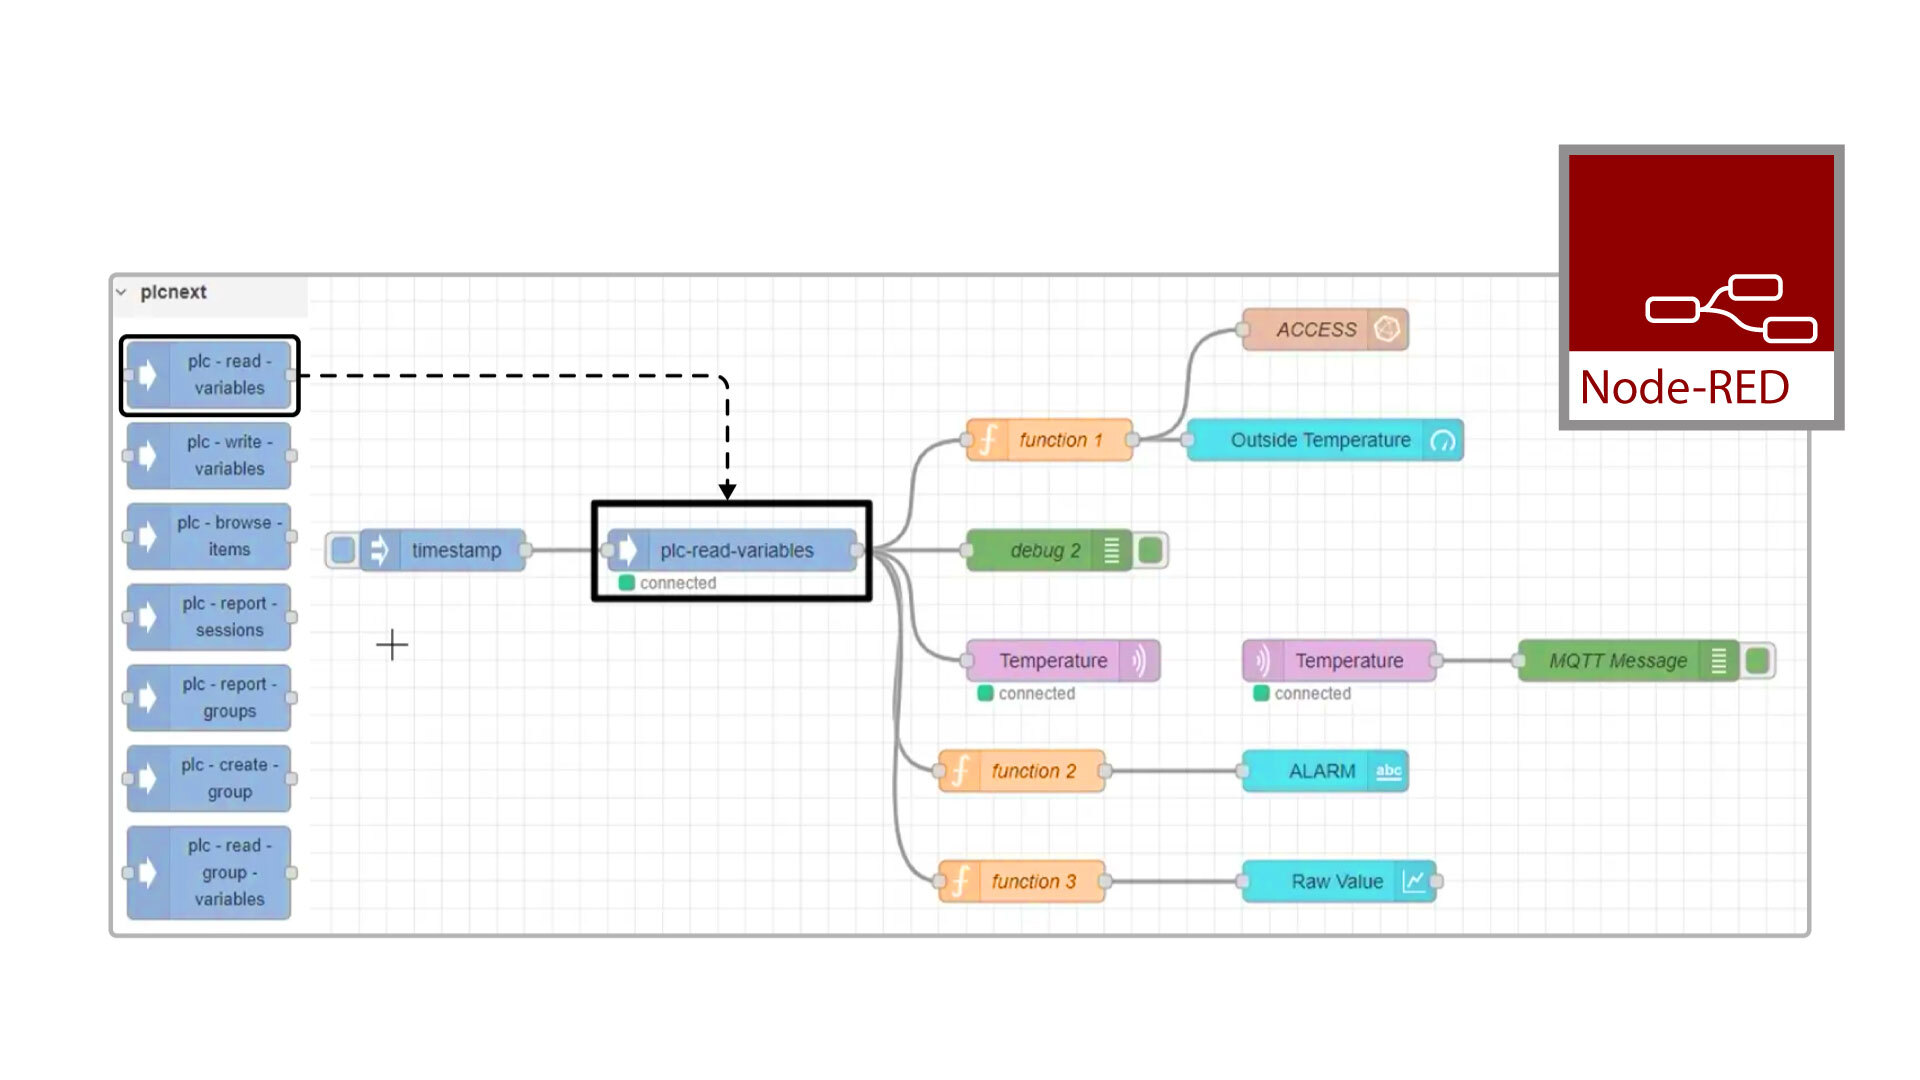
Each node has its own purpose. For example, you can use the plc-read-variables node to read the temperature data from a PLCnext controller.
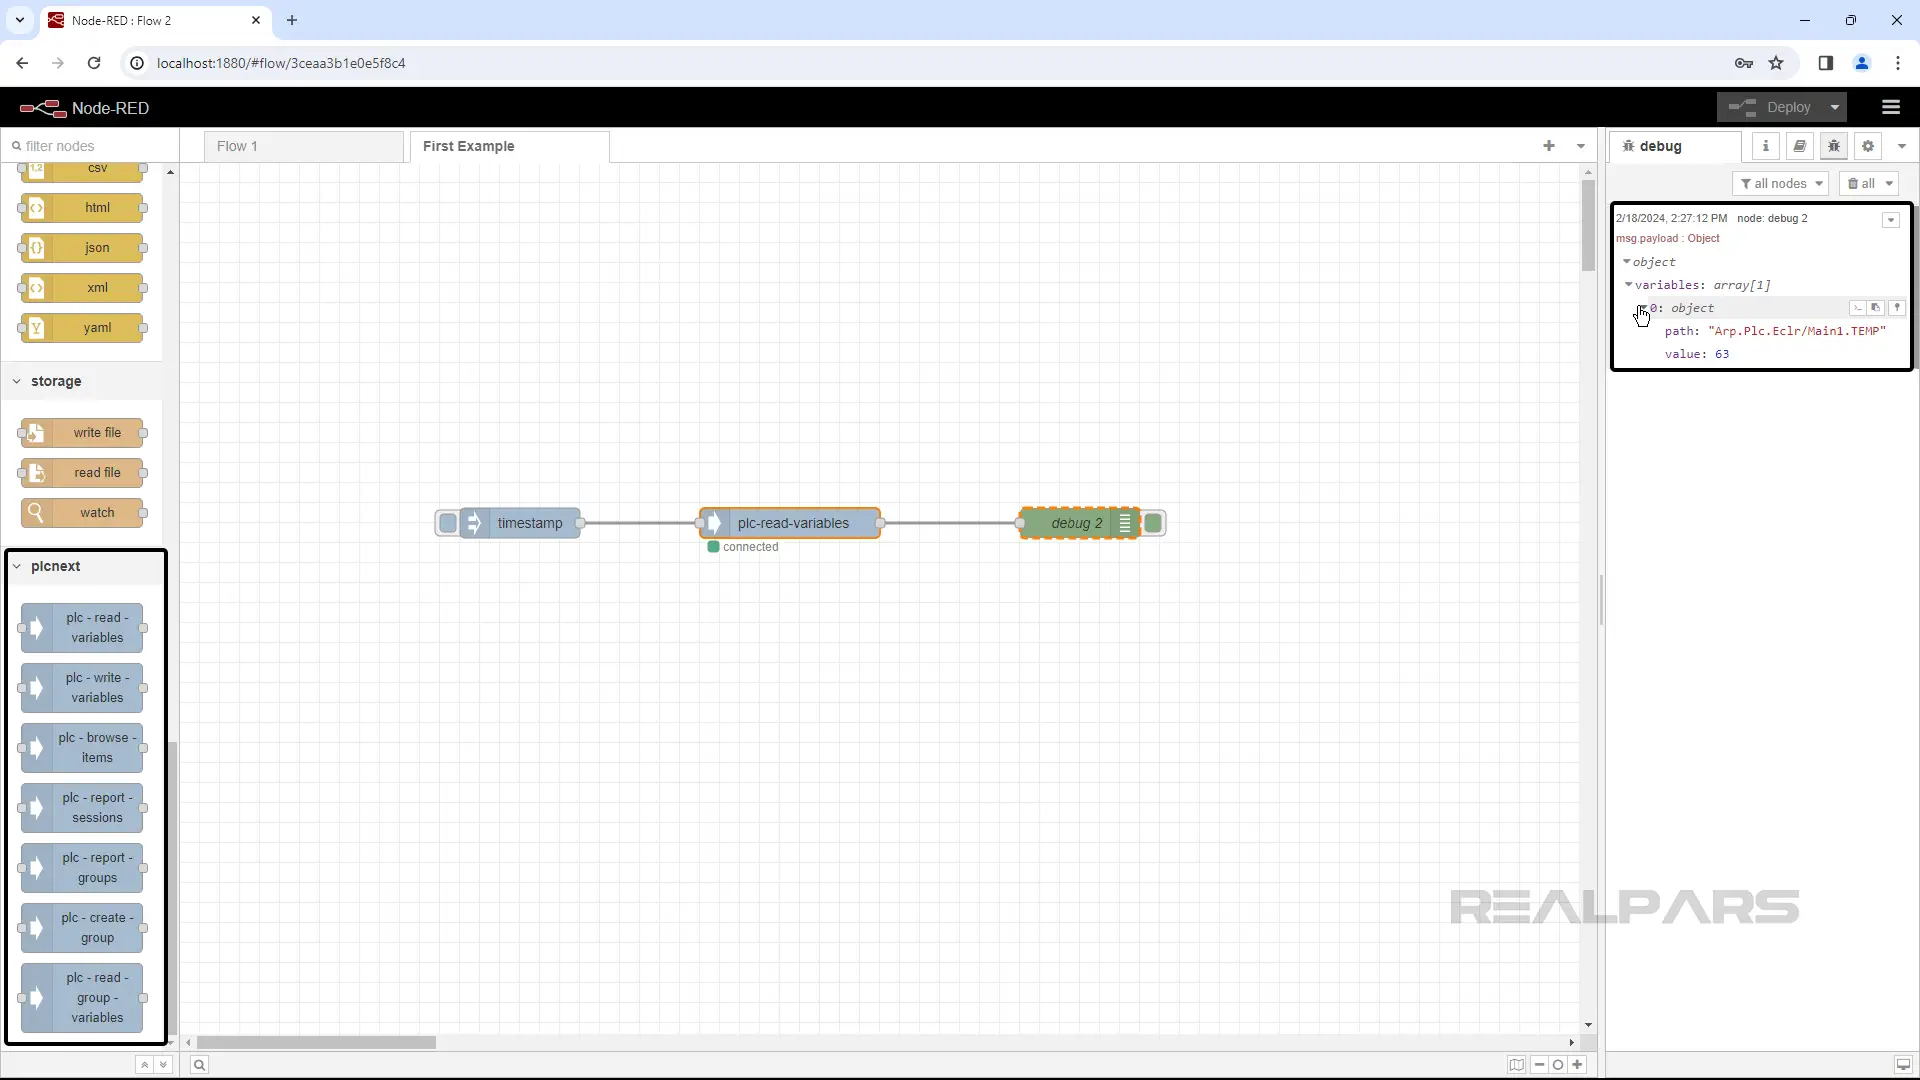
You can also use each of these nodes alongside MQTT nodes to publish and subscribe to data from a broker. In today’s IIoT world, it’s a must-know for every automation engineer to be able to use MQTT in their projects.
If you want to update your knowledge and learn how to use MQTT and PLCnext nodes to connect your controller to another device, we suggest checking out the IIoT Essentials: Node-RED & MQTT on PLCnext Technology course. In this course, you’ll learn how to configure communication between a PLCnext AXC F 2152 CPU and a PC. At the end of the course, you’ll receive a certificate of completion from Phoenix Contact.
Dashboard nodes
Now imagine you’ve completed your project and want to develop an interface for your Node-RED application. How should you do that? Well, Node-RED has solutions for it!
Using the Node-RED Dashboard library, you can quickly and easily build visualizations for your Node-RED applications.
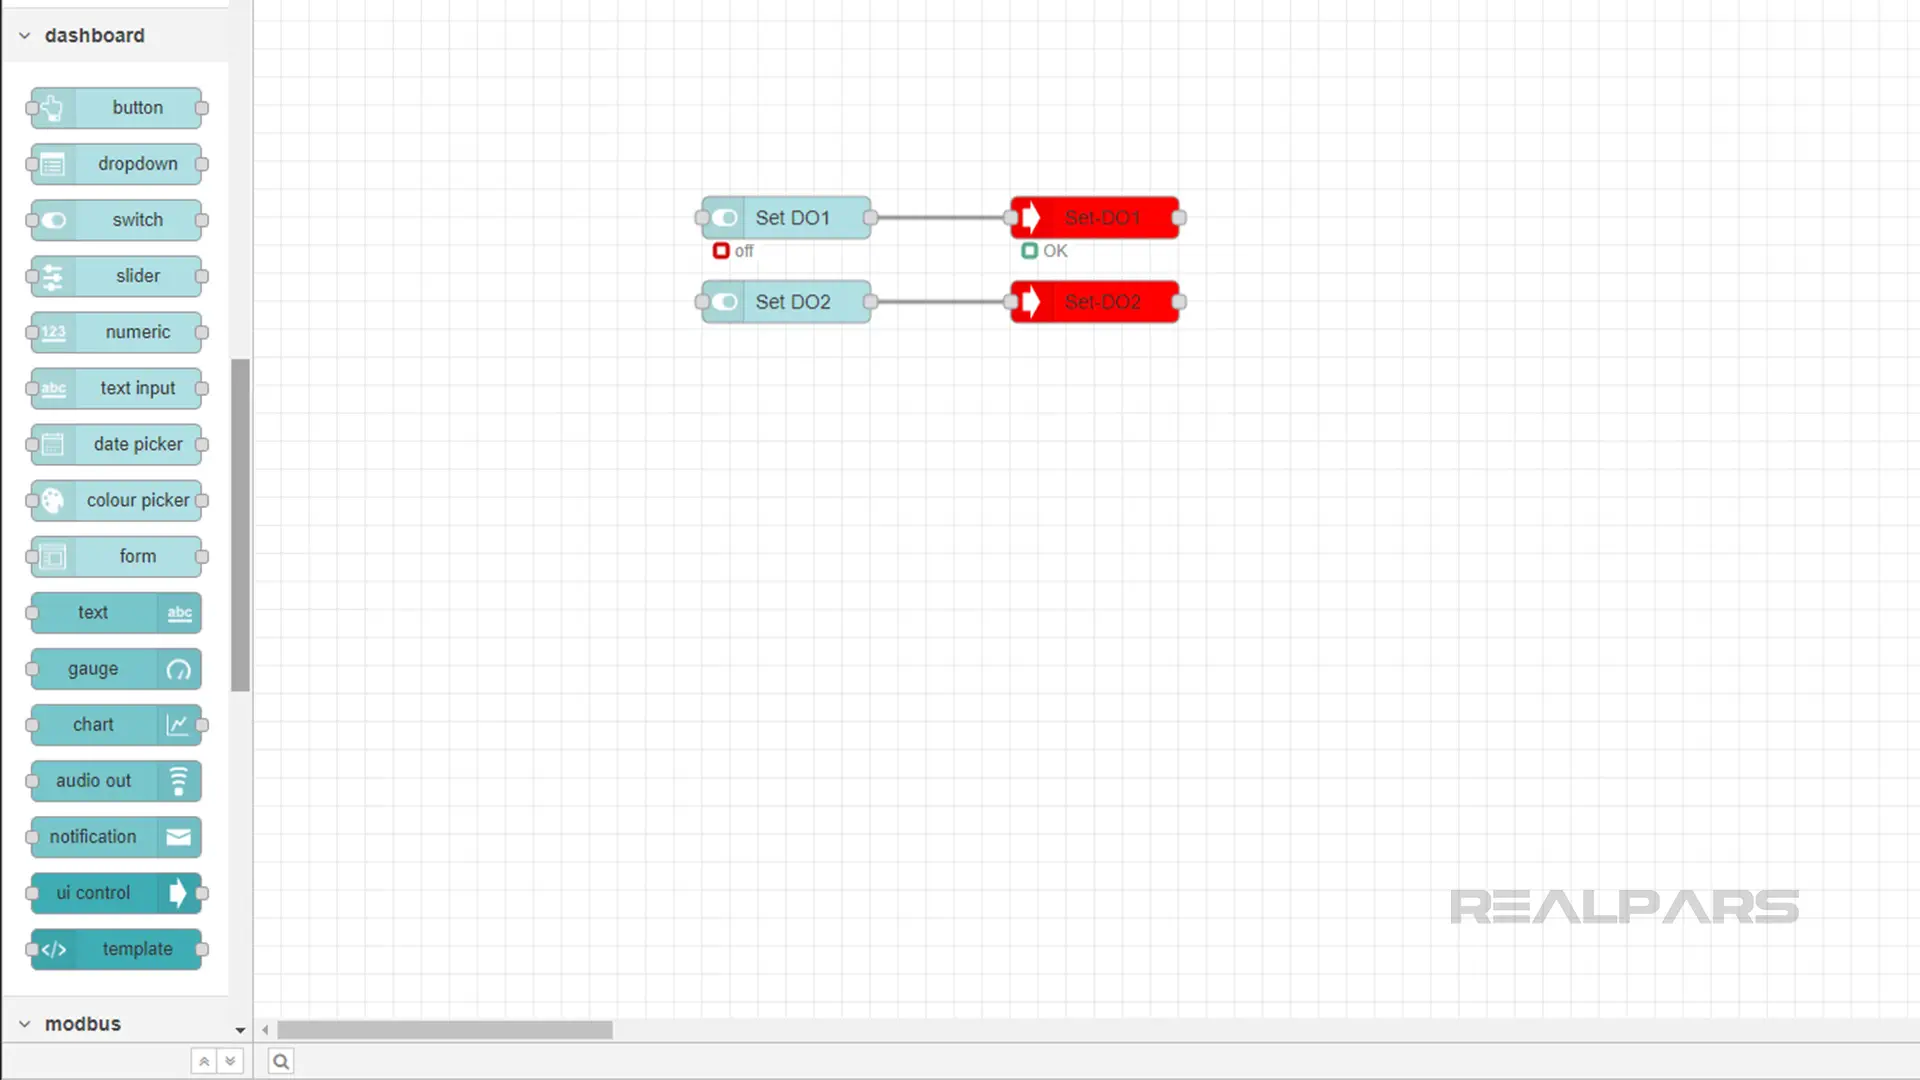
These visualizations can be very simple or even have several pages. You can show any data you want in your visualization pages.
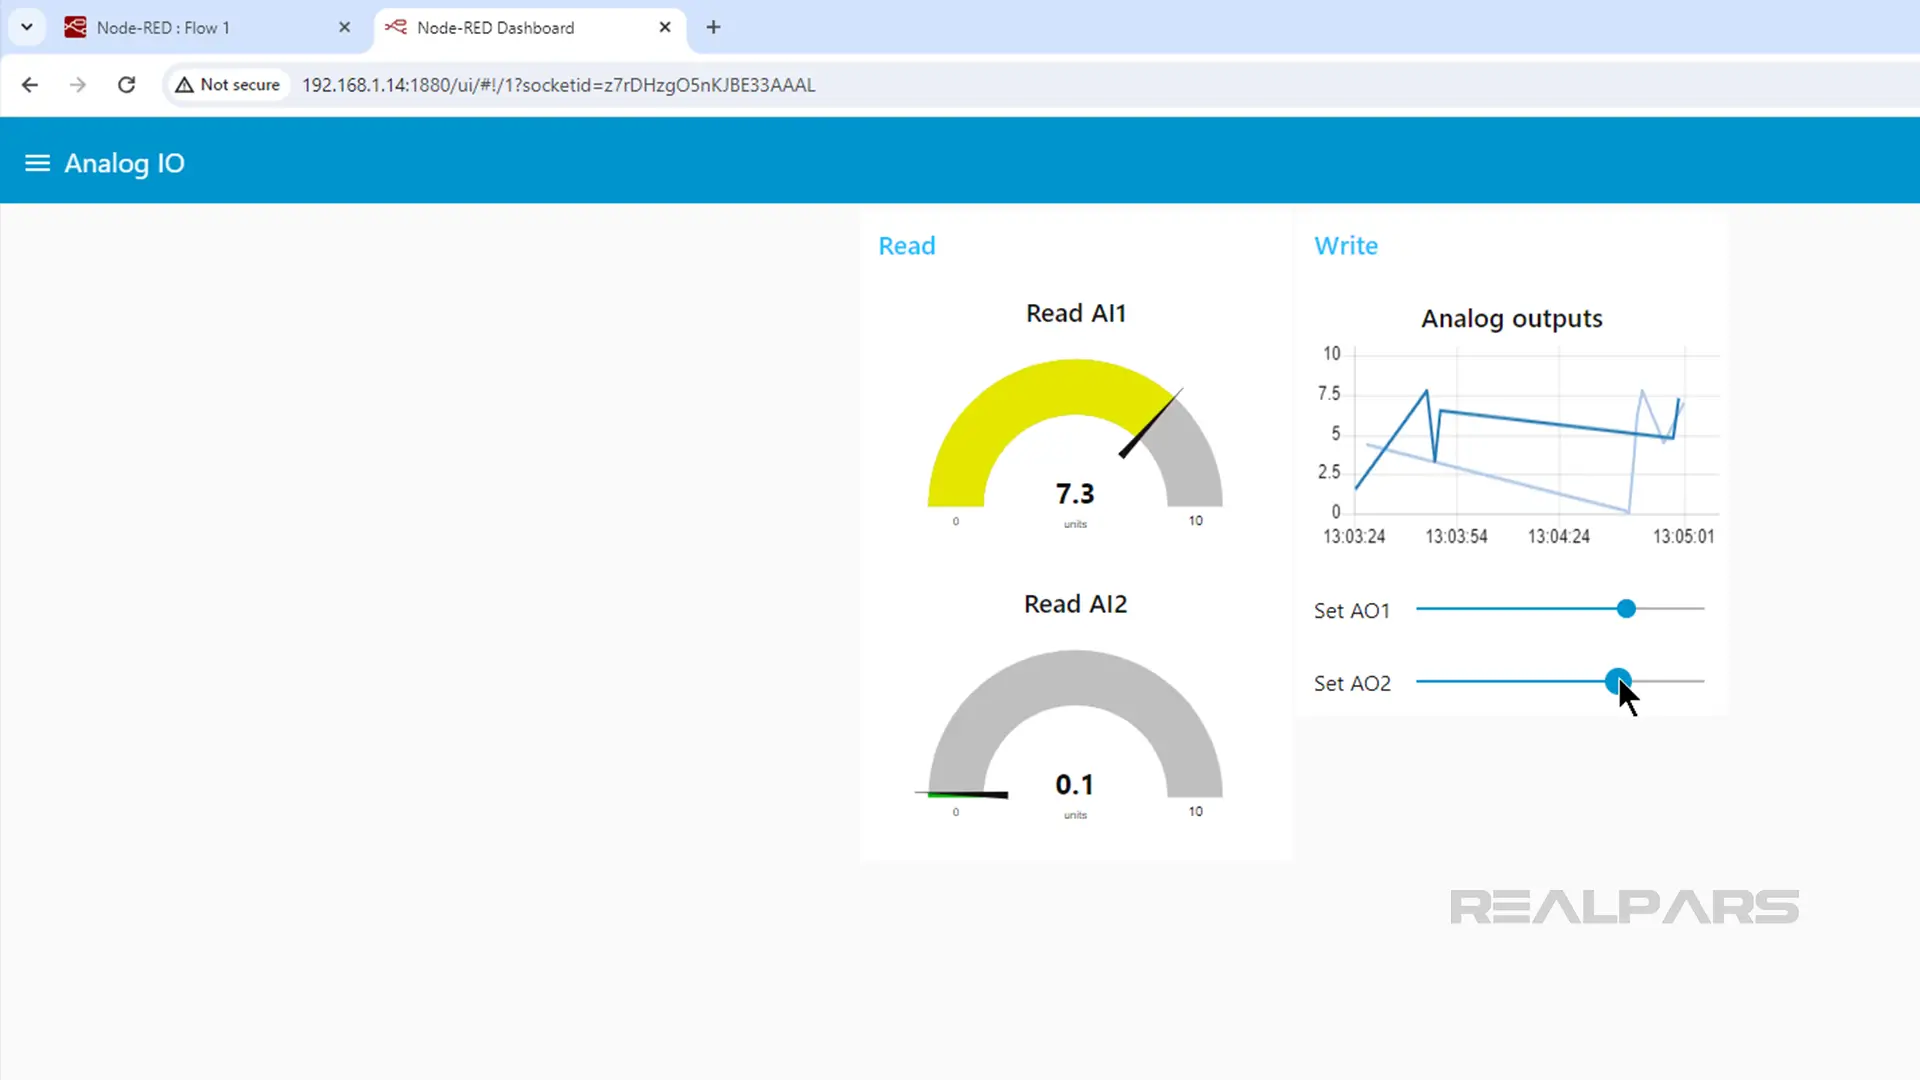
Want to know how to configure and use these nodes? Check out our Node-RED with WAGO PLCs course for more details. In this course, we explain how to create a multi-page visualization to monitor and control the PLC’s I/O points.
Wrap-Up
In this article, we introduced the different types of nodes and their use cases. You also learned how to install additional nodes and work with them.
And as a final note, if you're a plant manager or in a similar role and think your team could benefit from IIoT training, check out realpars.com/business. Add your contact info, and our team will quickly get in touch to see how we can help your team develop their skills.

