

Node-RED is a graphical development tool that is quickly becoming the industry standard for developing Industrial IoT applications.
To get you up to speed with Node-RED, this article explains exactly what Node-RED is and shows you how easy it is to develop a powerful Industrial IoT application using Node-RED.
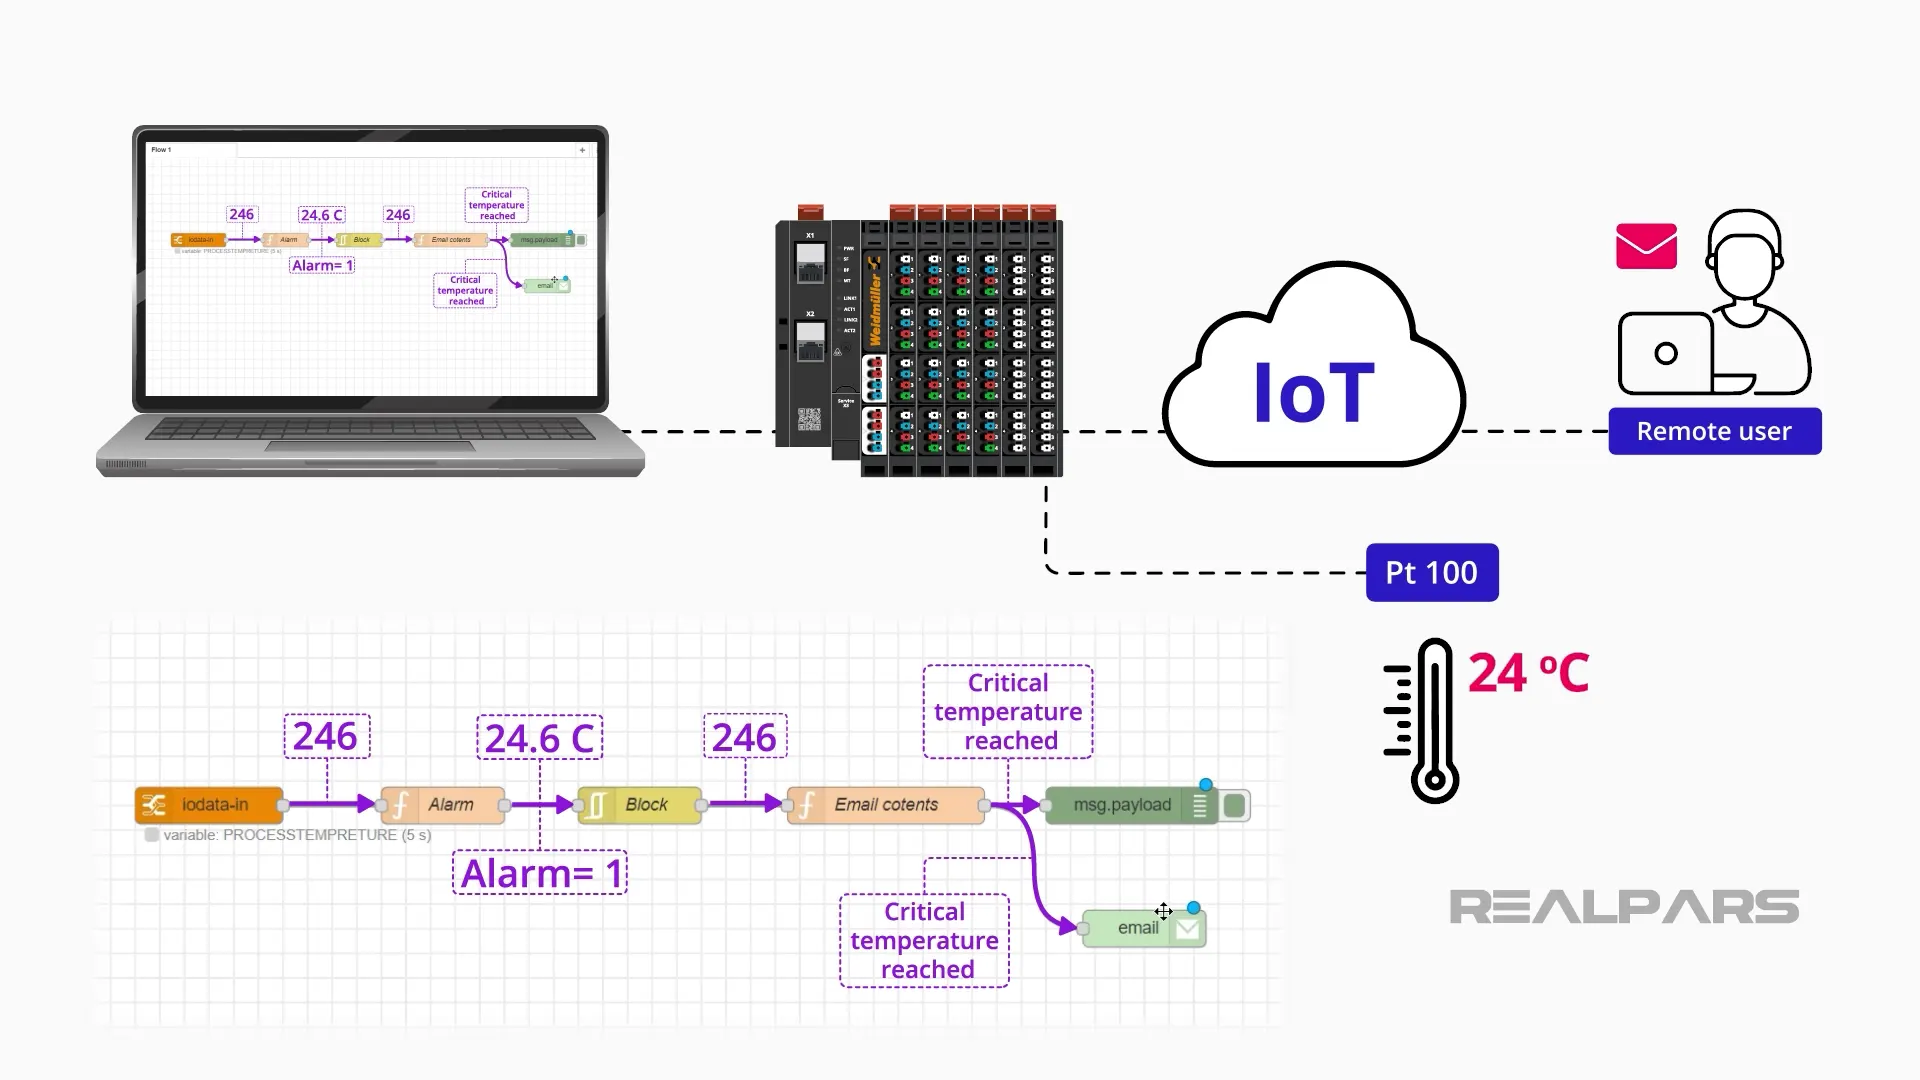
By the end of the article, we will have built a Node-RED application that analyzes data, processes the data, and sends an email alert when the data is within a critical range.
What is Node-RED?
Before we start building our application, let’s talk about what Node-RED is.
Node-RED is a graphical development tool that makes it easy to connect hardware devices, APIs, and online services to each other.
Node-RED was originally developed by IBM for internal use but was made open-source in 2016.
Since then, it has been adopted by the automation industry as an easy way to create Industrial IoT applications that collect, process, and share data through the internet.
Node-RED makes it easy to develop Industrial IoT applications in two ways:
– First, Node-RED ships with a huge number of pre-built nodes. As a developer, you can use these nodes in your applications to easily perform complex tasks such as sending data using the MQTT protocol, the Modbus/TCP protocol, or via email.
There are even nodes that let you publish data to online services such as Dropbox and Google Drive.
Currently, there are over two thousand nodes available for you to use in your Industrial IoT applications, and thanks to the tireless work of the open-source community, that number is steadily growing.
– Second, Node-RED is a graphical development tool. Each node in an application is placed on a canvas and connected to other nodes. Each node in the application performs a specific task such as collecting data, processing data, or sending data.
Node-RED flow
Once the application is deployed, a flow is triggered by an event and each node in the flow executes and passes data to the downstream node in the form of a message.
The event that triggers a flow is something that happens outside of the application like a hardware status change, a variable reaching a setpoint value, or a certain amount of time passing.
By placing and connecting nodes on the canvas, someone without deep knowledge of programming can create sophisticated Industrial IoT applications.
Now that we know what Node-RED is, let’s see how we can create an Industrial IoT application using Weidmüller’s u-mation platform.
In my last article, A First Look at the Low-Code Future of PLC Programming, I introduced the u-mation platform and showed how this modern platform makes it easy to develop real-time applications using a web-based development environment that is served directly from the controller. If you missed it, you can find a link to that article in the description below.
The u-mation platform also ships with a built-in Node-RED editor making it an ideal choice for quickly and easily developing Industrial IoT applications.
Node-RED IIoT Application Example
In the rest of this article, I will show you how to build and deploy a Node-RED application step-by-step.
Using u-create web, the web-based development environment for u-control controllers, we will build an application that sends an email alert to maintenance technicians when a process parameter reaches a critical level.
When building the application, we will see how to collect, process, and send data from a control system using Node-RED.
To start, I have powered up my u-control Starter Kit and connected it to my computer using a USB cable.

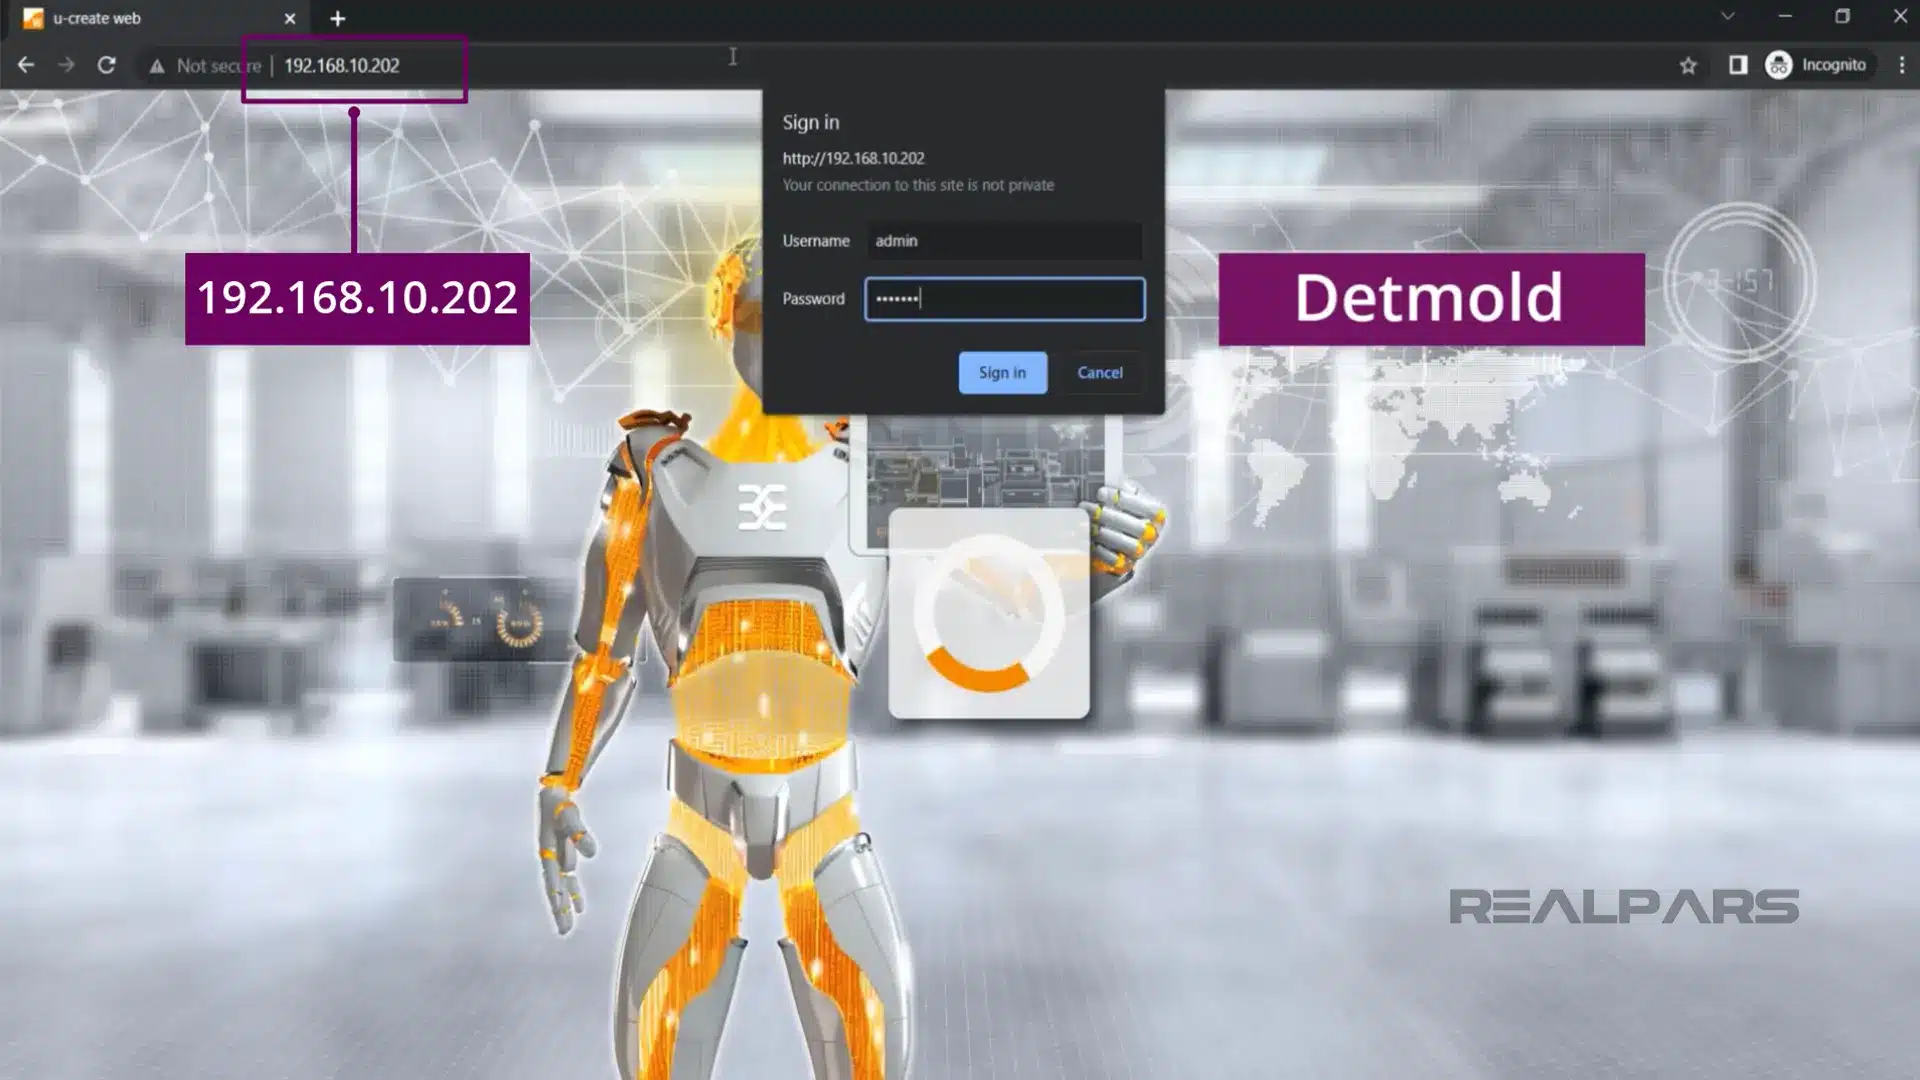
Once I have a connection between the controller and my computer, I can open my web browser and navigate to 192.168.10.202, the default IP address of the controller’s USB port.
When the login page loads, I can log in with the default credentials admin and Detmold. In case you are wondering, Detmold is the German city where Weidmüller was founded.
On the u-create web homepage, I click Edit to begin modifying the real-time application on the controller. The real-time application editor opens and I click on Global Variables to modify the real-time application’s Global Variables.
In the Global Variables table, I add a new variable using the plus icon in the top-right corner. I call the new variable Process Temperature and specify that the data type of the variable is INT.
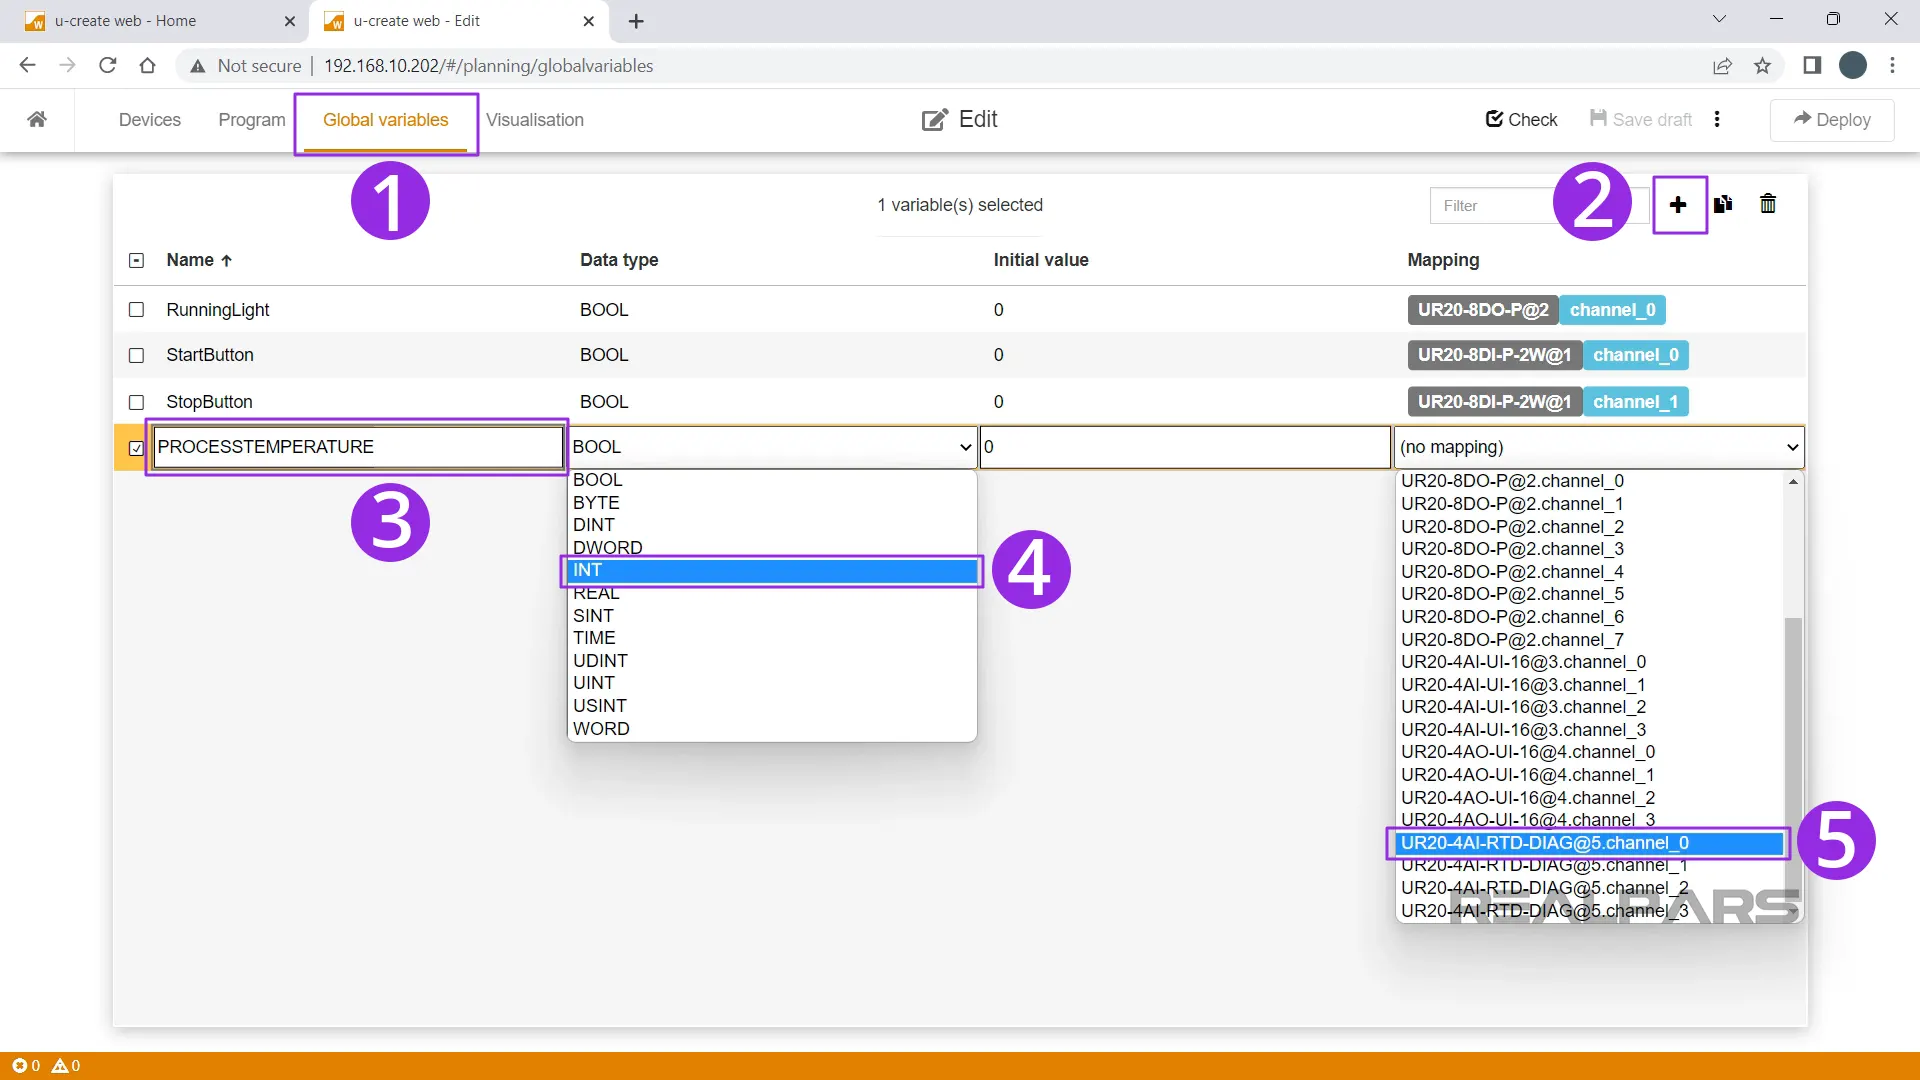
Finally, I map the variable to the first input of the Starter Kit’s RTD Analog Input card. This input is connected to the Pt100 temperature sensor on the Starter Kit which we will use throughout the demonstration.
Live view
Once my application variables are configured, I click Deploy to deploy the application on the controller. The application is deployed and after a short delay, I can click Start to put the controller into Run mode.
After putting the controller in Run Mode, the Live view opens, and after switching the Global Variables tab, I can monitor the value of the Global Variables.
Here, I can see that the temperature sensor on the Starter Kit is reporting a value of 218, which is 21.8 degrees Celsius.
When I cover the Pt100 temperature sensor of the Starter Kit, the temperature increases to around 24 degrees Celsius.
Now that the variables for our application are configured, let’s look at how to build our Node-RED application.
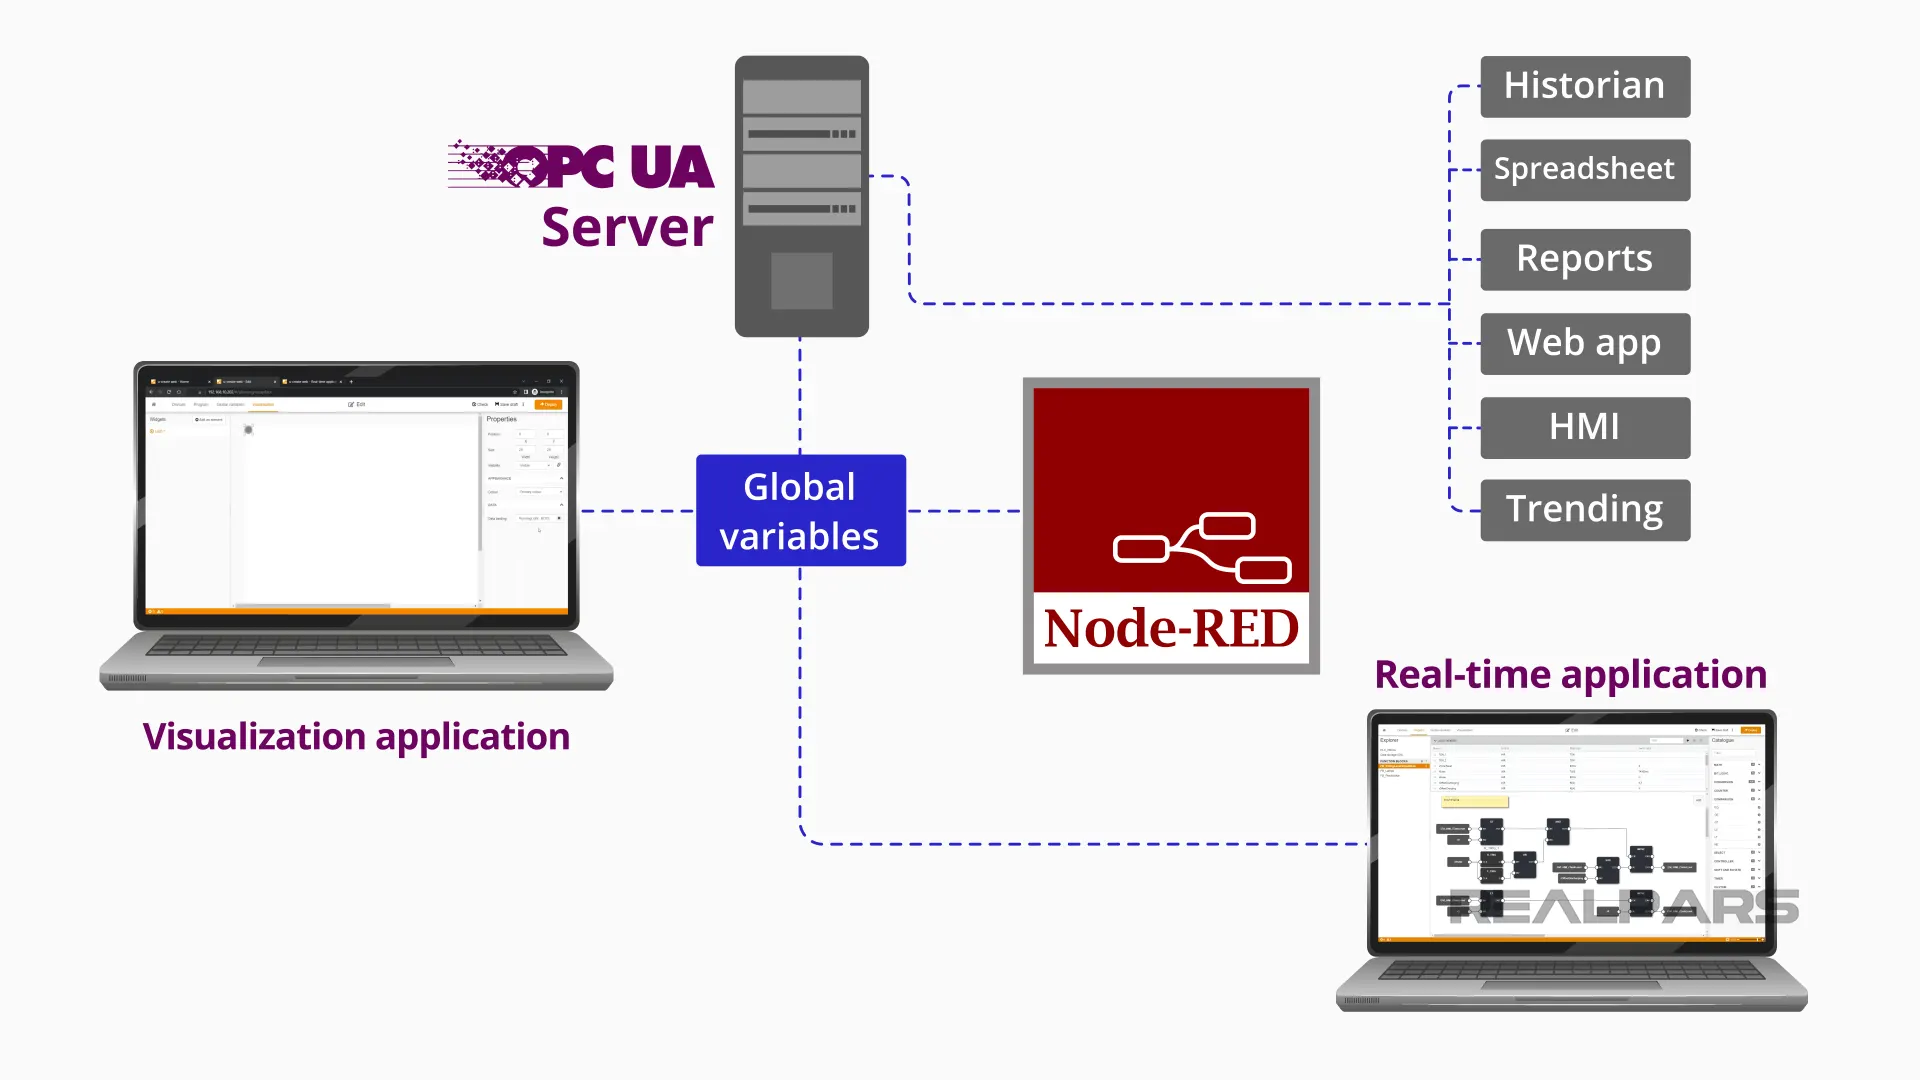
Before moving on, I want to highlight that Global Variables are truly global. All of the Global Variables defined here are added to a global data pool and can be accessed by all of the applications running on the controller including Node-RED and visualization applications.
This is a really nice feature that eliminates data redundancies in the project.
Build the Node-RED application
I can access the Node-RED application by switching back to the u-create web homepage and clicking on Node-RED in the Connectivity, Apps section.
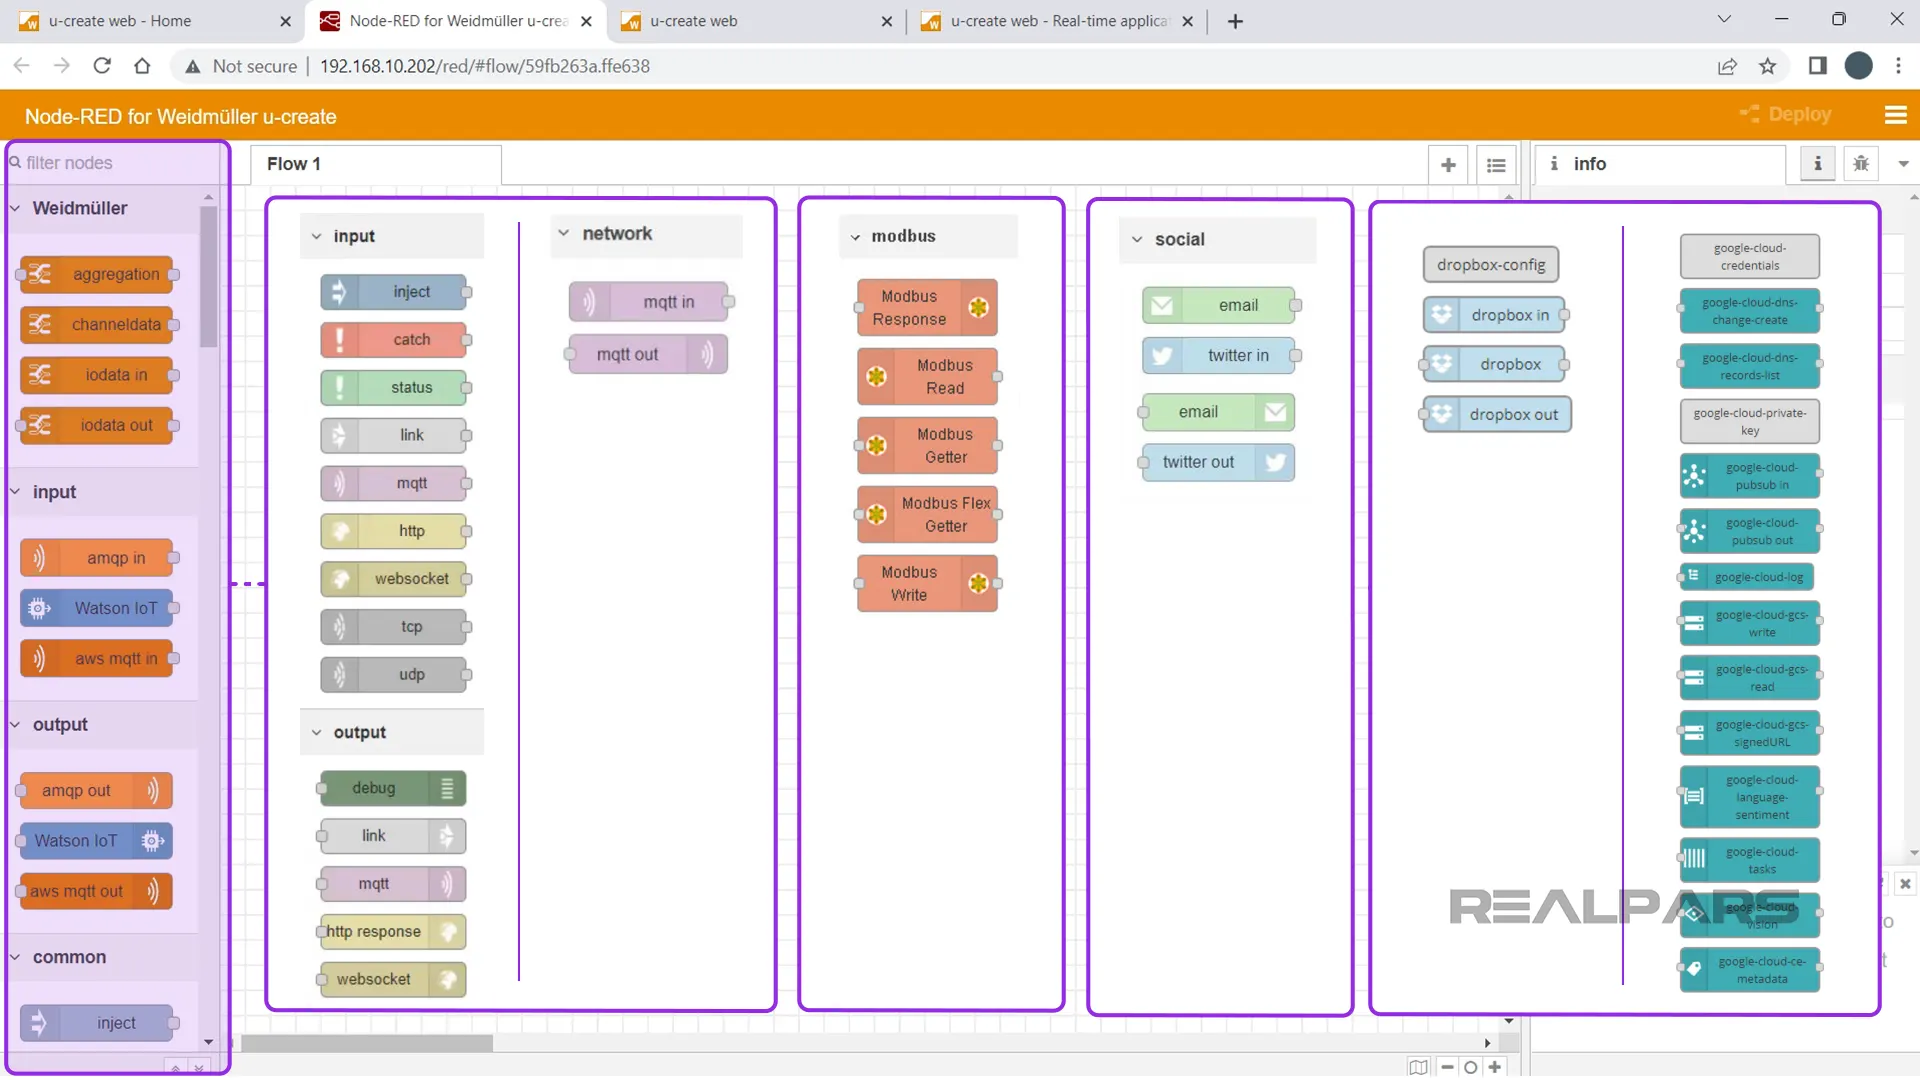
The Node-RED editor opens with a default flow called Flow 1 created. A Node-RED application can have multiple flows.
On the left, you can see the Palette of nodes available to build the application. This palette includes the default nodes that ship with the u-control controller and additional nodes can be installed as required by the application.
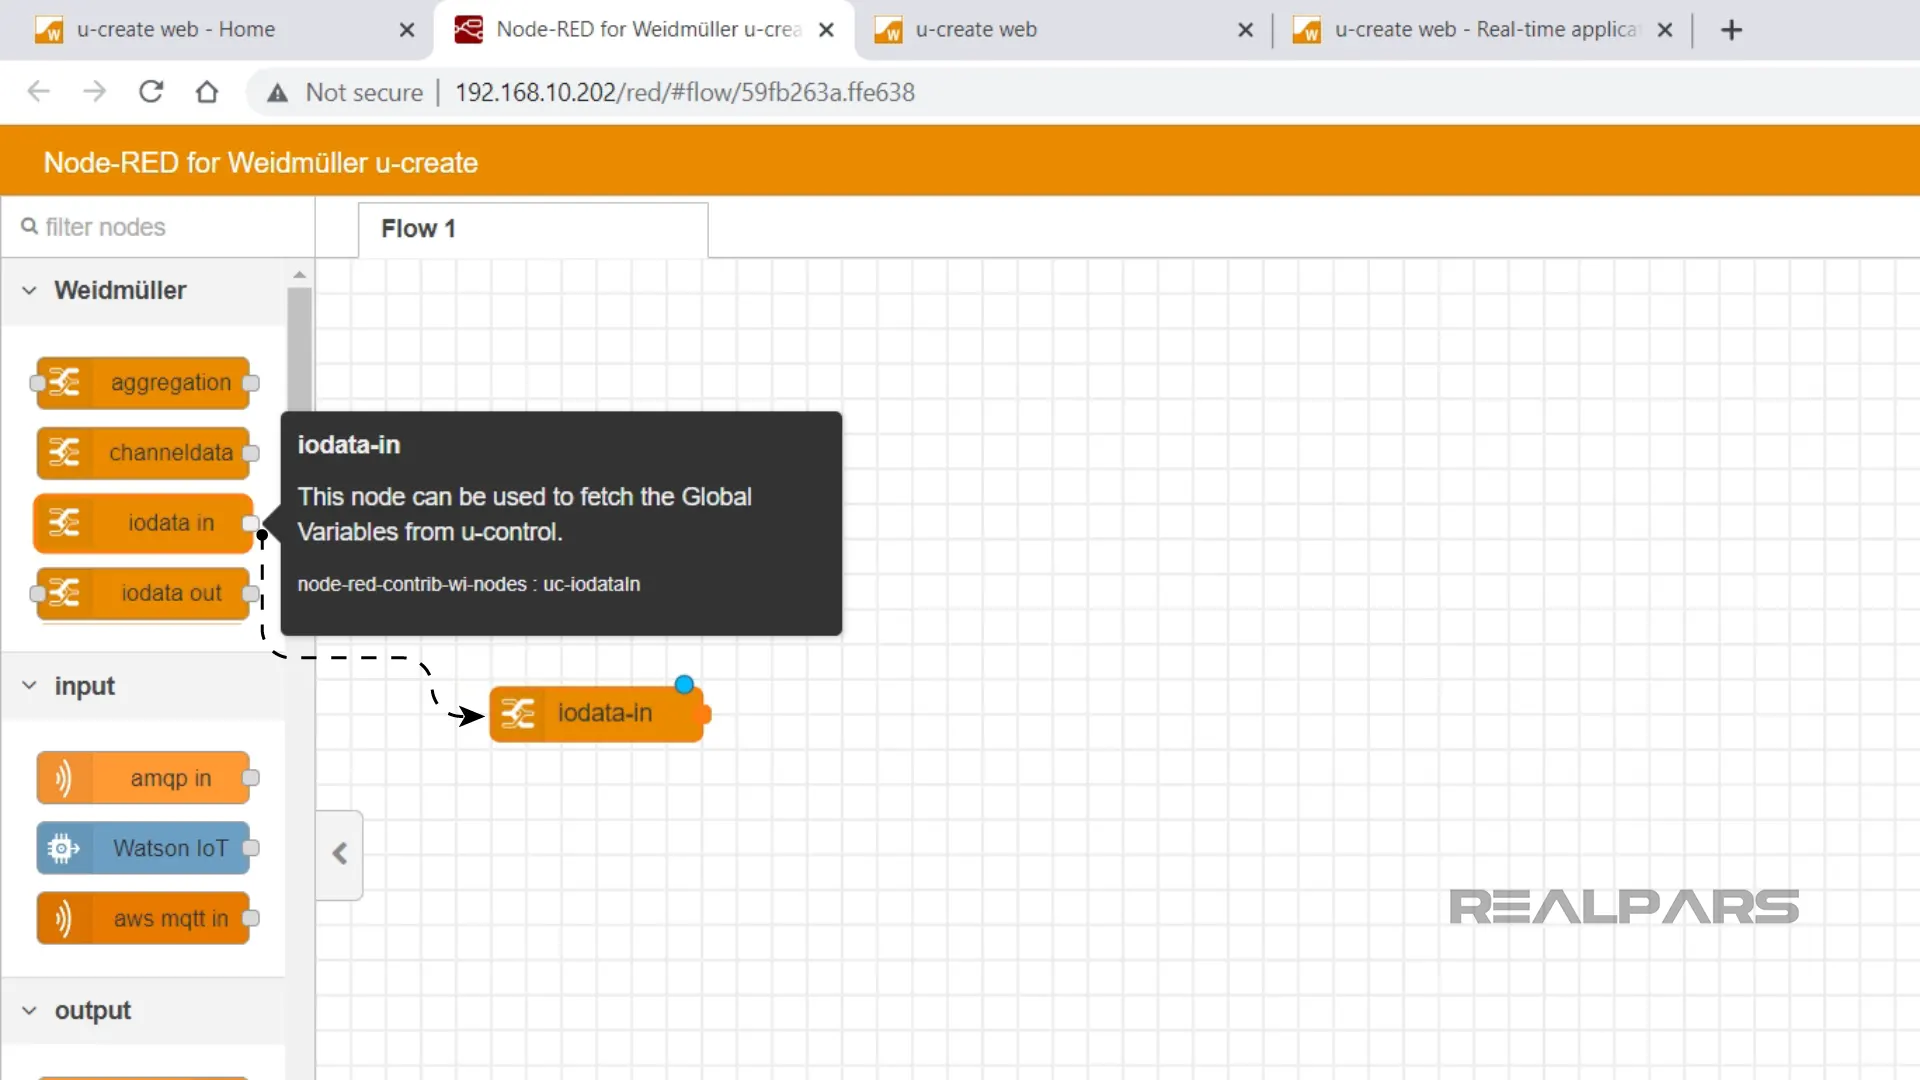
iodata-in node
To start, hover your mouse over the iodata-in node. A tooltip appears and gives a brief explanation of the node’s functionality. In this case, this node is used to read the value of a global variable from a u-control controller which is exactly what we want to do.
Drag the node from the palette and drop it on the canvas.
I can open the node’s properties by double-clicking on the node. In the properties panel, I verify that the node is retrieving the value from the correct global variable and that the polling time is 5 seconds.
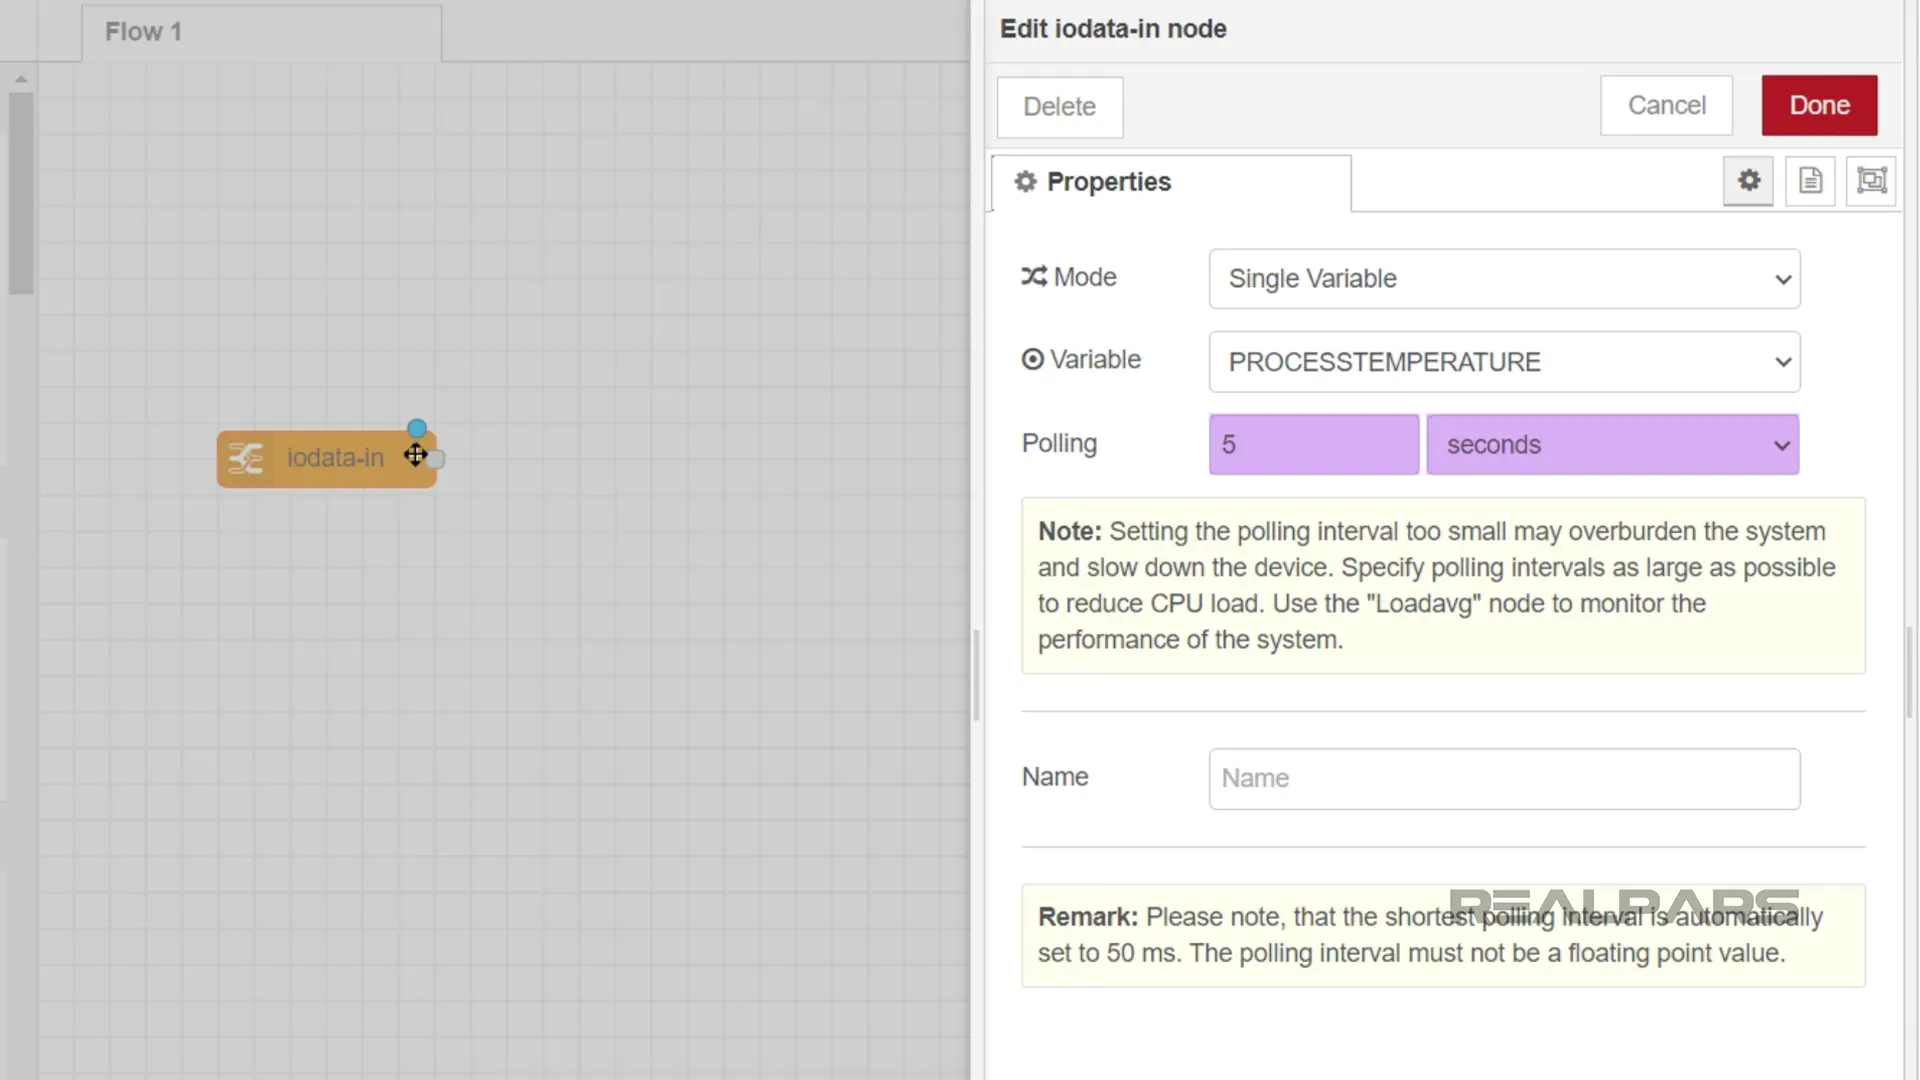
This means that every 5 seconds, this node will retrieve the value of the ProcessTemperature variable and start the flow.
It’s worth noting that even though you can have a polling time of 50 milliseconds, a Node-RED application is not a real-time application and should not be used for control. Typically, Node-RED applications are used for data collection over longer periods of time.
To see the structure of the data that comes out of a node, we can use a Debug node. I scroll down to the Common folder and place a Debug node on the canvas.
To create a connection between two nodes, I can drag from the first node’s handle and drop on the second node’s handle.
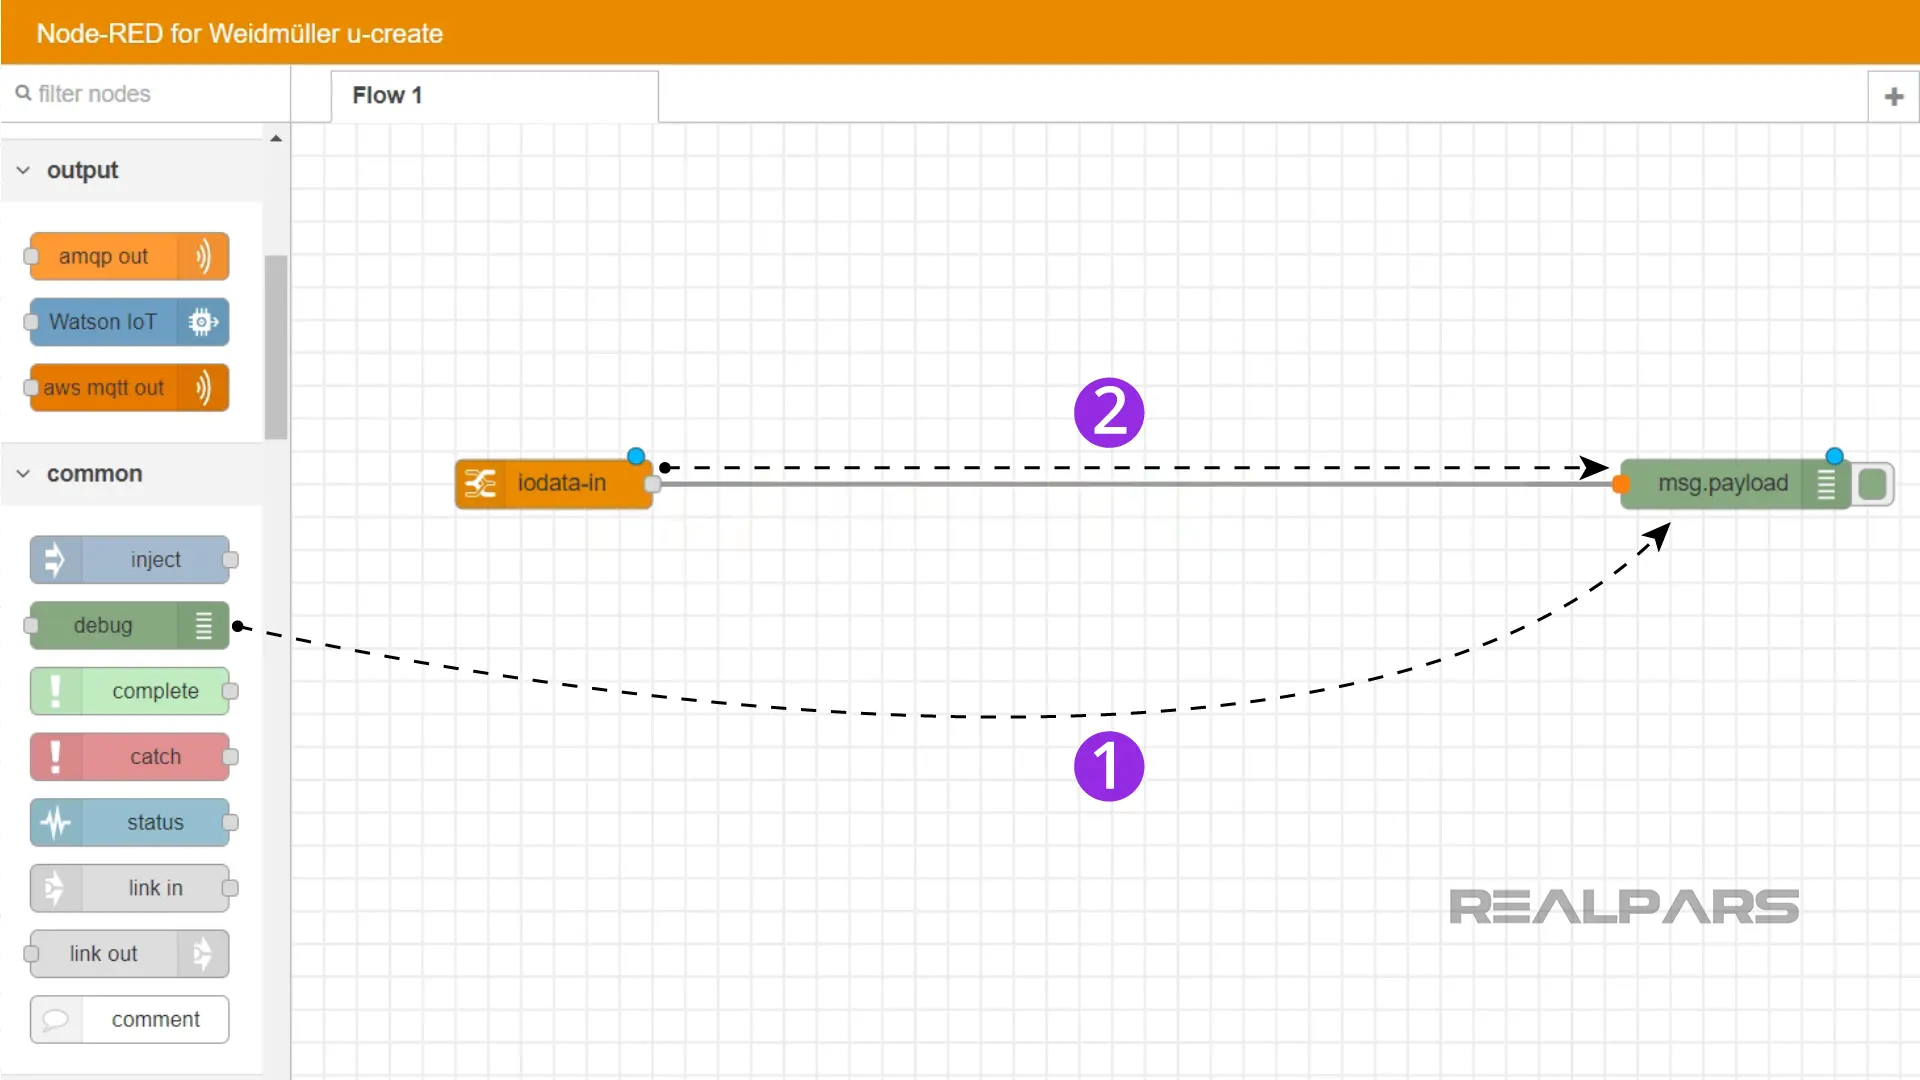
You may notice a blue dot on each node. This dot indicates that the node has not been deployed as part of the Node-RED application yet. Click on Deploy to deploy the current application.
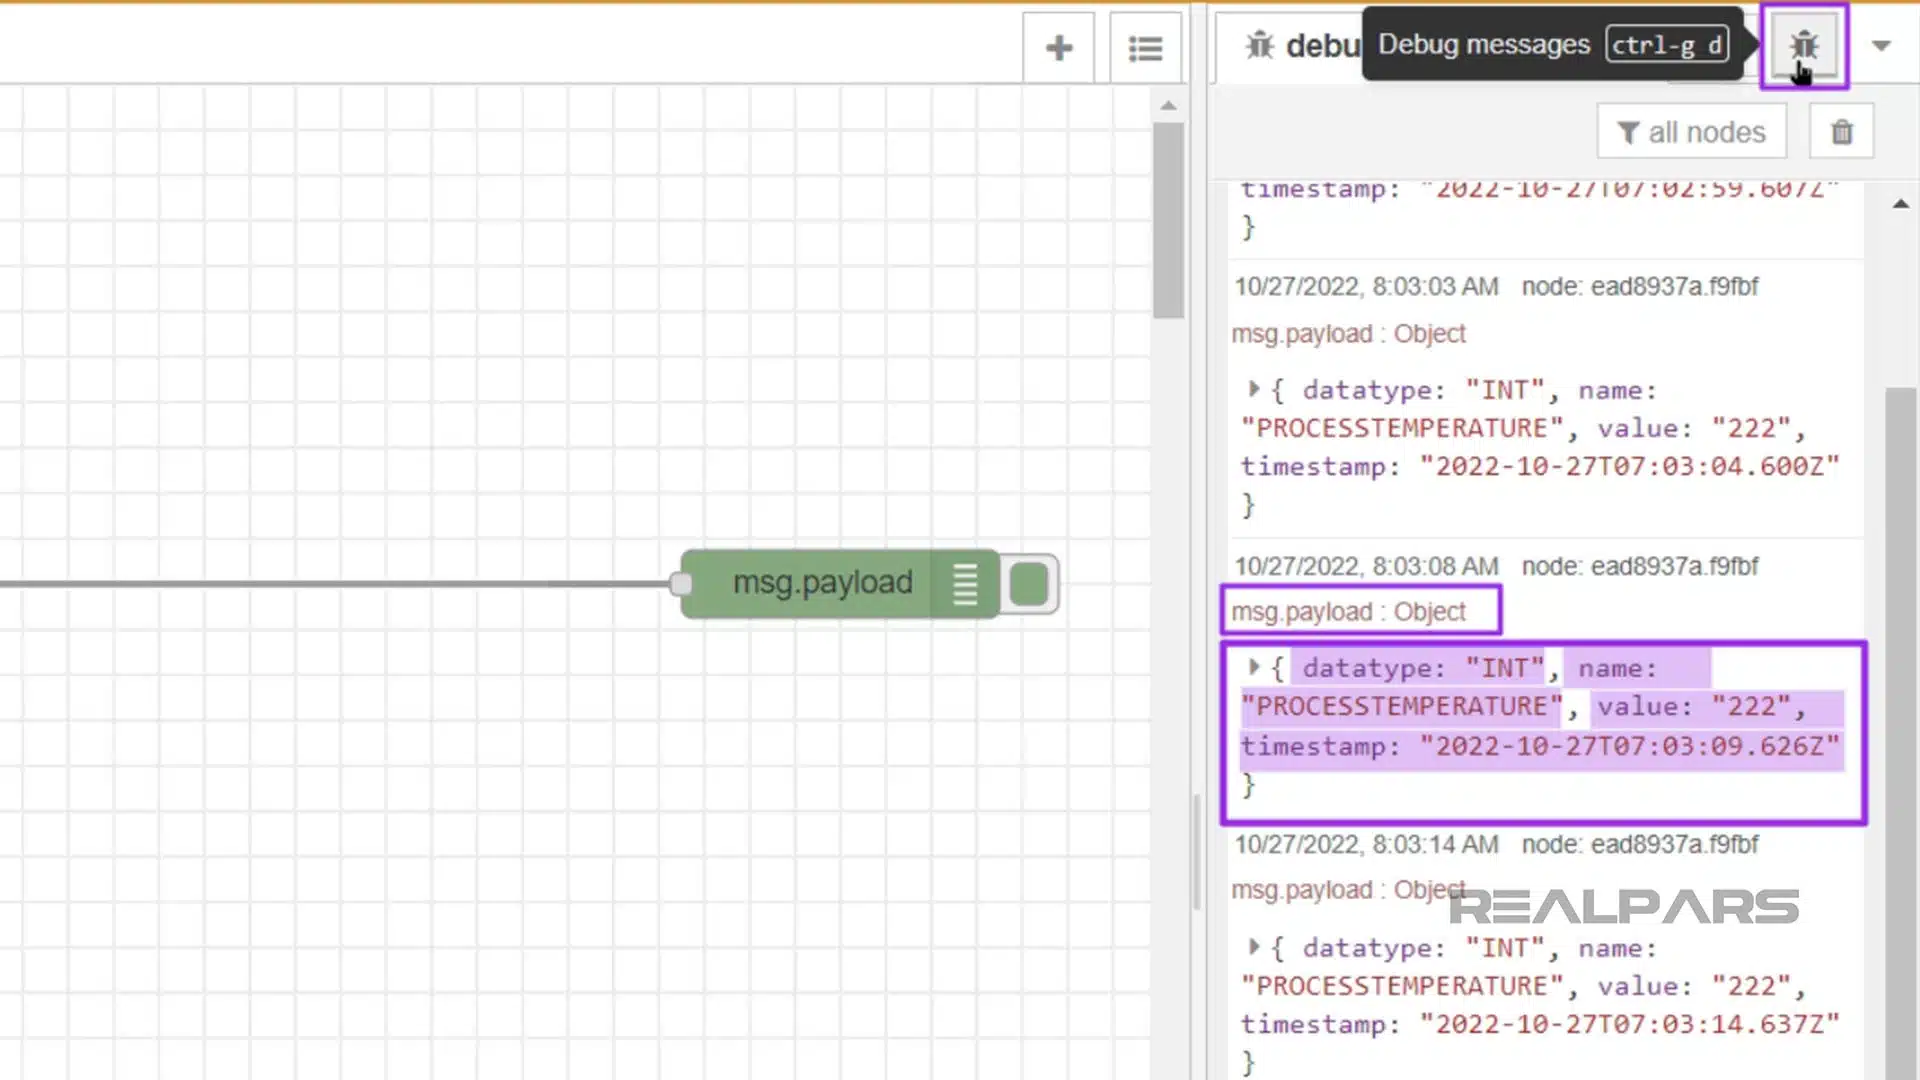
After deploying, I click on the bug symbol to open the Debug console. In this console, I can see the messages logged by the Debug node.
I see that the message coming from the iodata-in node is an object with a complex data structure, that includes the global variable’s data type, name, value, and the timestamp when the data was retrieved. In Node-RED, messages passed between nodes are always objects.
Function node
In this application, we want to send an email to a technician when a process value reaches a critical range.
To make it easy to understand if the process value has reached the critical range, we can add an alarm element to the message object.
It is easy to modify the contents of a message using the Function node. Drag a function node from the palette and drop it on the connecting line between the existing nodes. The function node is added in between the existing nodes and the connections between the nodes are automatically added.
The function node allows you to write JavaScript code to manipulate the contents of the message object.
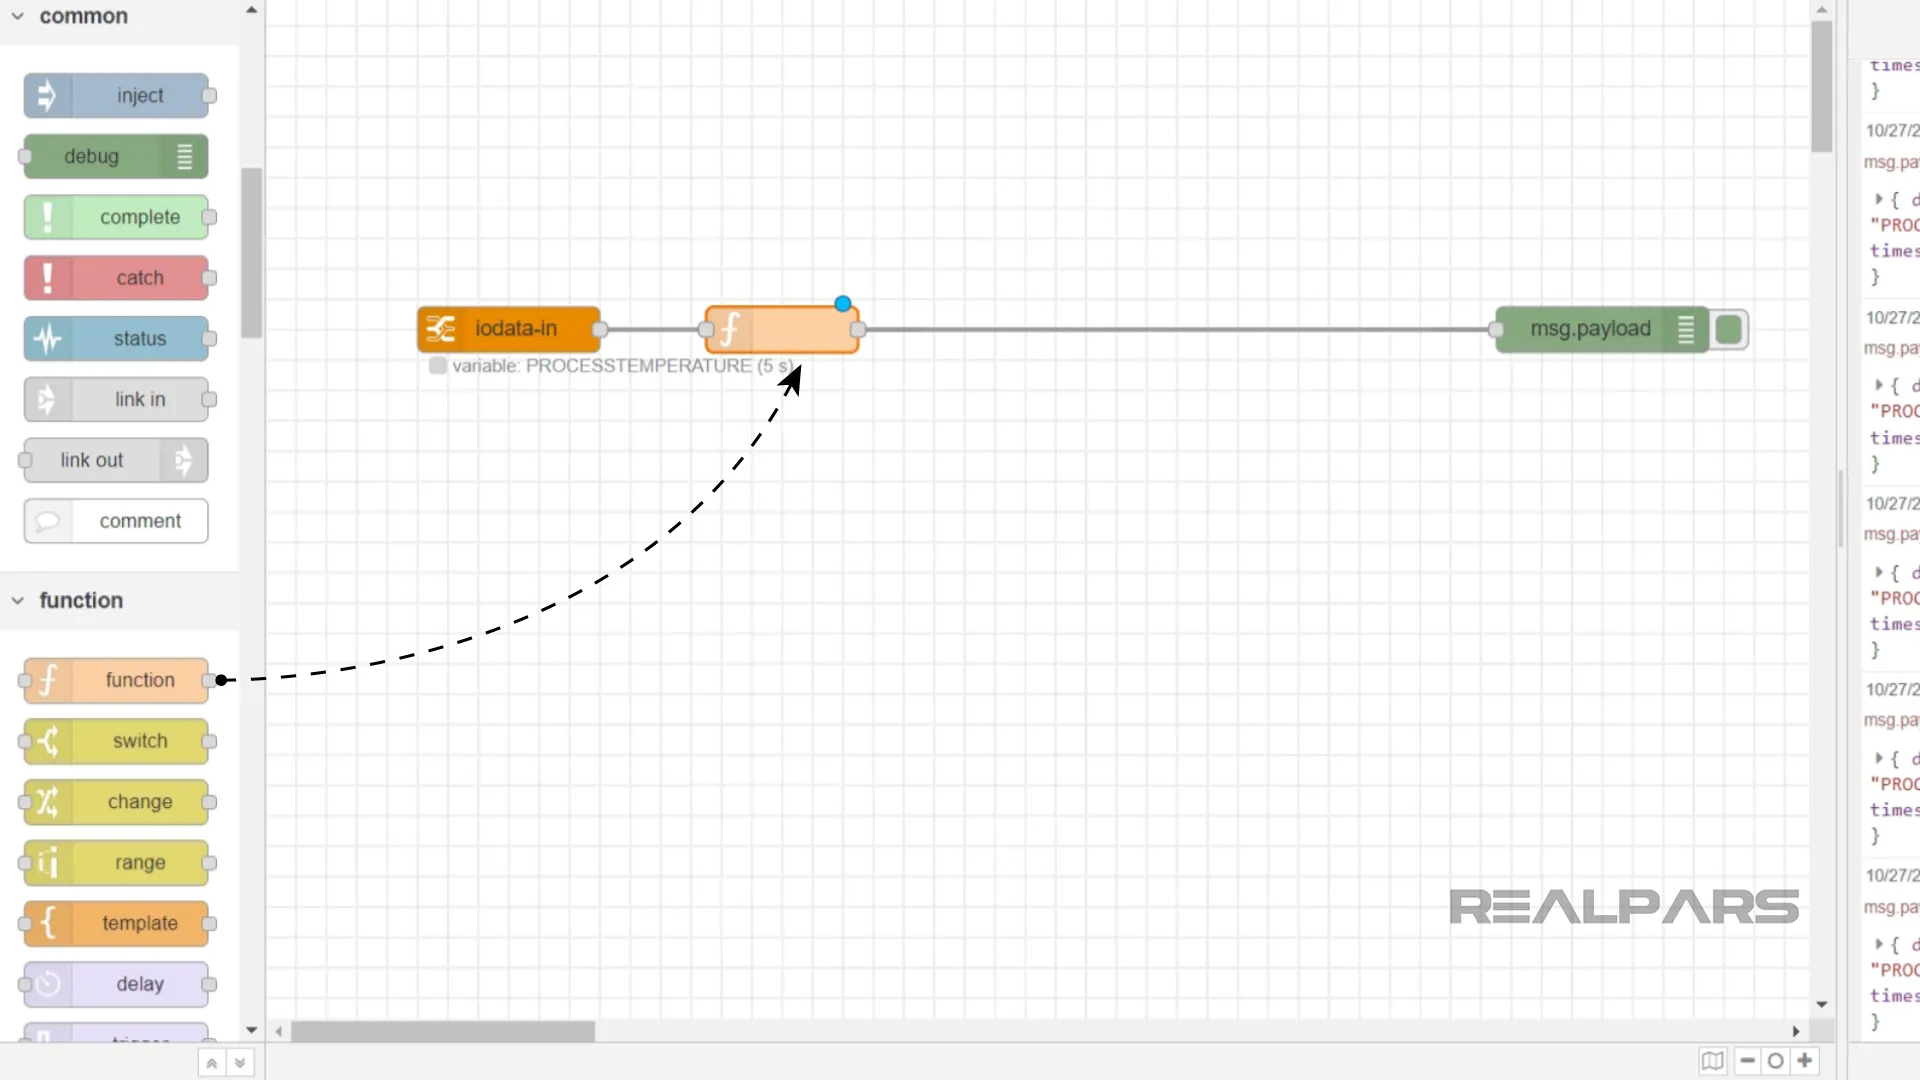
You can double-click on the node to open the JavaScript editor.
In this example, we are dividing the raw value from the sensor by ten to convert it into degrees Celsius.
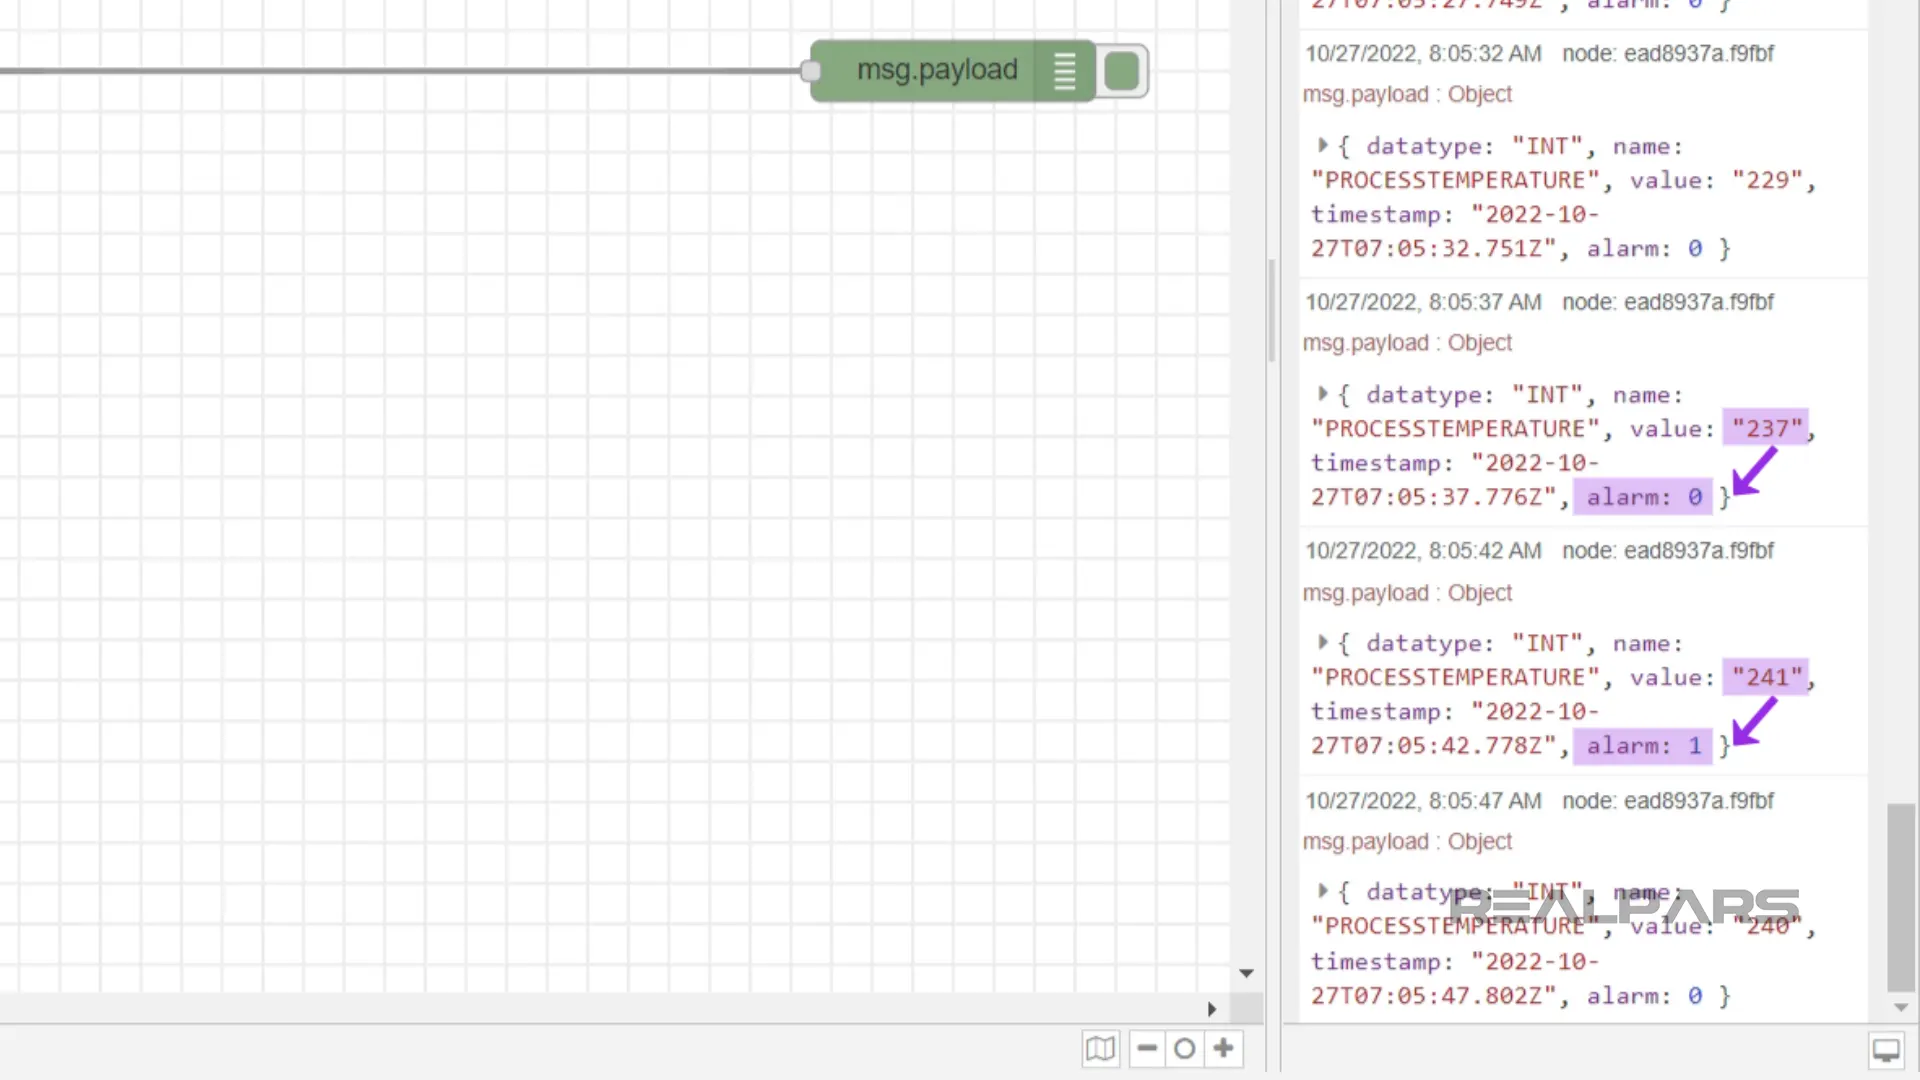
After the conversion, we are adding an alarm element to the message object and set the value of that element to 1 when the process value that we are monitoring is greater than 24 and 0 when it is less than 24.
a = msg.payload.value/10if (a > 31.0){ msg.payload.alarm = 1;}else{ msg.payload.alarm = 0;}return msg;
view rawFunction node - Node-RED JavaScript.js hosted with ❤ by GitHub

When I deploy the application and cover the temperature sensor, I see from the debug window that the alarm element has the value 0 when the temperature is below 24 degrees and 1 when it is above.
RBE node
The maintenance technicians at our plant already receive enough emails from managers, we don’t want to bombard them with even more emails from the controls systems. Therefore, we only want to send an email when the alarm element of the message object changes value.
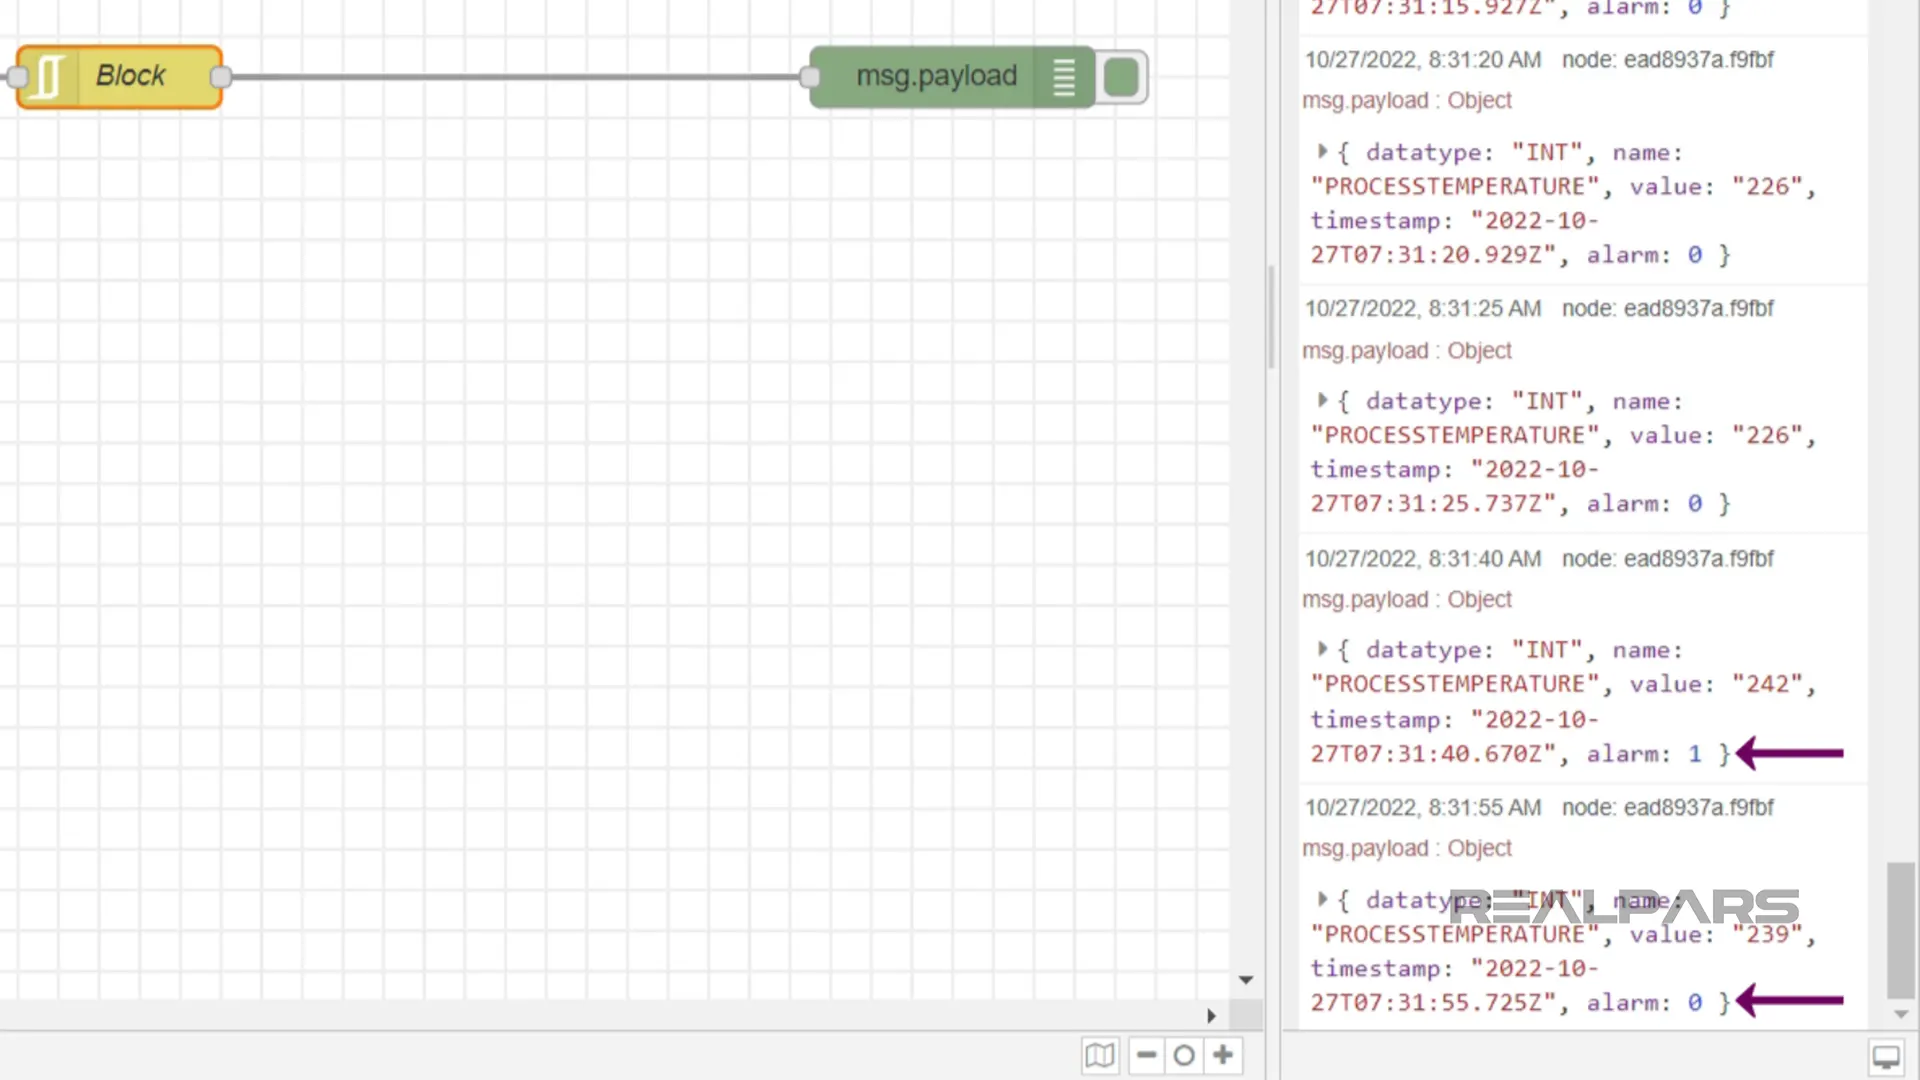
We can build this functionality using an RBE node which blocks the execution of a flow unless a certain condition has been met.
I drag an RBE node onto the canvas between the Function and Debug node and double-click on the node to open its properties.
In the properties window, I configure the RBE node to block unless value changes.

Now, after I deploy the application, I see that the RBE node blocks the flow until the value of the alarm element changes.
In the Debug console, I see a message logged when the alarm element becomes 1 and another message when the alarm element becomes 0. Now our flow is executed based on an event instead of a certain amount of time passing.
Email contents
Before we send out an email, we need to configure the email’s contents. To do this, we can use another Function node.
Once again, I drag a function node from the palette, place it on the canvas between the RBE node and the Debug node, and double-click on the node to open its properties.
I add a snippet of JavaScript code here to update the contents of the message object depending on if the alarm is active or not.
var a = msg.payload.value/10;if (msg.payload.alarm == 1){ msg.payload.text = "Critical Temperature Reached: " + a + "°C"}else{ msg.payload.text = "Critical Temperature Reduced: " + a + "°C"}msg.payload = msg.payload.text;return msg;
view rawEmail node - Node-RED JavaScript.js hosted with ❤ by GitHub
In this demonstration, I am only setting the contents of the email message but it is possible to set other parts of the email including the subject.
With the function configuration done, I can close this node and deploy the application again.
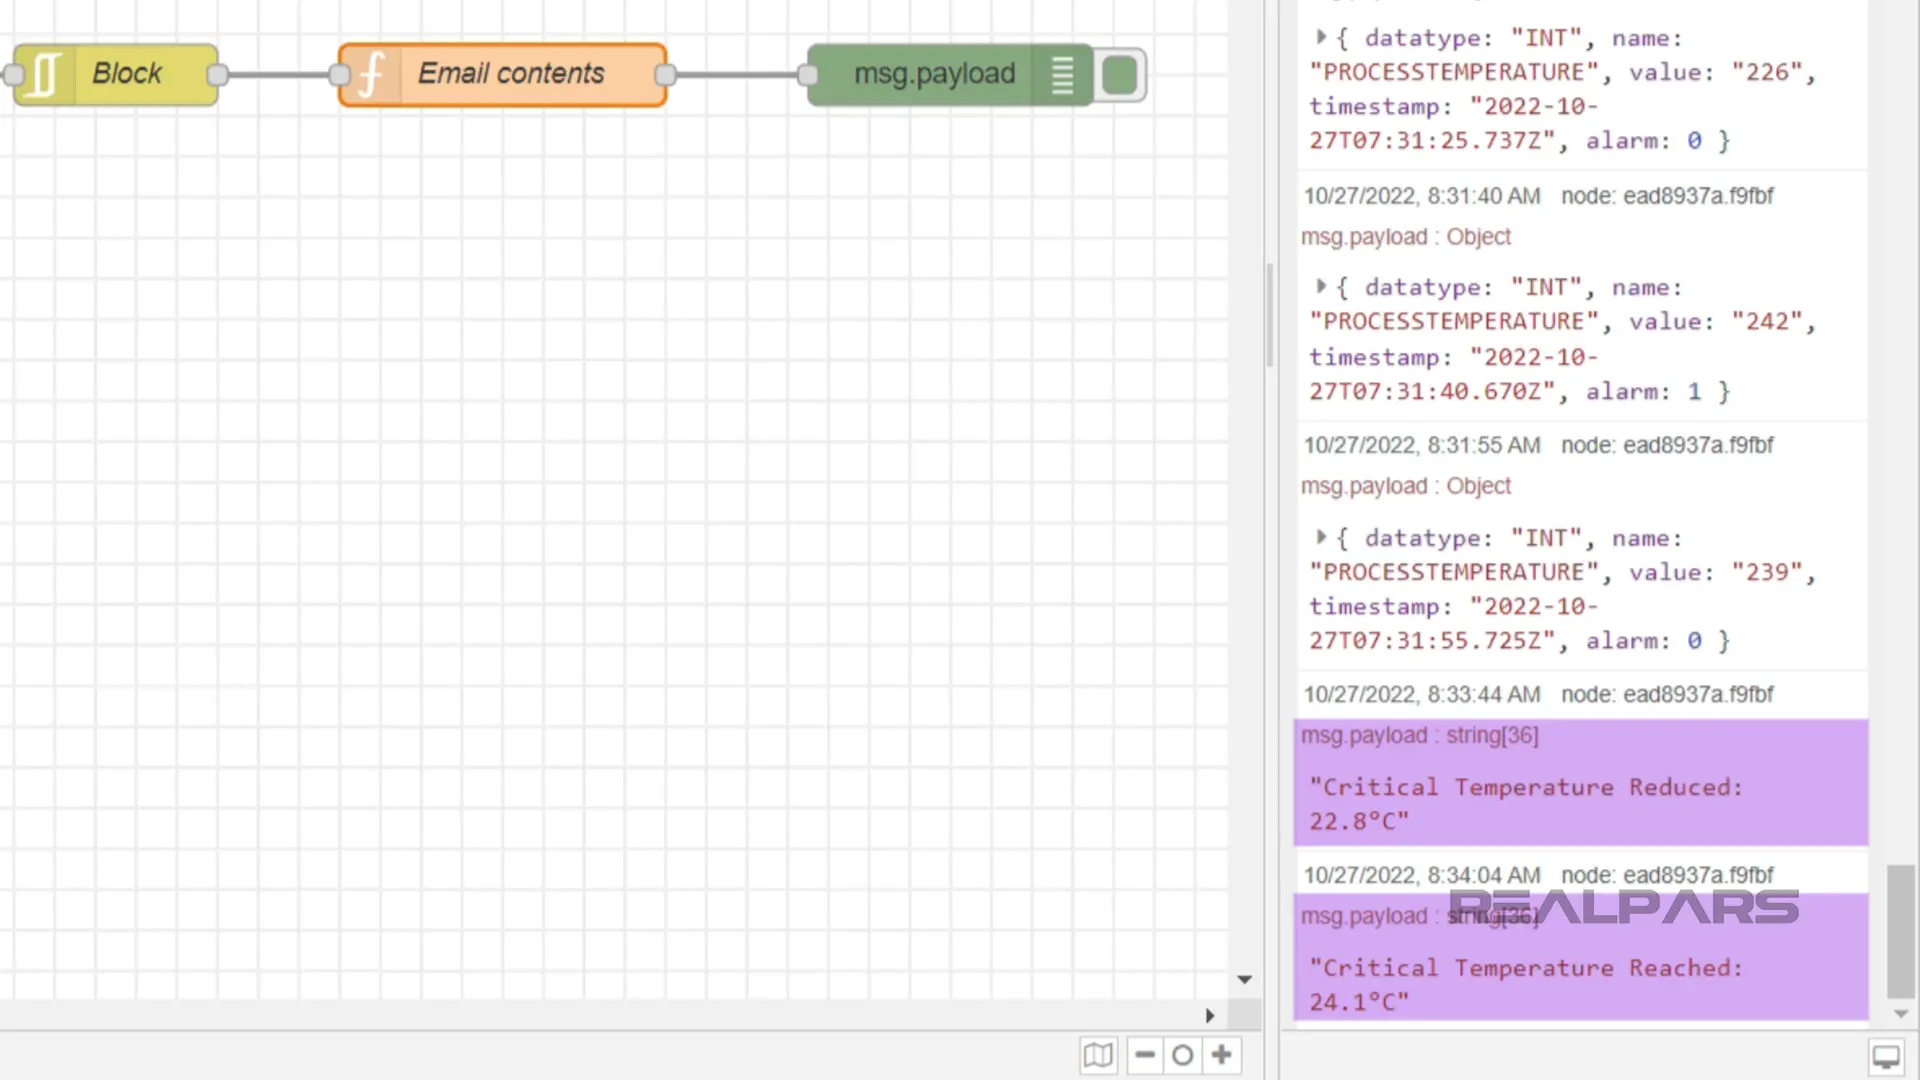
In the debug console, I see that the contents of the message object are as expected when the temperature reaches a critical value and returns from the critical value.
Email node
Finally, I can connect my u-control controller to the internet and add an email node to send the message out via email.
This is the final node in the flow so I cannot add it in between the Function node and Debug node.
Instead, I place it on the canvas and add an extra connection from the Function node to the Email node.

As you can see, a flow can be split to send messages from one node to multiple nodes throughout a flow.
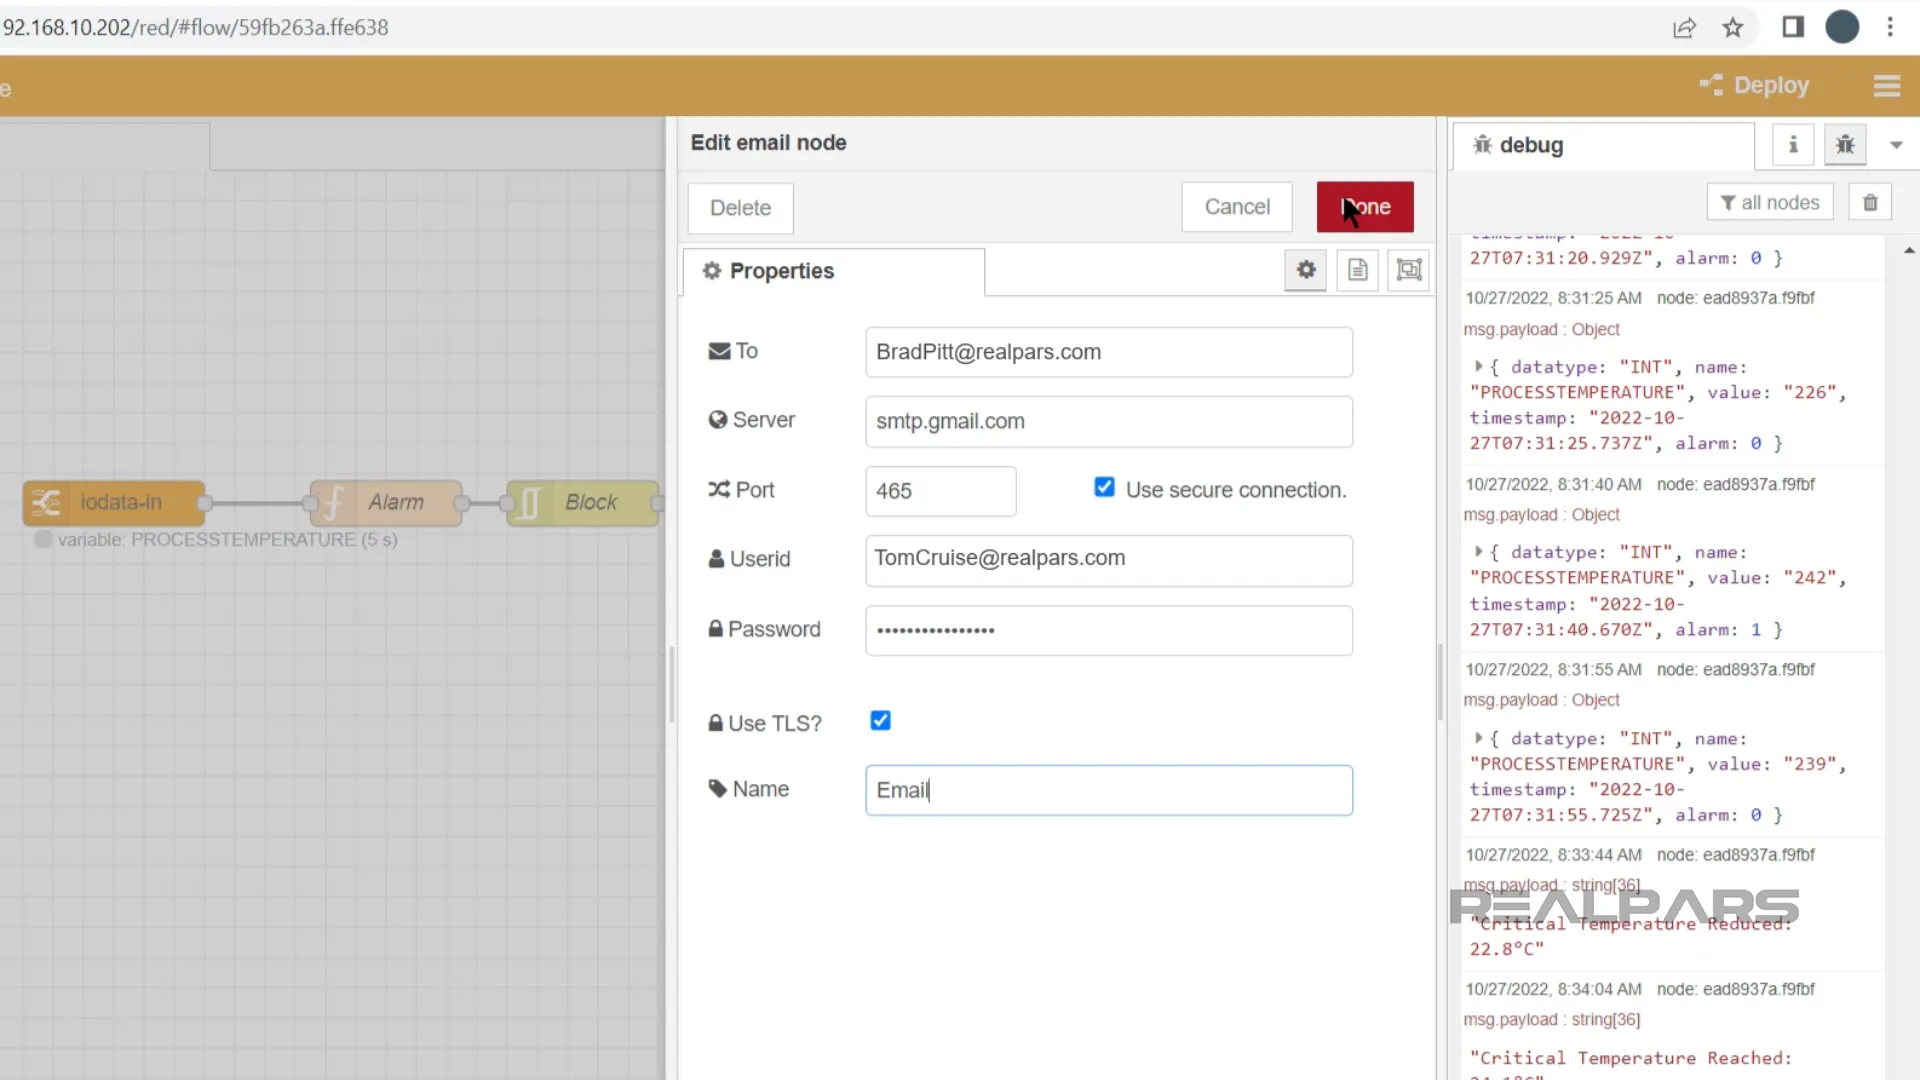
I configure the email node with the settings shown here.
Once again, I can cover the temperature sensor and when the temperature reaches the critical value, I see the email message logged in my debug console.
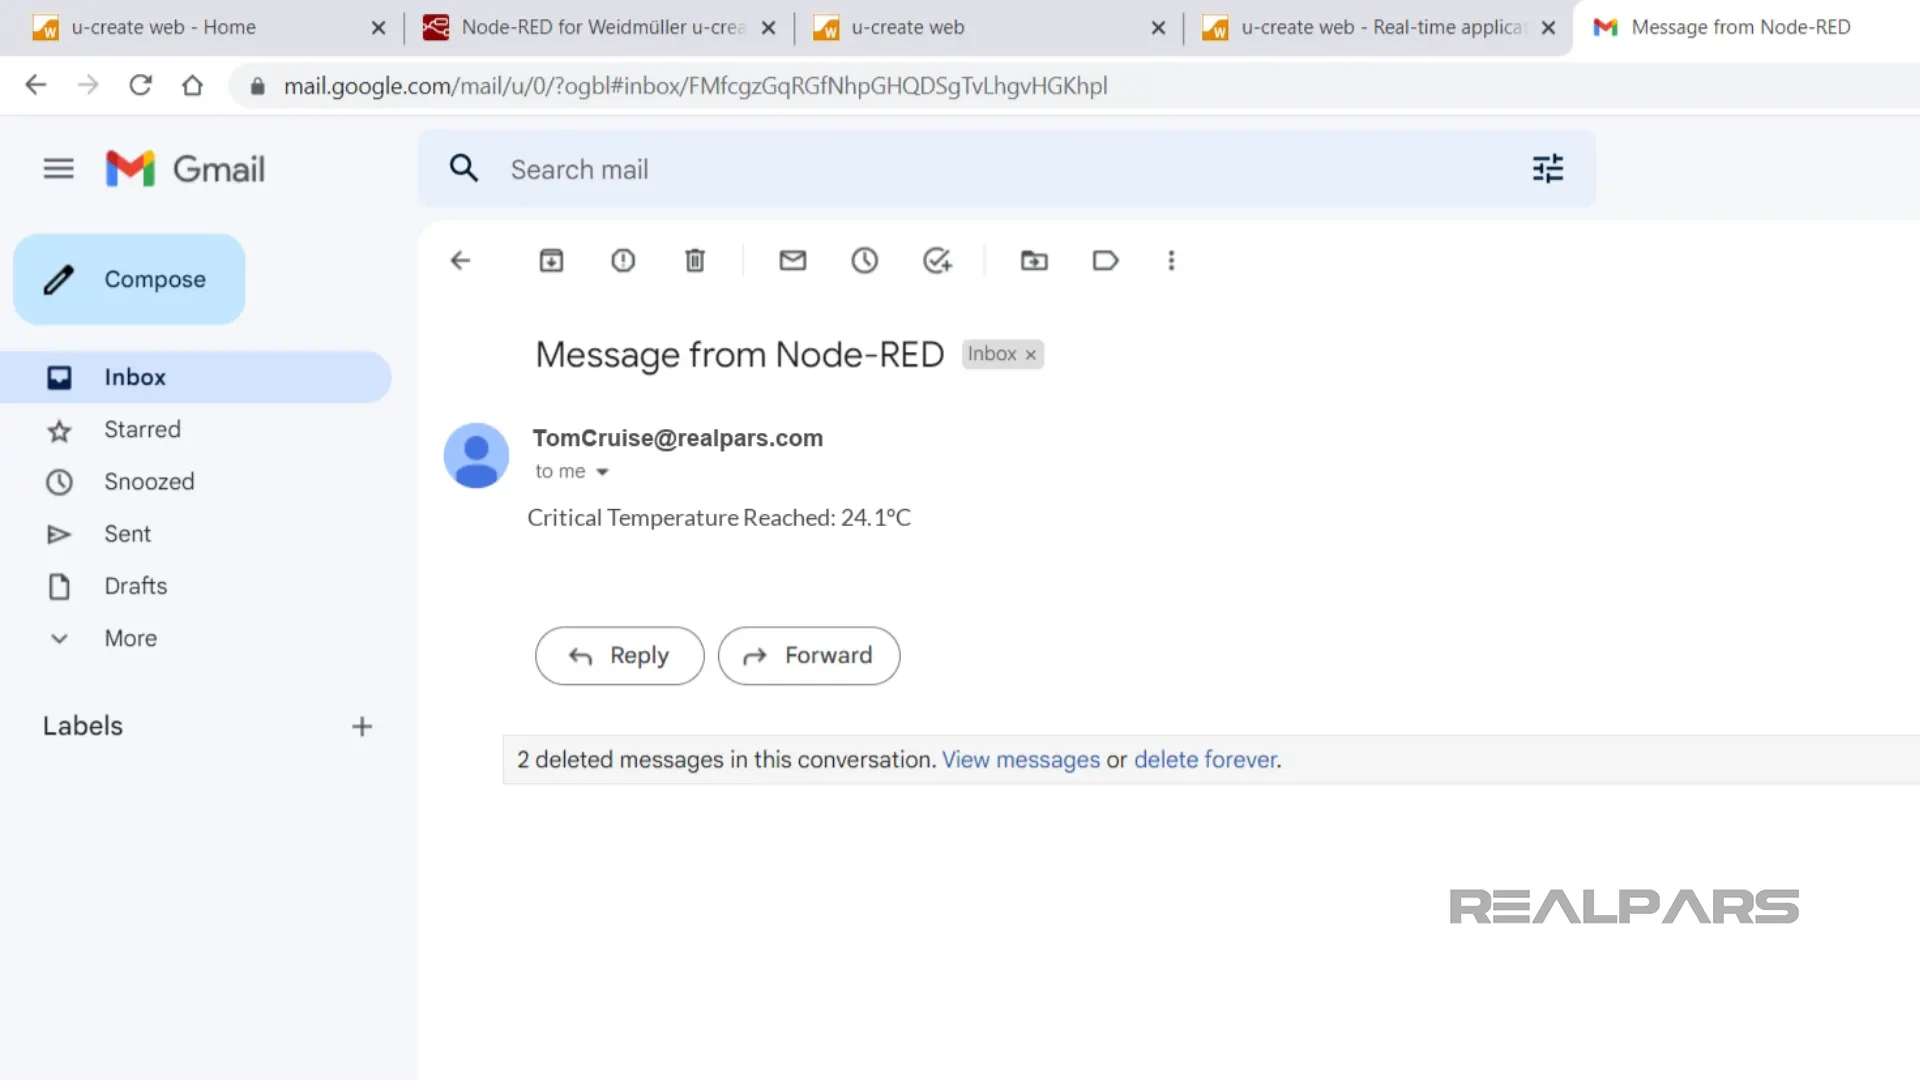
When I switch over to my email inbox, I see that I have received an email from Node-RED notifying me that the process value has reached a critical value.
Wrap-Up
In this quick demonstration, I have shown you how easy it is to build sophisticated Industrial IoT applications using the u-mation platform and Node-RED. Node-RED makes it easy to collect, process, and send data from hardware devices over the internet.
Many companies, including Boreal Light, are using u-mation and Node-RED to retrieve data from machines deployed around the world.
The data retrieved from these machines allows engineers based at the company headquarters to analyze and optimize the performance of the machines remotely leading to higher productivity and reduced costs.
If you’re interested in learning more about Node-RED, I highly recommend that you pick up a Weidmüller u-control Starter Kit so that you can see how easy it is to create Industrial IoT applications in a web-based development environment.
In this article, we saw how easy it is to develop Industrial IoT applications with the u-mation platform but you can also use u-mation for complex automation tasks.
In the next article, we will see how open and flexible operating systems are revolutionizing industrial automation applications.
Got questions about Node-RED or u-mation? No worries – we’re here for you! Leave a comment and one of our friendly instructors will get back to you in no time.
If you know someone working on an IIoT project, why not share this article with them and help them join the Node-RED revolution? They’ll be thankful for your input!