
In this article, I’ll show you how to connect a CODESYS PLC to a Factory IO scene using the OPC UA communication protocol. Before we learn how to do that, let me take a minute to introduce the tools that we will use in this article.
CODESYS
CODESYS is an ideal tool for learning PLC programming because the development system is completely free to download and use.
In our blog, we have CODESYS posts that show you how to download and install CODESYS and explain why CODESYS is an important technology in industrial automation.
Factory IO
Factory IO is a 3D simulation environment for PLC training.
It allows you to build virtual factories using a library of components and then connect these virtual factories to a PLC. This allows you to test and visualize how your code would control a physical process in a safe, virtual environment.
Factory IO is a paid piece of software, but you can sign up for a free trial using this link.
OPC UA
OPC UA, or Open Platform Communications Unified Architecture, is a data exchange standard that is used in industrial automation to connect devices, systems, and software applications.
In recent years, it has become very popular for two reasons;
First, it is vendor-agnostic. This means that it can be used to connect controllers and devices from different manufacturers easily.
Second, it has built-in security features like encryption and authentication to maintain data integrity and confidentiality.
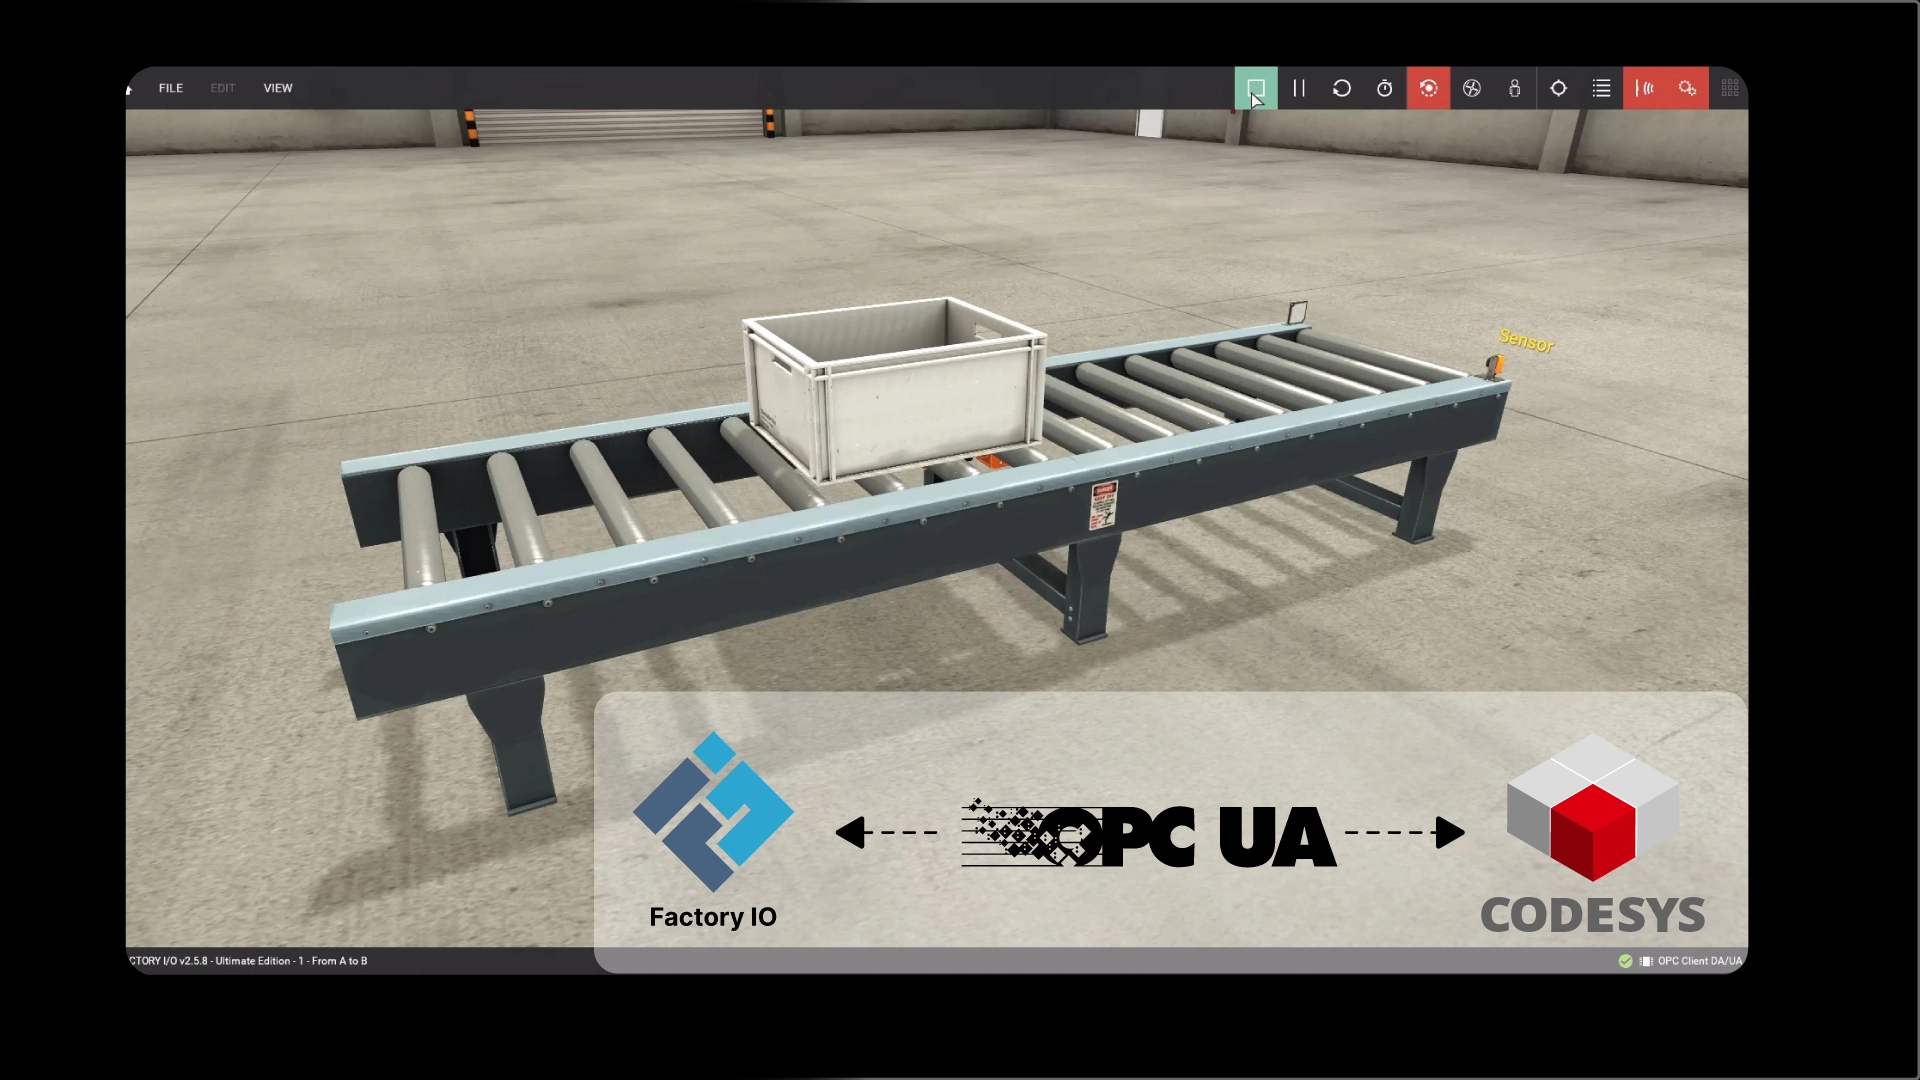
Since CODESYS supports OPC UA, we can use OPC UA to connect a CODESYS PLC to a Factory IO scene.
Let’s see how to do that.
Use OPC UA to connect a CODESYS PLC to Factory IO
Go ahead and create a new project in CODESYS.
The project should use the Standard Project template with a CODESYS Control Win v3 device.
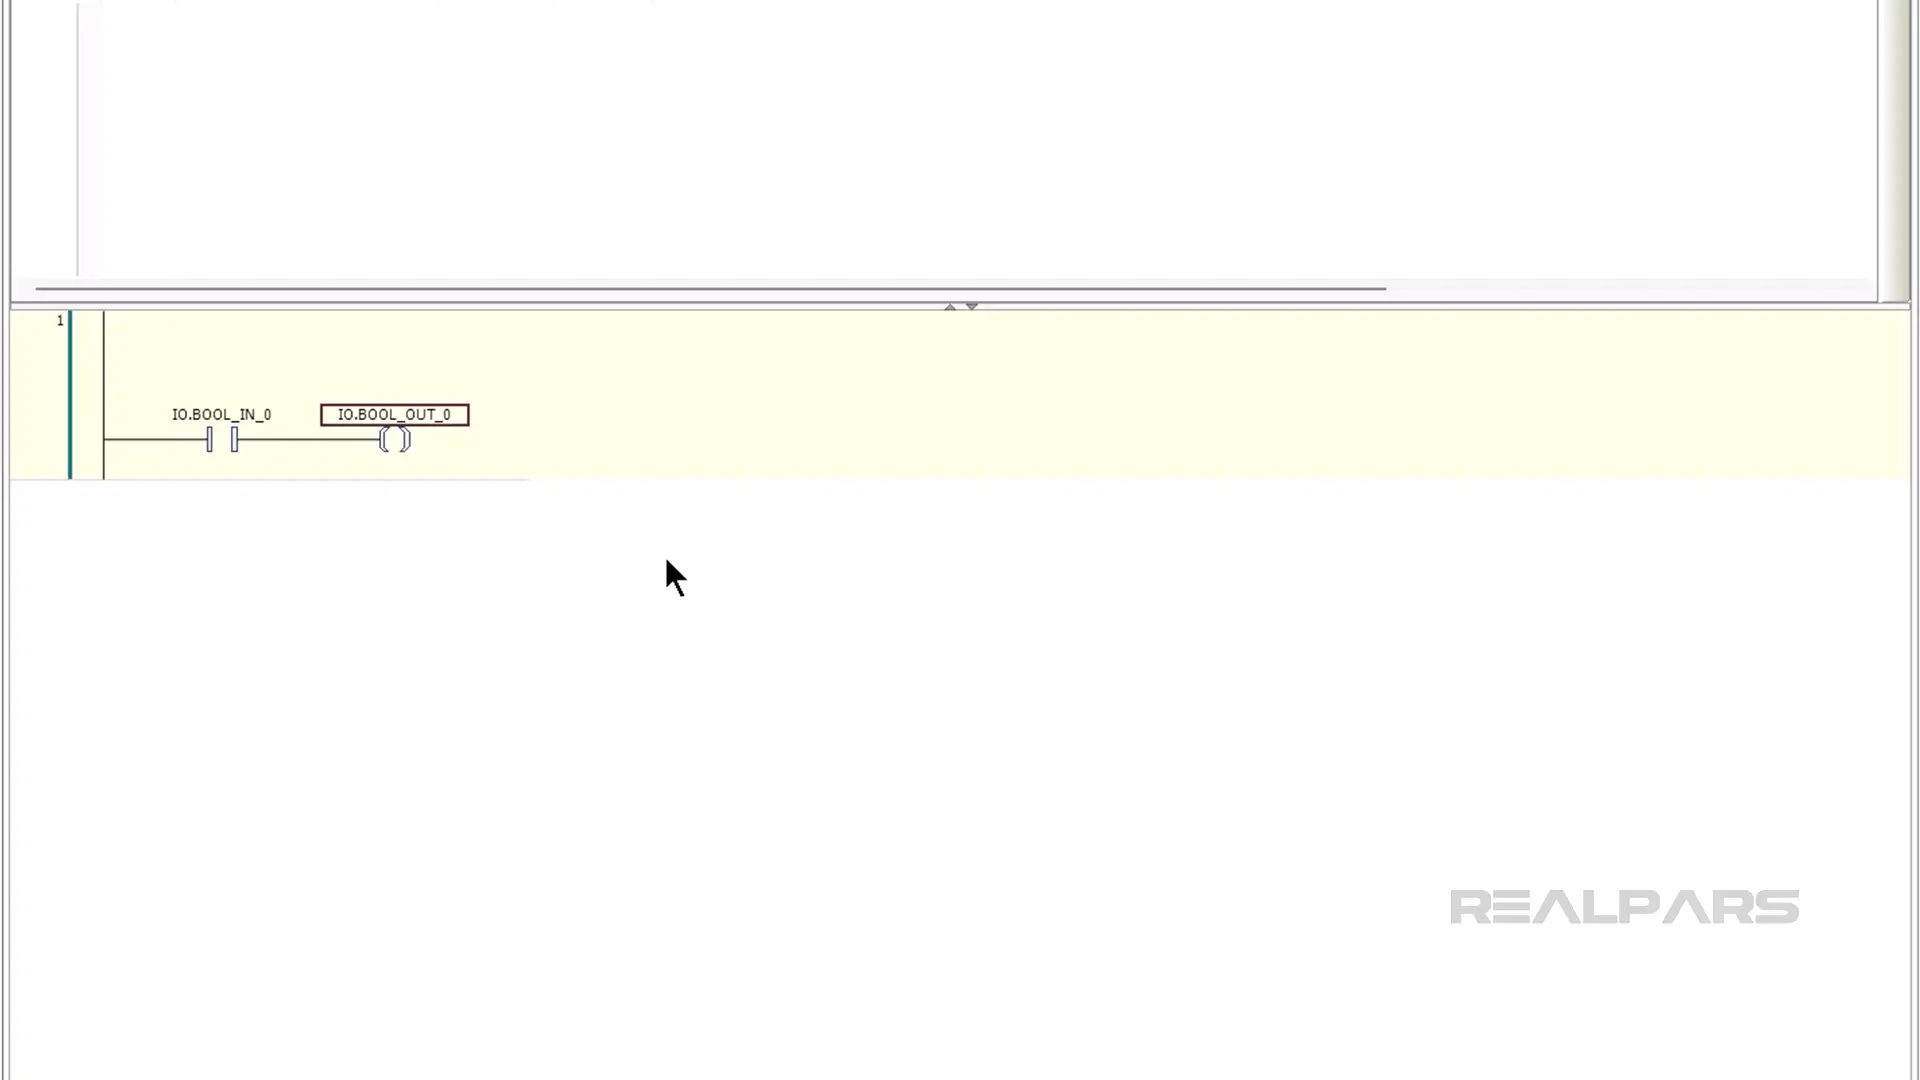
In this case, I’m creating PLC_PRG with the Ladder Diagram programming language, but you can choose whatever language you are comfortable with.
Next, add a Global Variable List to the application.
Give the Global Variable list a name and add the variables that are required to communicate with the Factory IO scene.
Finally, enable the always link option for the Global Variable List in the Build tab of its Properties menu.

Write the logic
Next, I open the PLC_PRG POU and write the simple logic for this application to run the conveyor motor when the normally-closed sensor is not triggered.
Configure User Management
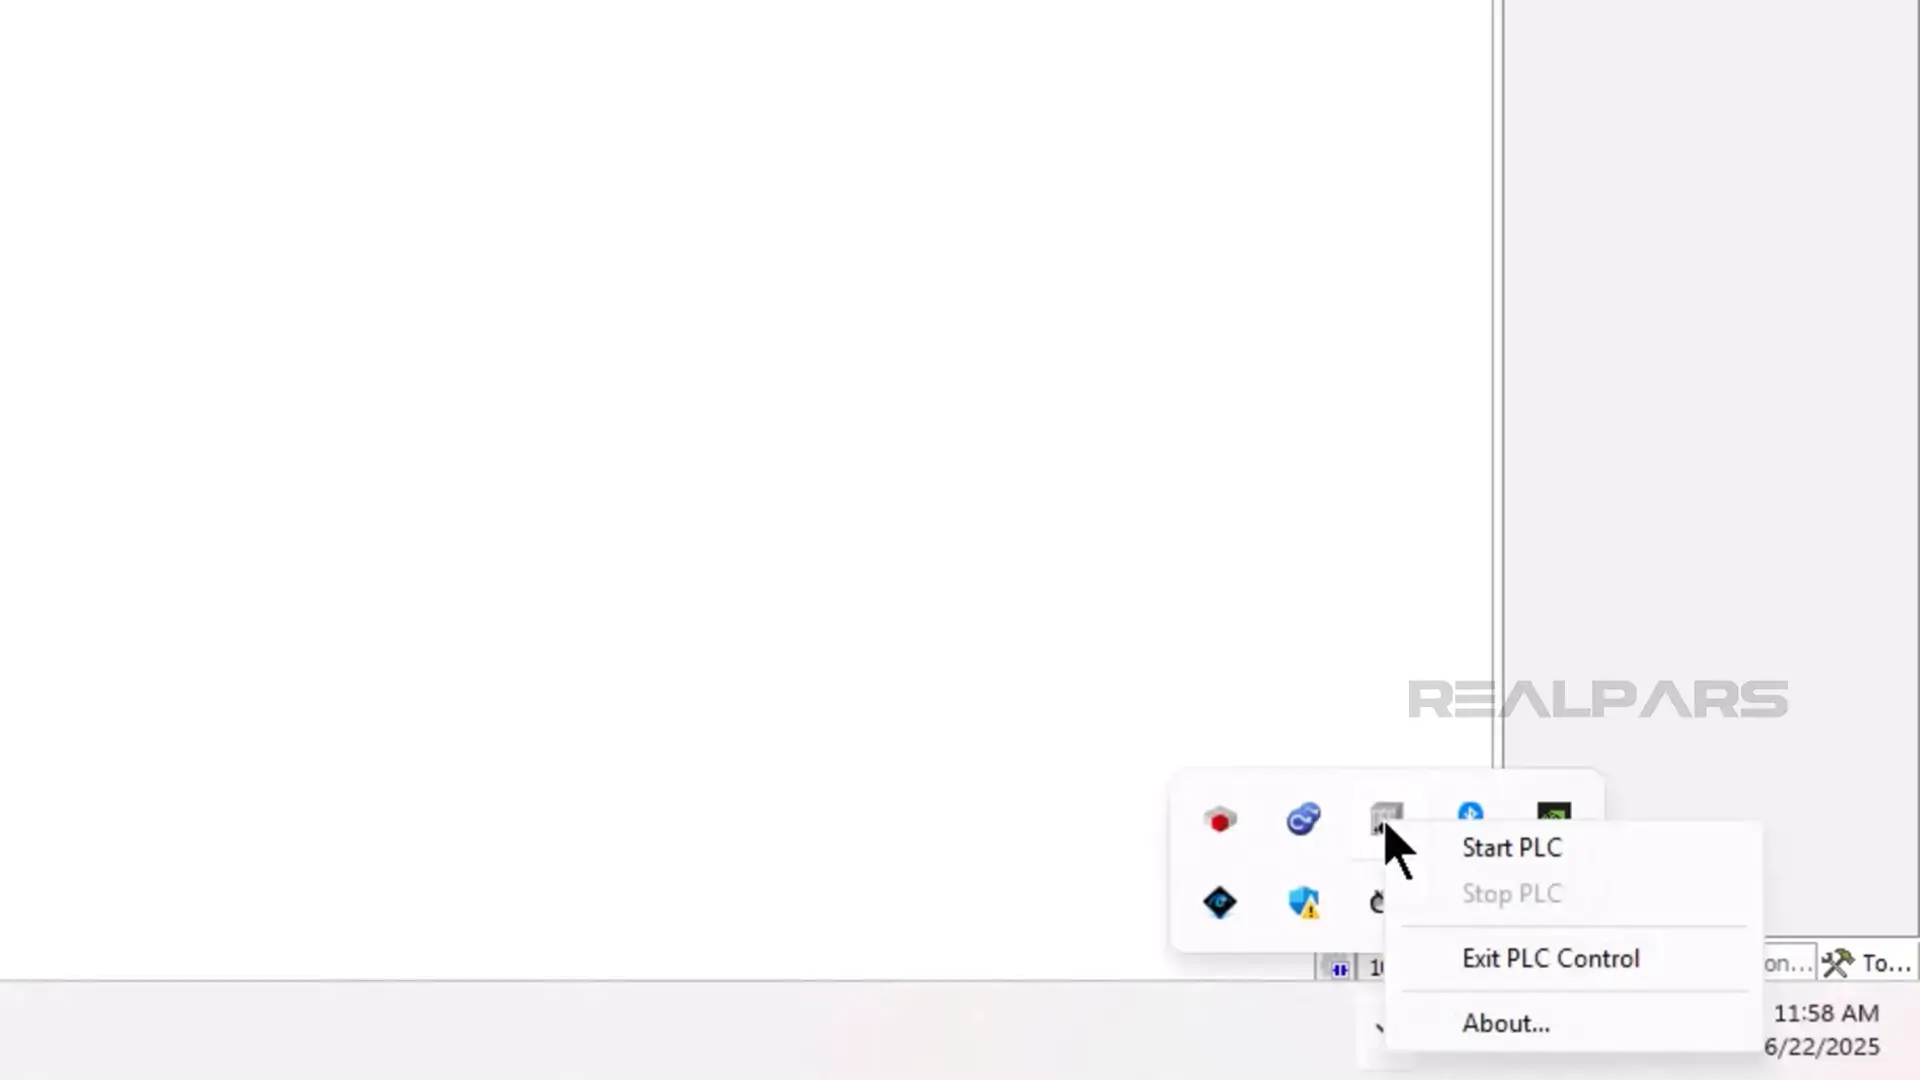
After writing the logic, we can disable user management for the PLC.
To do that, start the CODESYS runtime from the system tray as shown here.
In the CODESYS Development System, double-click on the device to open the Communication Settings window.
In the Communication Settings window, click Scan Network to scan the network for compatible devices. You should see the CODESYS runtime instance that you just started in the Select Device dialog.
Select the Device and click OK.
If this is your first time downloading to the PLC, you may be prompted to set up a username and password, and then to use these credentials to log in to the PLC.
For CODESYS to communicate with Factory IO, we have to disable device user management. To do that, click on Device and then Change Runtime Security Policy as shown here.
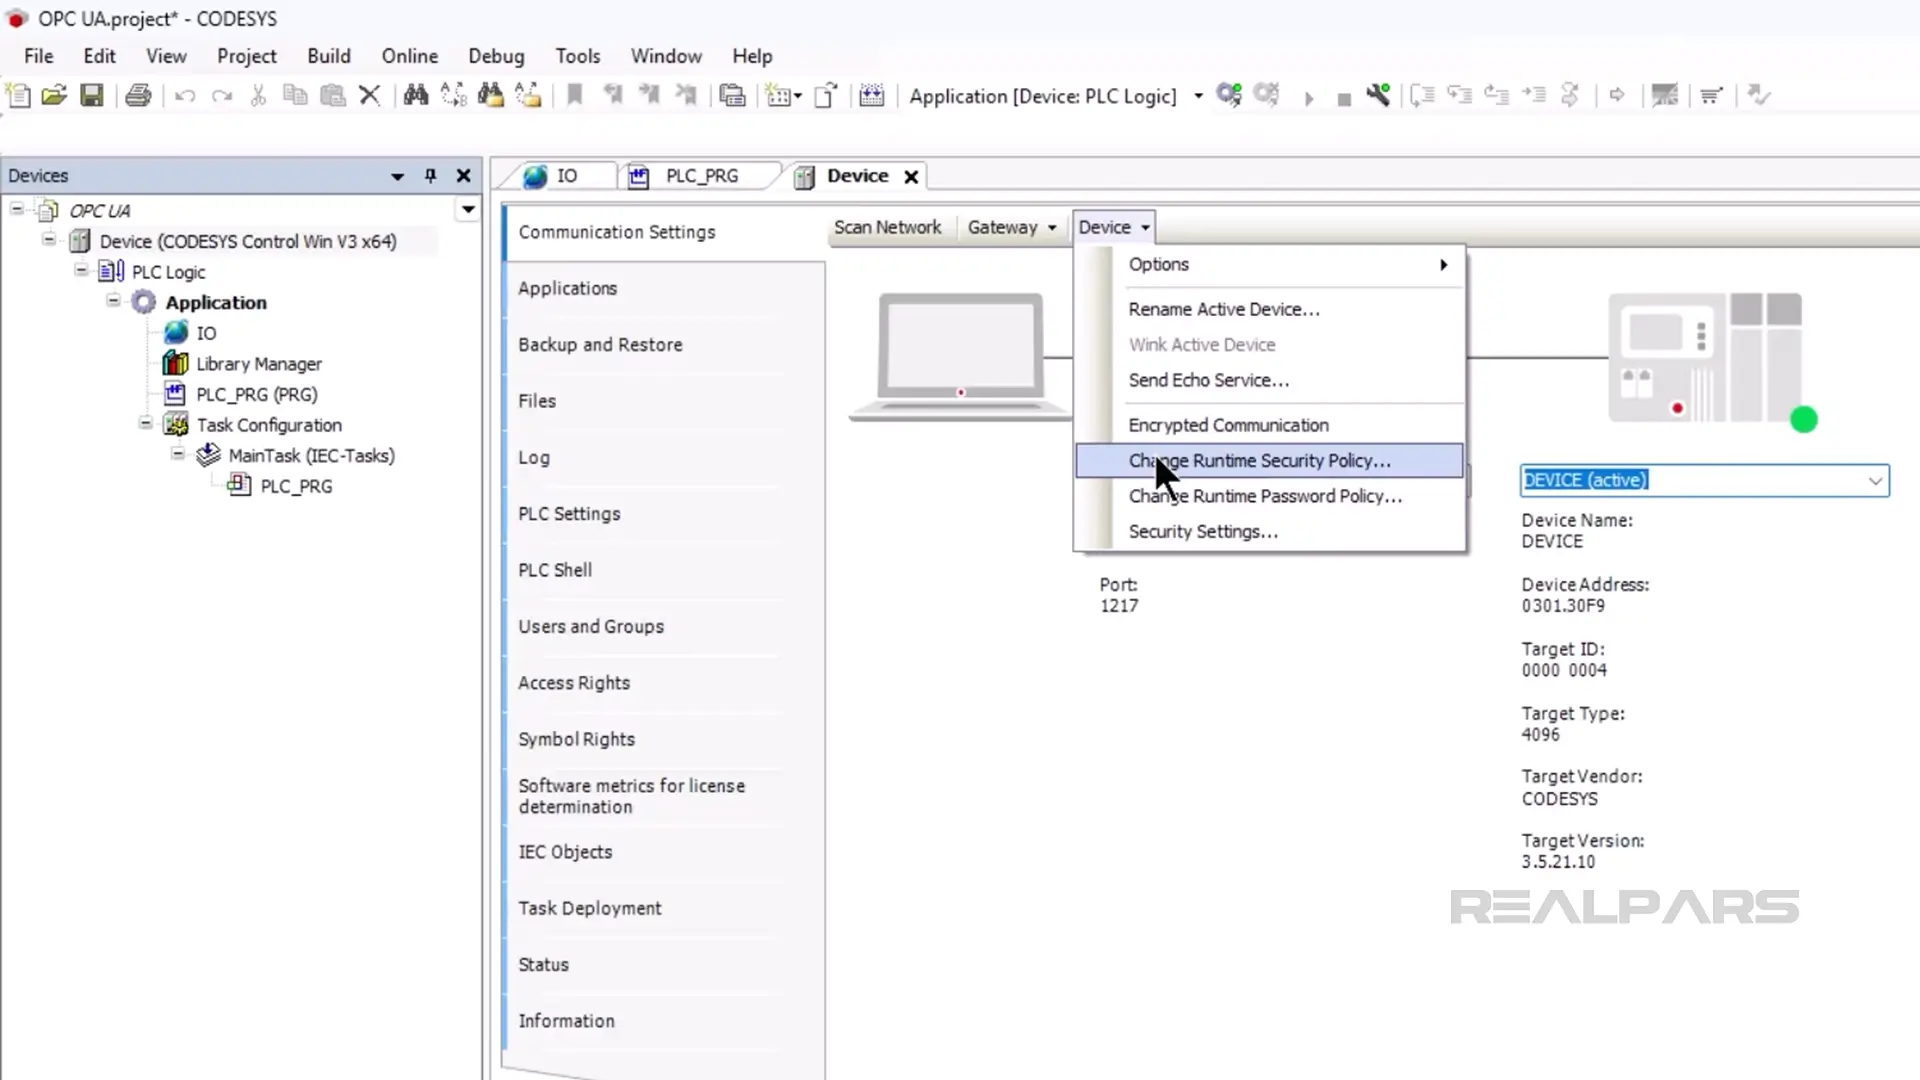
In the Device User Management section, select Optional User Management and then check the Allow Anonymous Login box. Click OK to save the configuration.

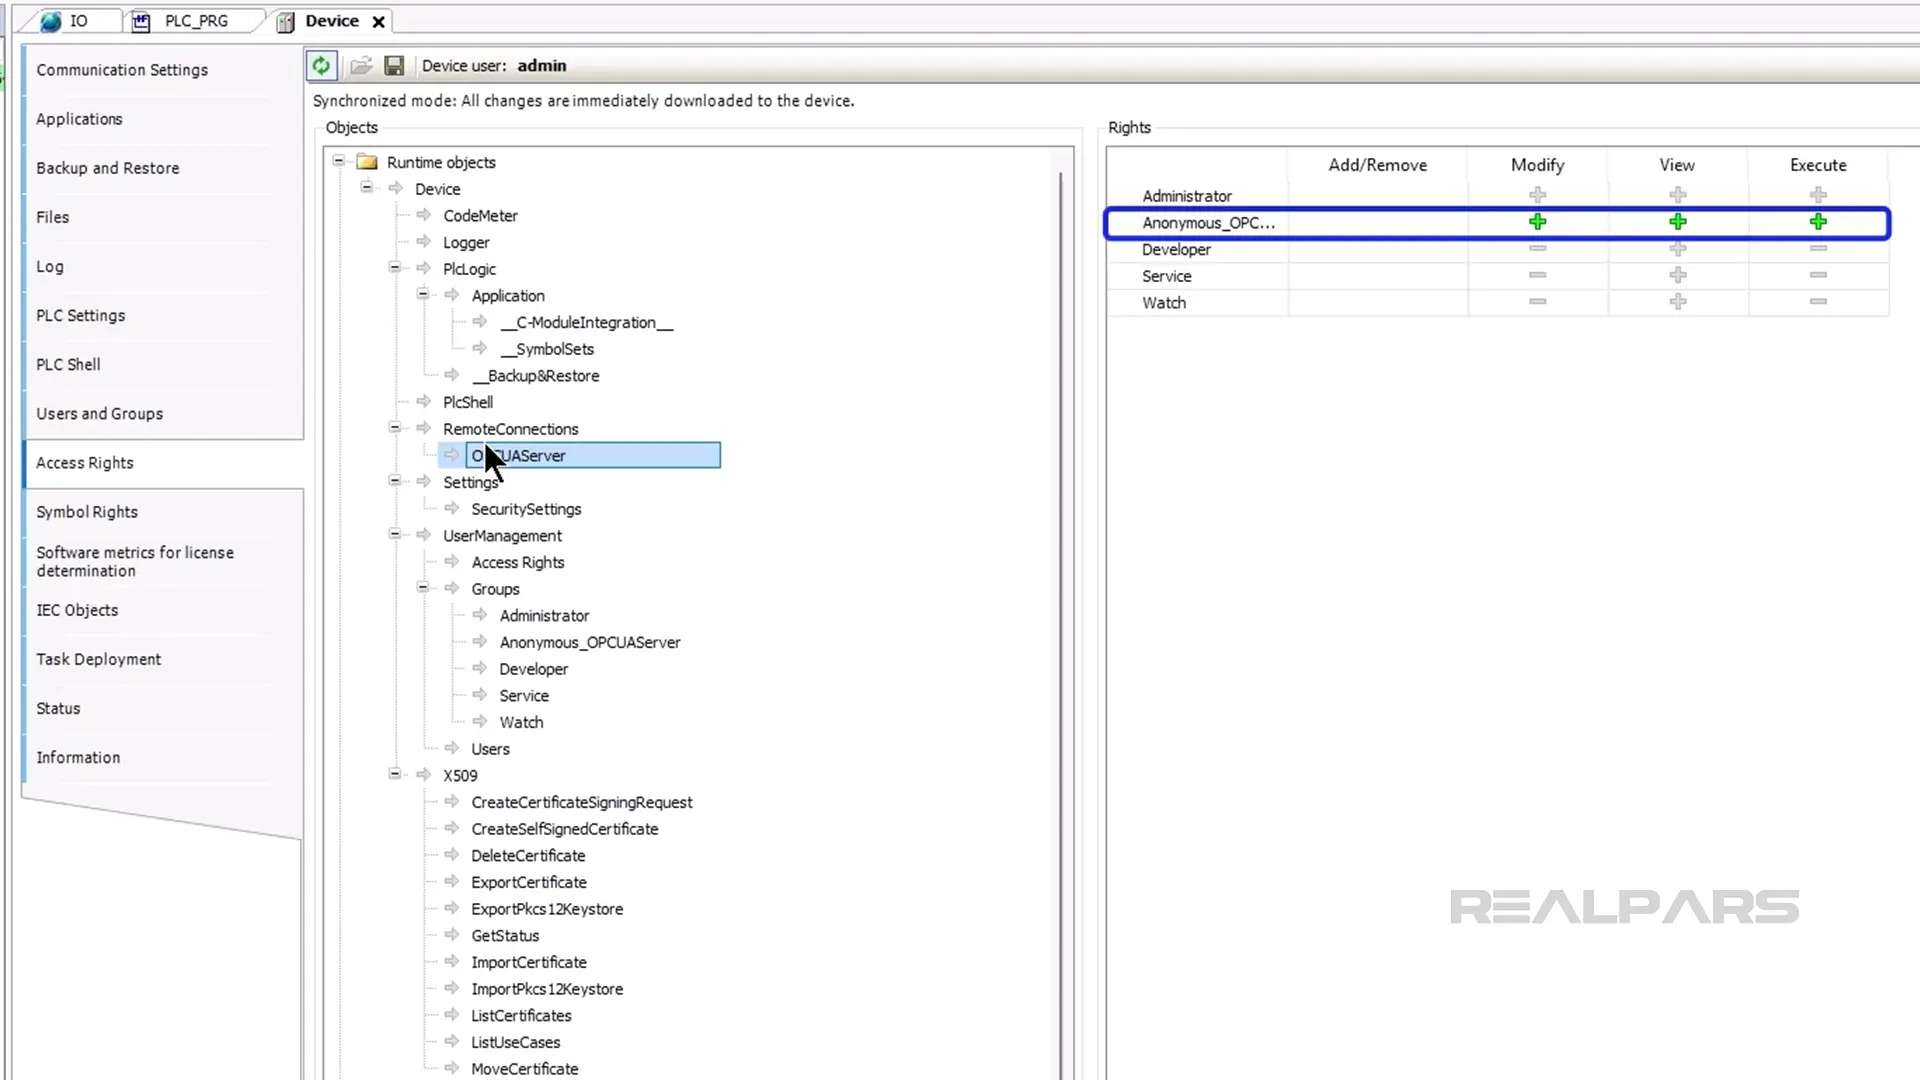
Configure OPC UA server
Next, we can configure the device’s OPC UA Server that will be used to exchange data with Factory IO.
Activate the Access Rights tab and then click on the synchronization button.
In the Objects pane, expand the Remote Connections folder and select OPC UA server.
In the Rights pane, ensure that Anonymous users have the Modify, View, and Execute permissions.
Add Symbol Configuration
Now that our OPC UA server is configured, we can add a Symbol Configuration, which will allow our Global Variables to be accessed by other applications through the OPC UA server.
To do that, right-click on the application and select Symbol Configuration under the Objects menu.
Make sure that the Support OPC UA features checkbox is checked, and then click Add to add the Symbol Configuration to your project.
In the Symbol Configuration, which was opened automatically, click Build to build the symbol configuration for the application.
You can now see that the Global Variables that are used to exchange data with the Factory IO scene are included in the Symbol Configuration.
Download the project
Finally, we can download and run the project by clicking Online and then Login to download the project.
After downloading the project, you can run the application on the device by clicking on Debug and then Start.
Set up Factory IO
Now that our PLC is configured, we can turn our attention to Factory IO.
Launch Factory IO and open the scene 1 - From A to B, which we’ll be using in this demo.
Open the Driver Configuration window by clicking on File and then Drivers.
In the Driver dropdown, select OPC Client DA/UA to specify that we want Factory IO to act as an OPC UA client.
Click on Configuration to open the Configuration window for the driver.
In the Configuration window, enter opc.tcp://localhost:4840 in the OPC Server input field and press Enter to connect to the server.
Once connected, set the Container Filter to IO as shown here and click Browse to discover the tags.

Once the driver is configured, return to the driver window and map the tags of the Factory IO scene to the tags exposed by the OPC UA server, as shown here.
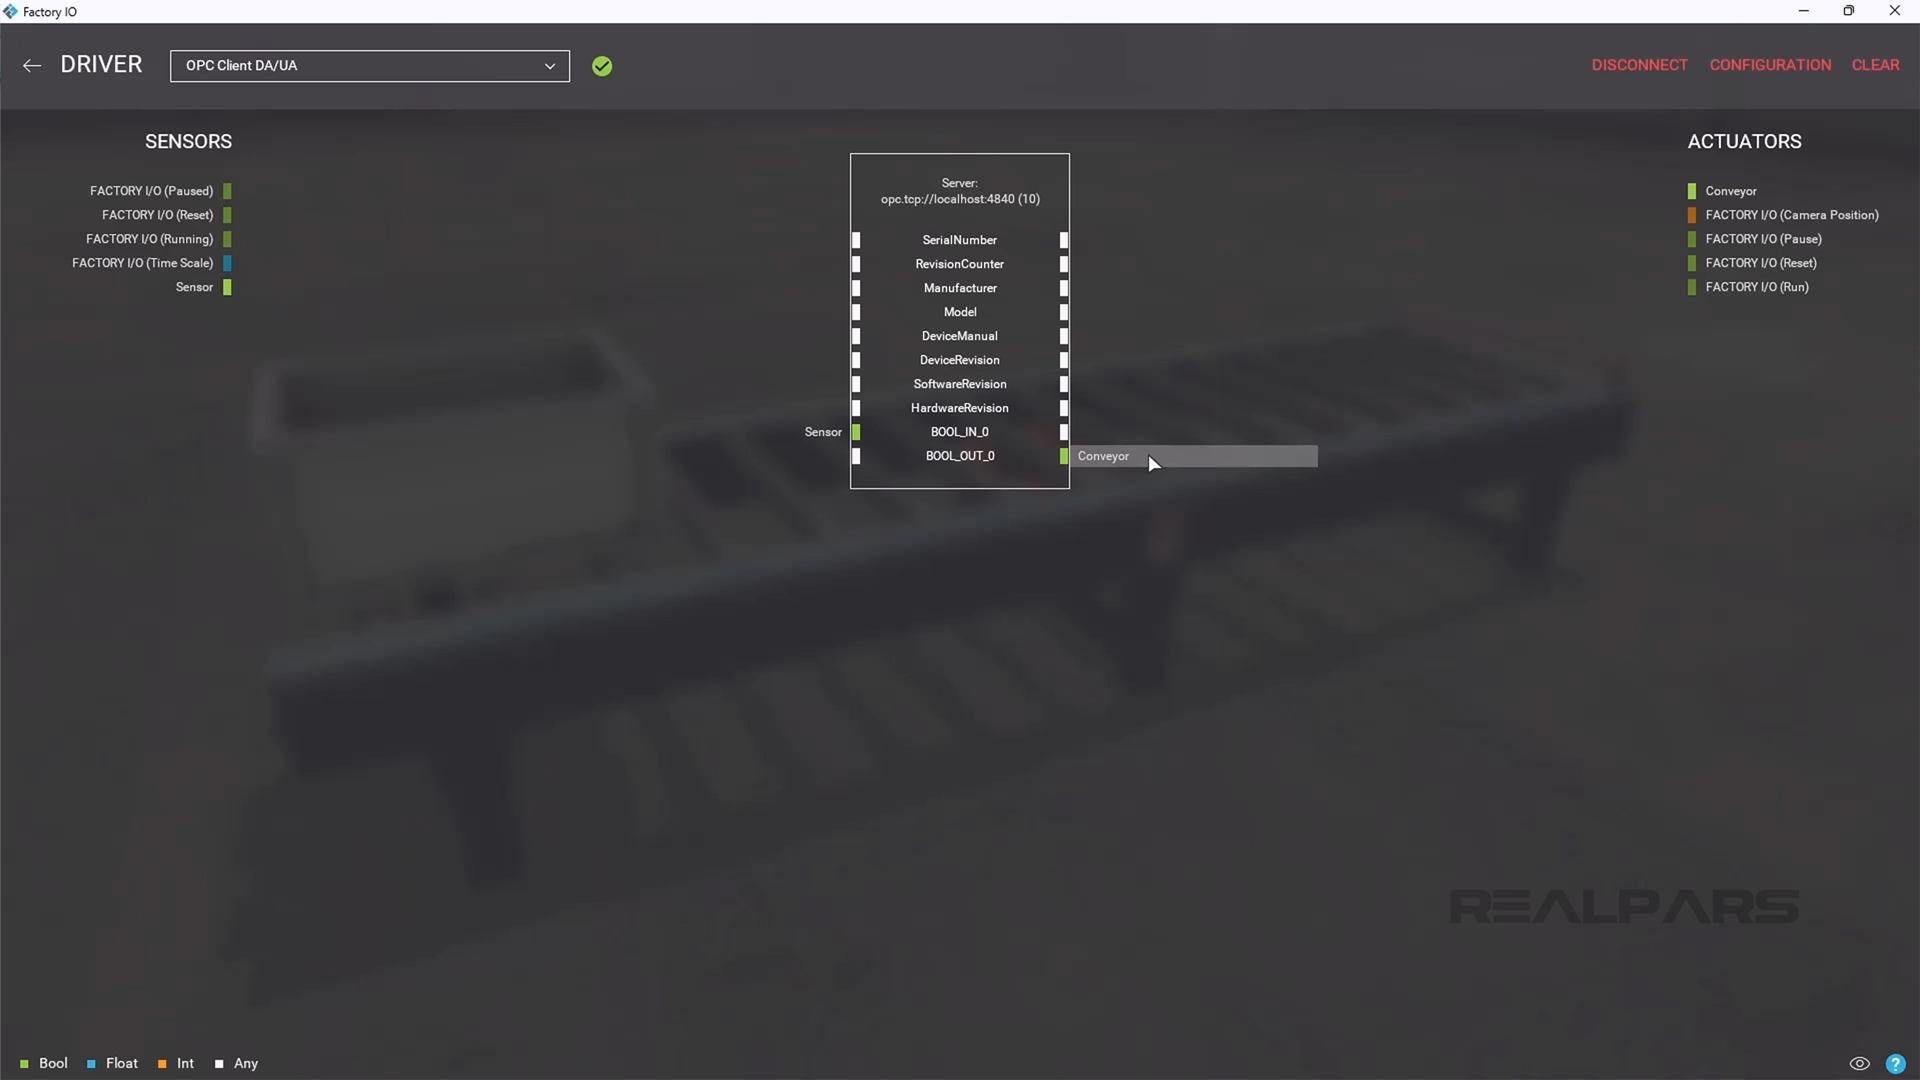
Finally, close the Driver window and run the scene to confirm that the connection is working.
Wrap-Up
In this article, I showed you how to connect a CODESYS PLC to Factory IO using OPC UA. I also explained what CODESYS, Factory IO, and OPC UA are.
If you would like to learn more about programming CODESYS PLCs, you can check out our CODESYS courses.
RealPars Business members get access to these courses and all of our other great courses on industrial automation for a fixed annual price. Head to realpars.com/business to learn more about how a RealPars Business membership can help train your team and reduce downtime.