
It’s probably safe to say that the digital multimeter (DMM) is the main electrical troubleshooting tool for any control engineer or maintenance technician. But how is it really used? Is it simply testing individual components, or part of a logical process to identify faults in a system?
Simple component testing checks the resistance or continuity of devices such as fuses, switches, relays, sensors, or fans to determine whether they need to be replaced.
If you’d prefer watching instead of reading, check out the video below. Otherwise, feel free to skip it and continue with the blog.
In this article, we’ll explore why live testing is often a better choice than resistance testing during practical troubleshooting.
To clarify, live testing can mean different things depending on the tools used. Essentially, it involves any testing performed while the power is still on. For example, measuring current with a clamp-on ammeter is a form of live testing.
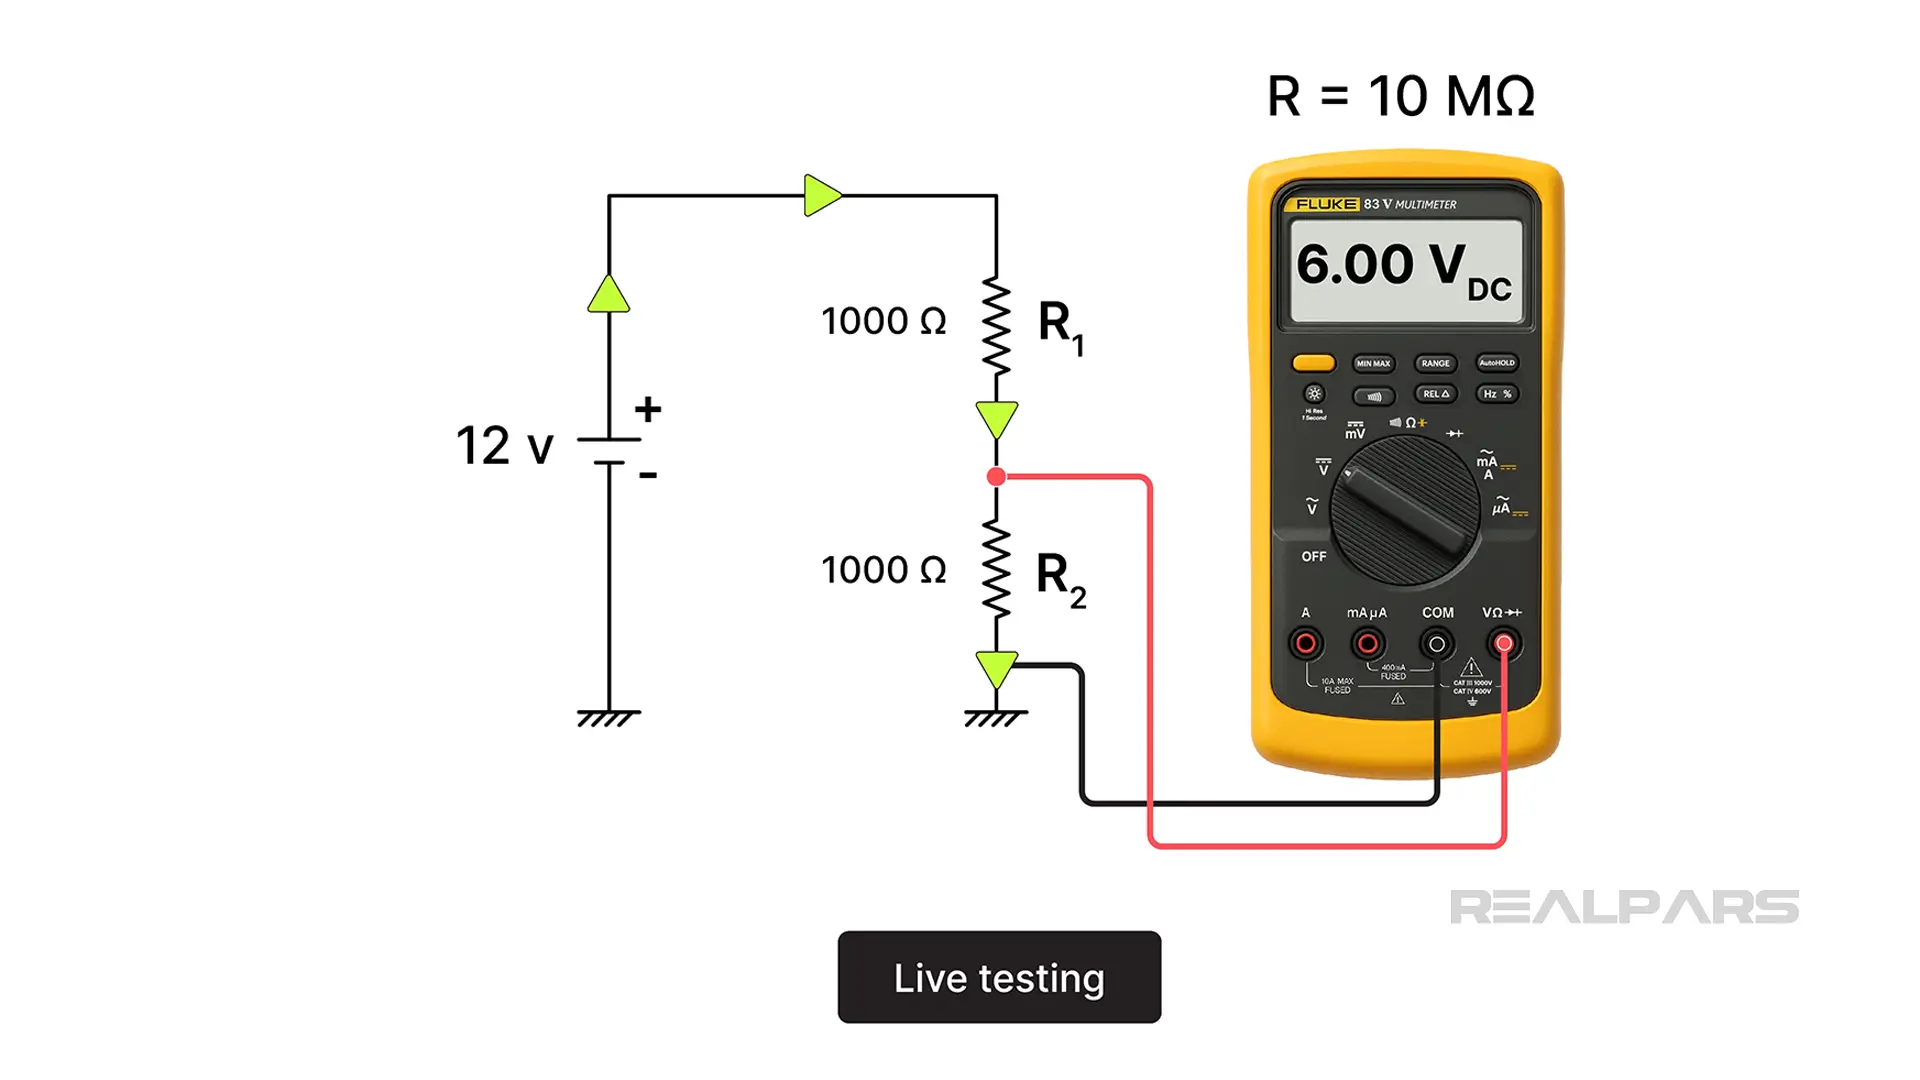
In this article, we will use a DMM set to measure voltage during live testing. We will also use a DMM set to measure resistance during resistance testing.
Can you use a DMM to measure resistance while the power is still on? Yes, but only if you're prepared to risk injury, damage to the equipment under test, or possibly damaging the meter.
Safety in live testing
While live testing is essential for troubleshooting, we strongly recommend conducting it only under safe, controlled conditions. Hazards include electrical shock, burns, and secondary injuries such as falls or impacts that can cause bruises or broken bones.
Live testing involves inherent risks, so you must be prepared to work safely around live equipment.
Safety practices
To reduce these risks, always follow these safety practices when performing live tests:
- It goes without saying that electricity can cause injury; take all necessary precautions to avoid contact with any voltage source.
- Keep your fingers above the probe guards to prevent accidental contact. In some situations, wear insulated gloves.
- Using both hands to measure voltage can create a potential current path through one arm and out the other, possibly passing through your heart. Avoid doing this if possible, as it is dangerous. Seasoned troubleshooters will tell you to “keep one hand in your pocket”.
Voltage vs. Resistance testing
Alright, now that we’ve got the risky part out of the way, let’s compare the benefits of using a digital multimeter (DMM) for live voltage testing versus resistance testing.
Advantages of voltage testing
There are inherent features of today’s voltage-measuring digital multimeters that you should be aware of:
- Clearly, you don’t need to disconnect power to perform a voltage measurement.
- It has extremely high input resistance; therefore, it does not create a significant path for current flow.
- It is not a “power supply” and does not generate current flow to provide a derived voltage reading.
- You do not need to disturb the circuit under test; for instance, components do not have to be removed, and wires do not need to be cut.
Drawbacks of resistance testing
Alright, here are the drawbacks of using a digital multimeter to measure resistance during troubleshooting.
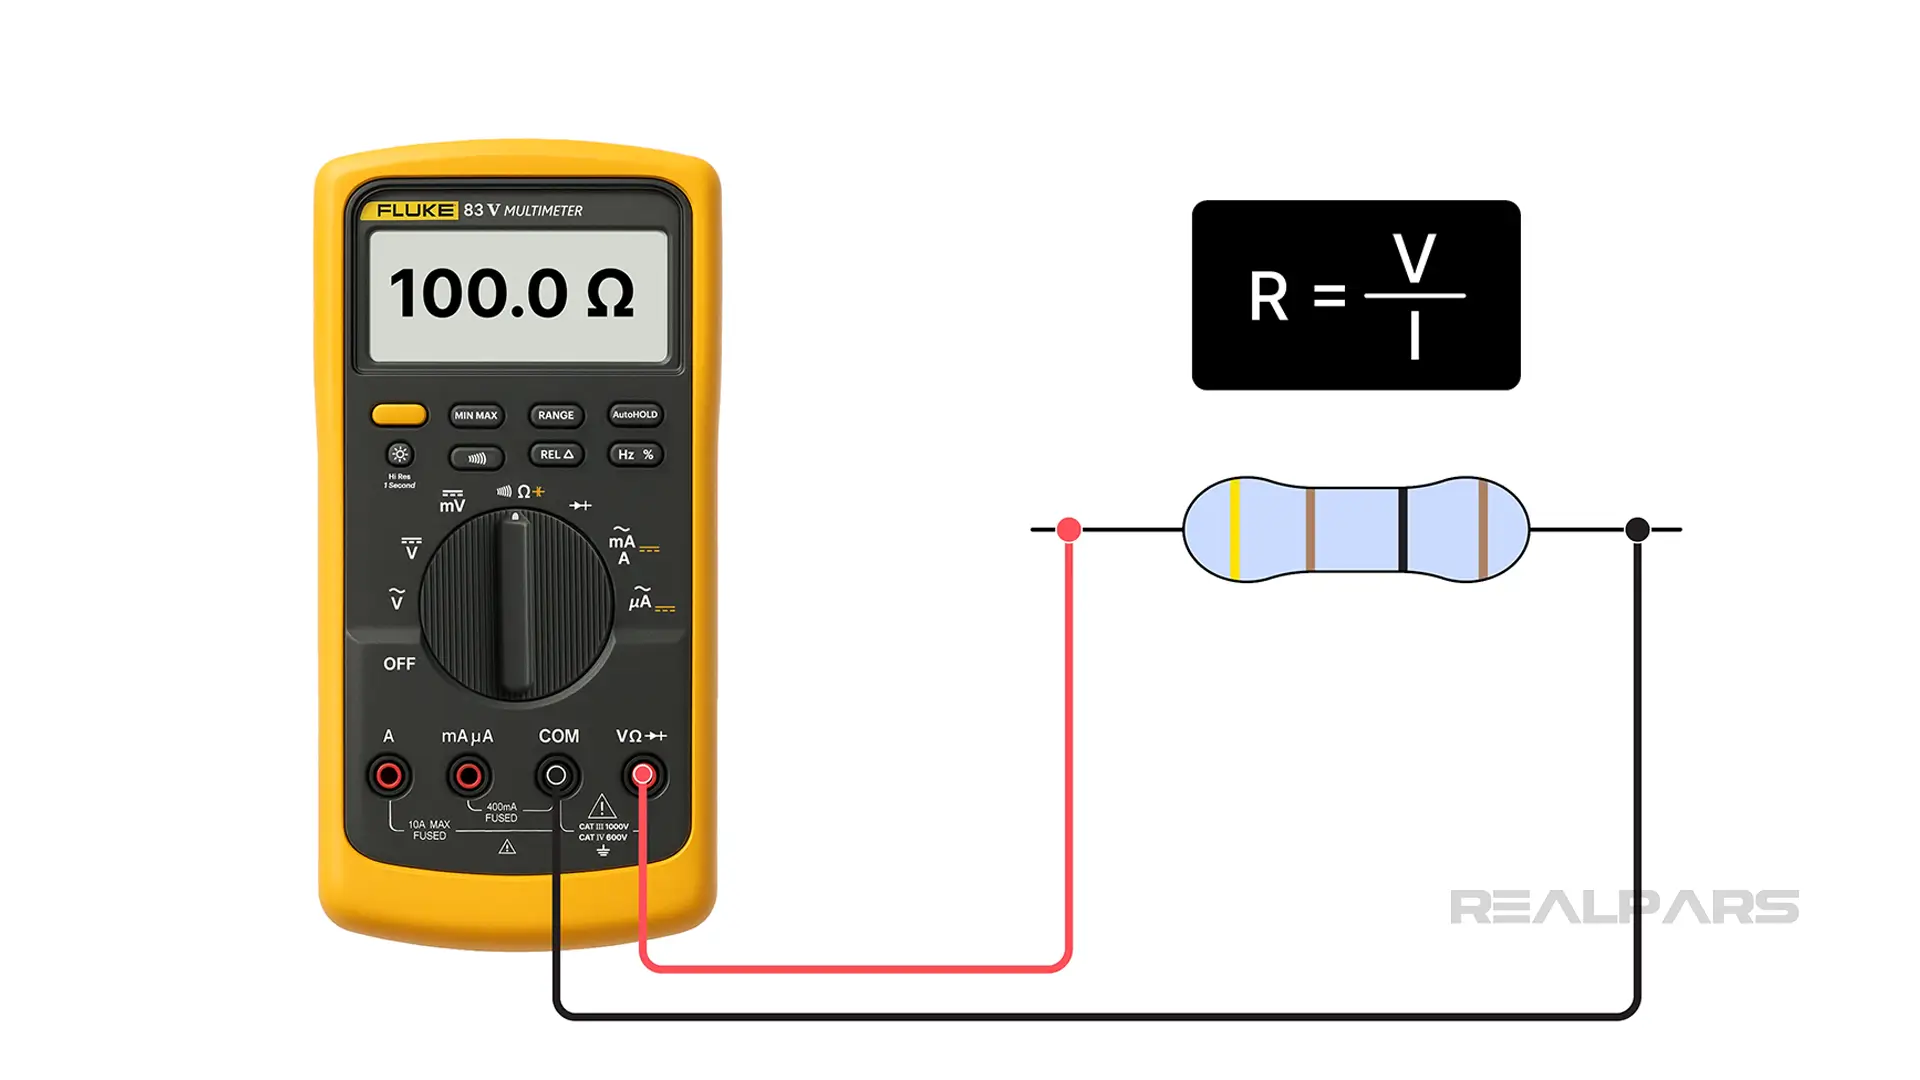
- A digital multimeter on the Ohms setting functions as a small internal power source, creating a current flow through whatever is connected across its leads. Why? The resistance reading is derived from Ohm's Law, which states that resistance equals voltage applied divided by the resulting current.
- You need to interrupt the circuit under test. Why? The component being tested must offer the only current path between the two multimeter leads.
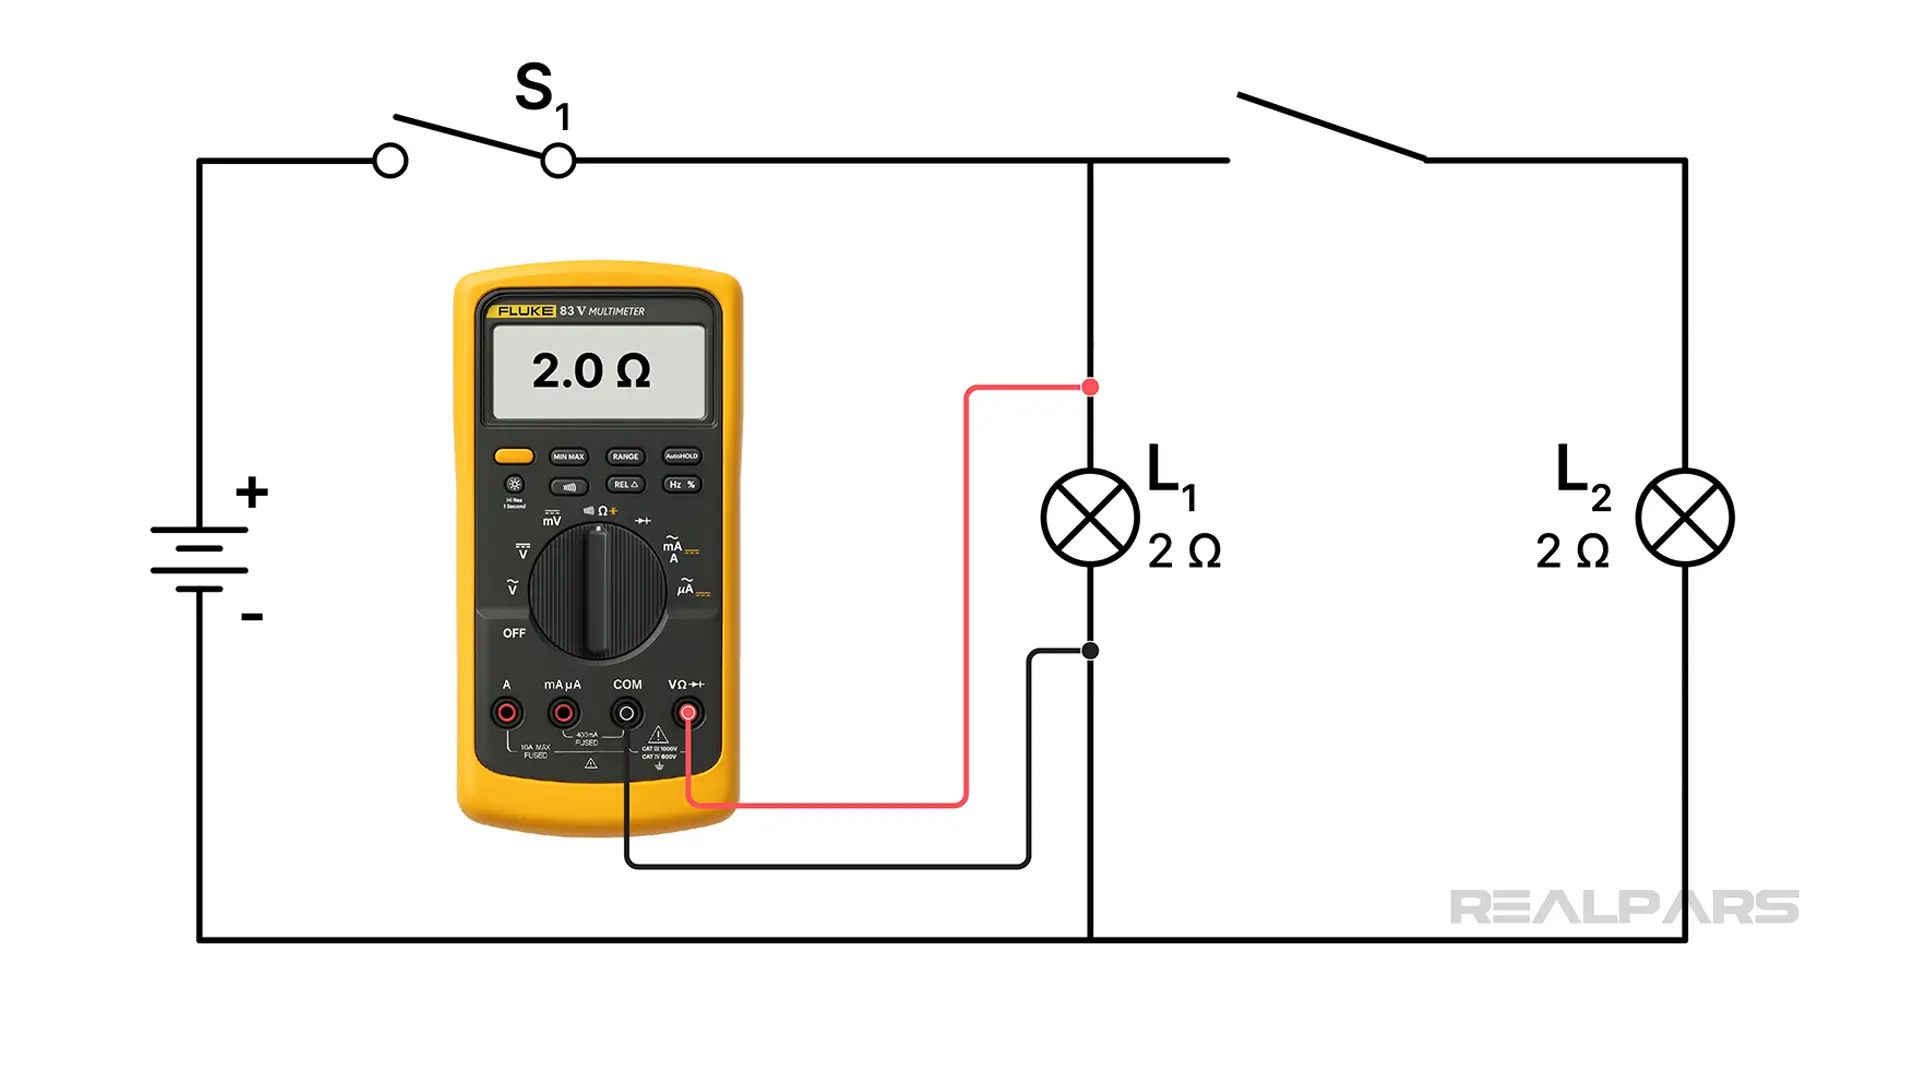
Let’s illustrate with an example. We want to check the resistance of the lamp L1. When the multimeter is connected directly across L1, it reads about one ohm even though L1’s actual resistance is two ohms.

Why? The meter detects two current paths between the red and black leads. Essentially, L1 and L2 form a parallel circuit with a combined resistance of one ohm.
To perform the measurement accurately, L1 must provide the only path; therefore, it must be disconnected from the circuit by cutting the wire between it and L2. So, we use our side cutters to isolate L1, and now the multimeter reads two ohms.
Always isolate the component before testing resistance to ensure it’s the only path between the meter leads.
- It is essential to disconnect power from the circuit before conducting a resistance test.
Why? Because you want to prevent introducing an additional power source from the meter into a live circuit. If you make this mistake, it’s usually not dangerous with modern multimeters that are protected against such issues.
However, older-style analog meters could actually explode if used on a live circuit.
Practical troubleshooting example
Ok, let’s troubleshoot a straightforward circuit to demonstrate why live testing is preferable to resistance testing.
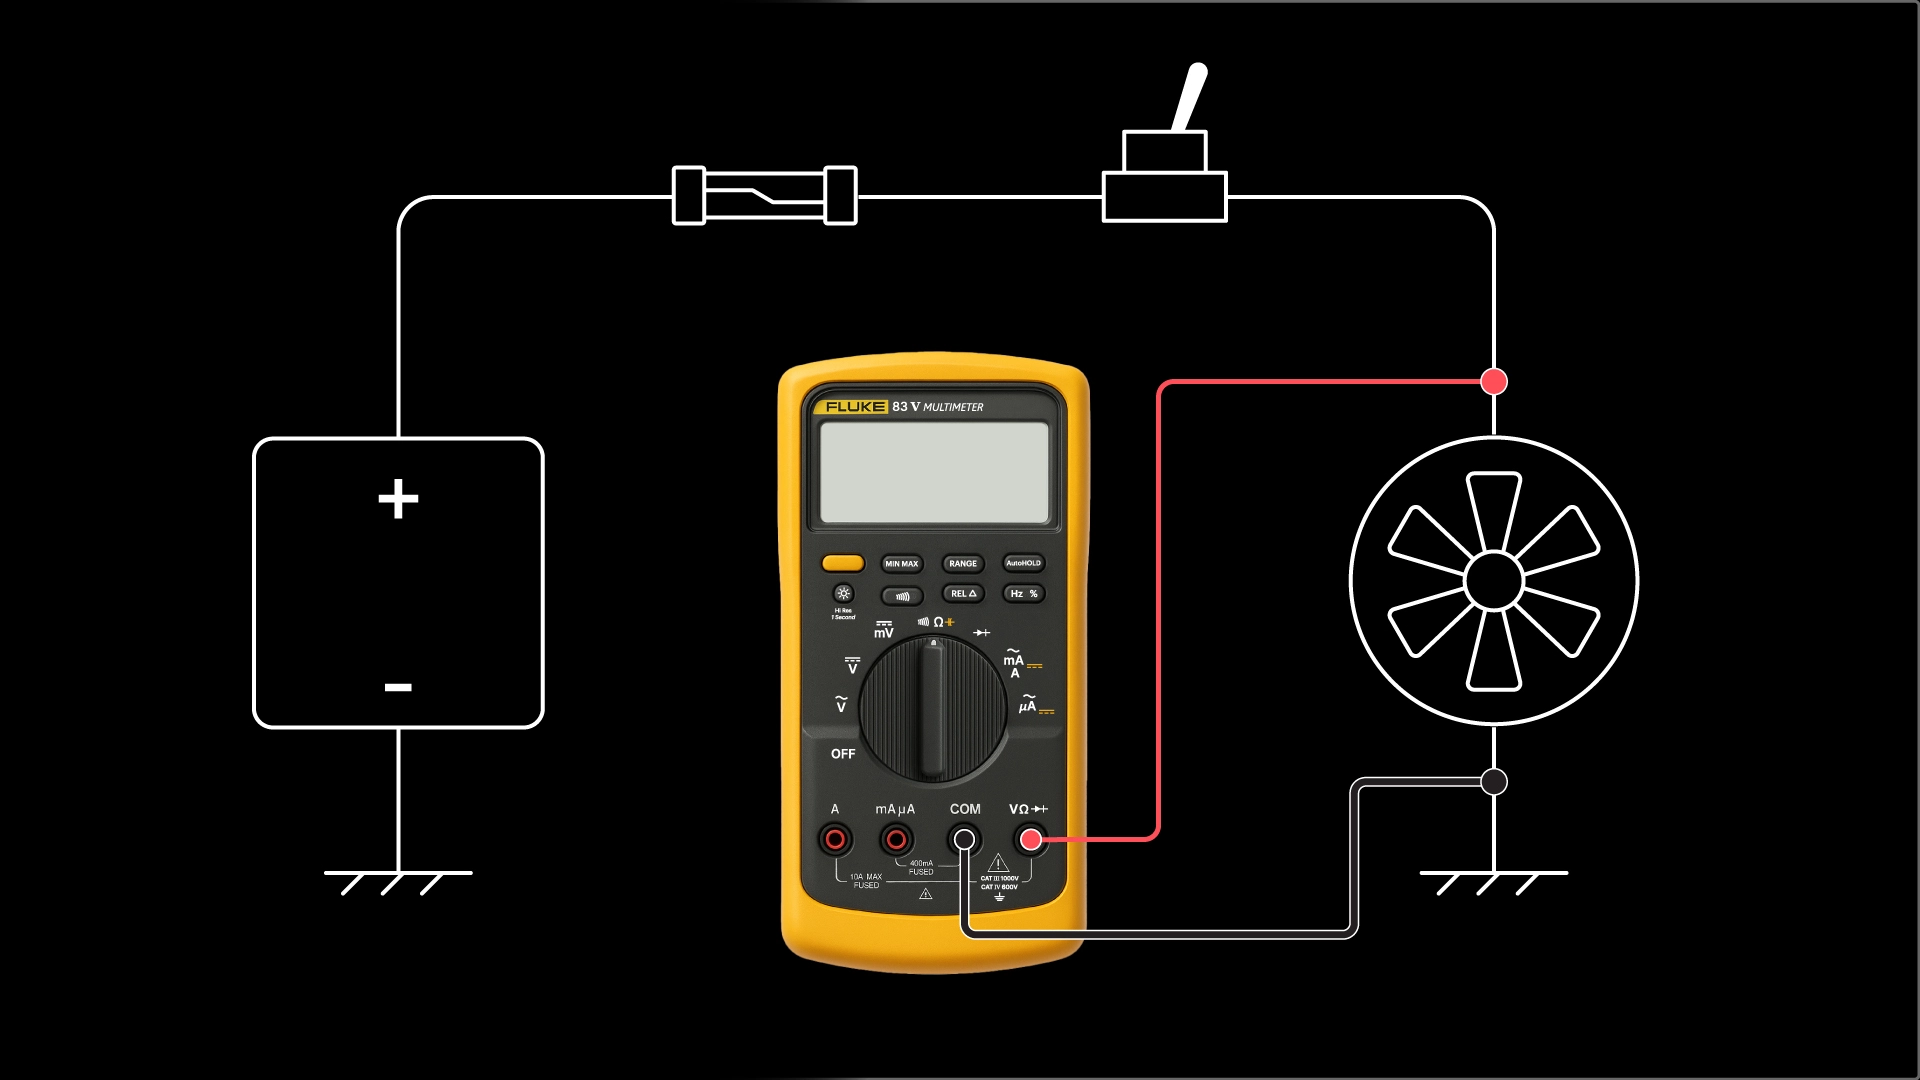
Our circuit includes a 24V power supply, a fuse, an SPST (Single Pole, Single Throw) ON/OFF toggle switch, and a fan.
Here’s the issue: the fan doesn't start when the switch is turned ON. We could take a shotgun approach and replace each part until it works, or we could test each component's resistance with our digital multimeter until we find the faulty one.
The first method isn’t ideal. The second is problematic and inefficient, as we'd need to disconnect the power supply and physically remove or isolate each component.
Testing the fuse might be straightforward if it's in a fuse holder or socket. However, testing the switch or fan would require more drastic measures, such as cutting wires.
Live testing procedure
Let’s conduct a live testing procedure to identify the fault. The first step is to attach the black lead of the multimeter to the chassis ground. Then, we will proceed by taking voltage measurements in the circuit.
The most probable fault is the fan, but we won’t jump to any early conclusions before continuing.
You might be tempted to check the fuse by removing it and testing its resistance or continuity.
If the circuit is powered, you can check the fuse’s condition without removing it: measure the voltage on each side of the fuse. If both sides read 24 V, the fuse is good.
If the battery side reads 24 V and the switch side reads 0 V, the fuse is blown. This method is quicker, safer, and avoids unnecessary handling.
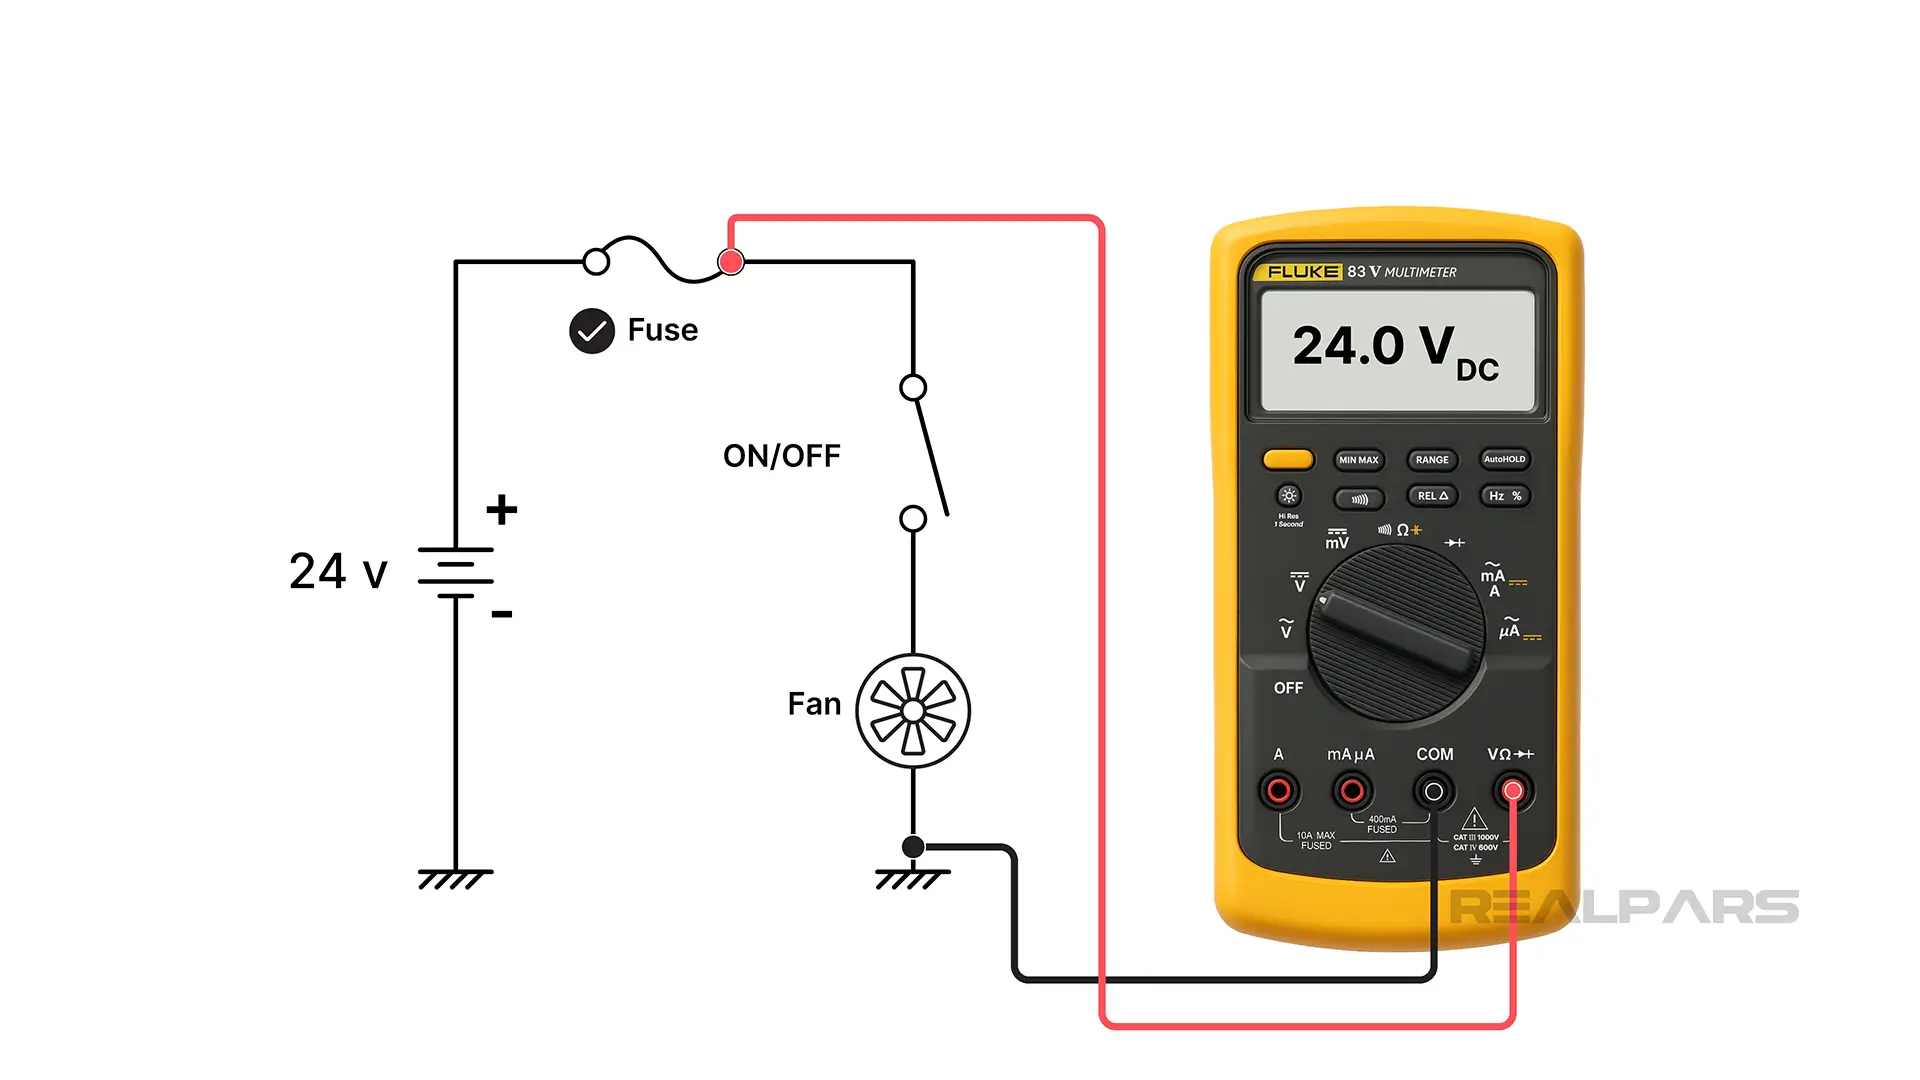
Let’s try a different method. We turn ON the switch or close it and connect the red meter lead to the switch side of the fuse.
If the reading is +24V, the fuse is fine, and it tells us to take another measurement closer to the fan.
Let’s put the red meter lead on the switch side of the fan.
If the reading is 0 V DC, it could indicate a defective switch or a broken wire at the switch.
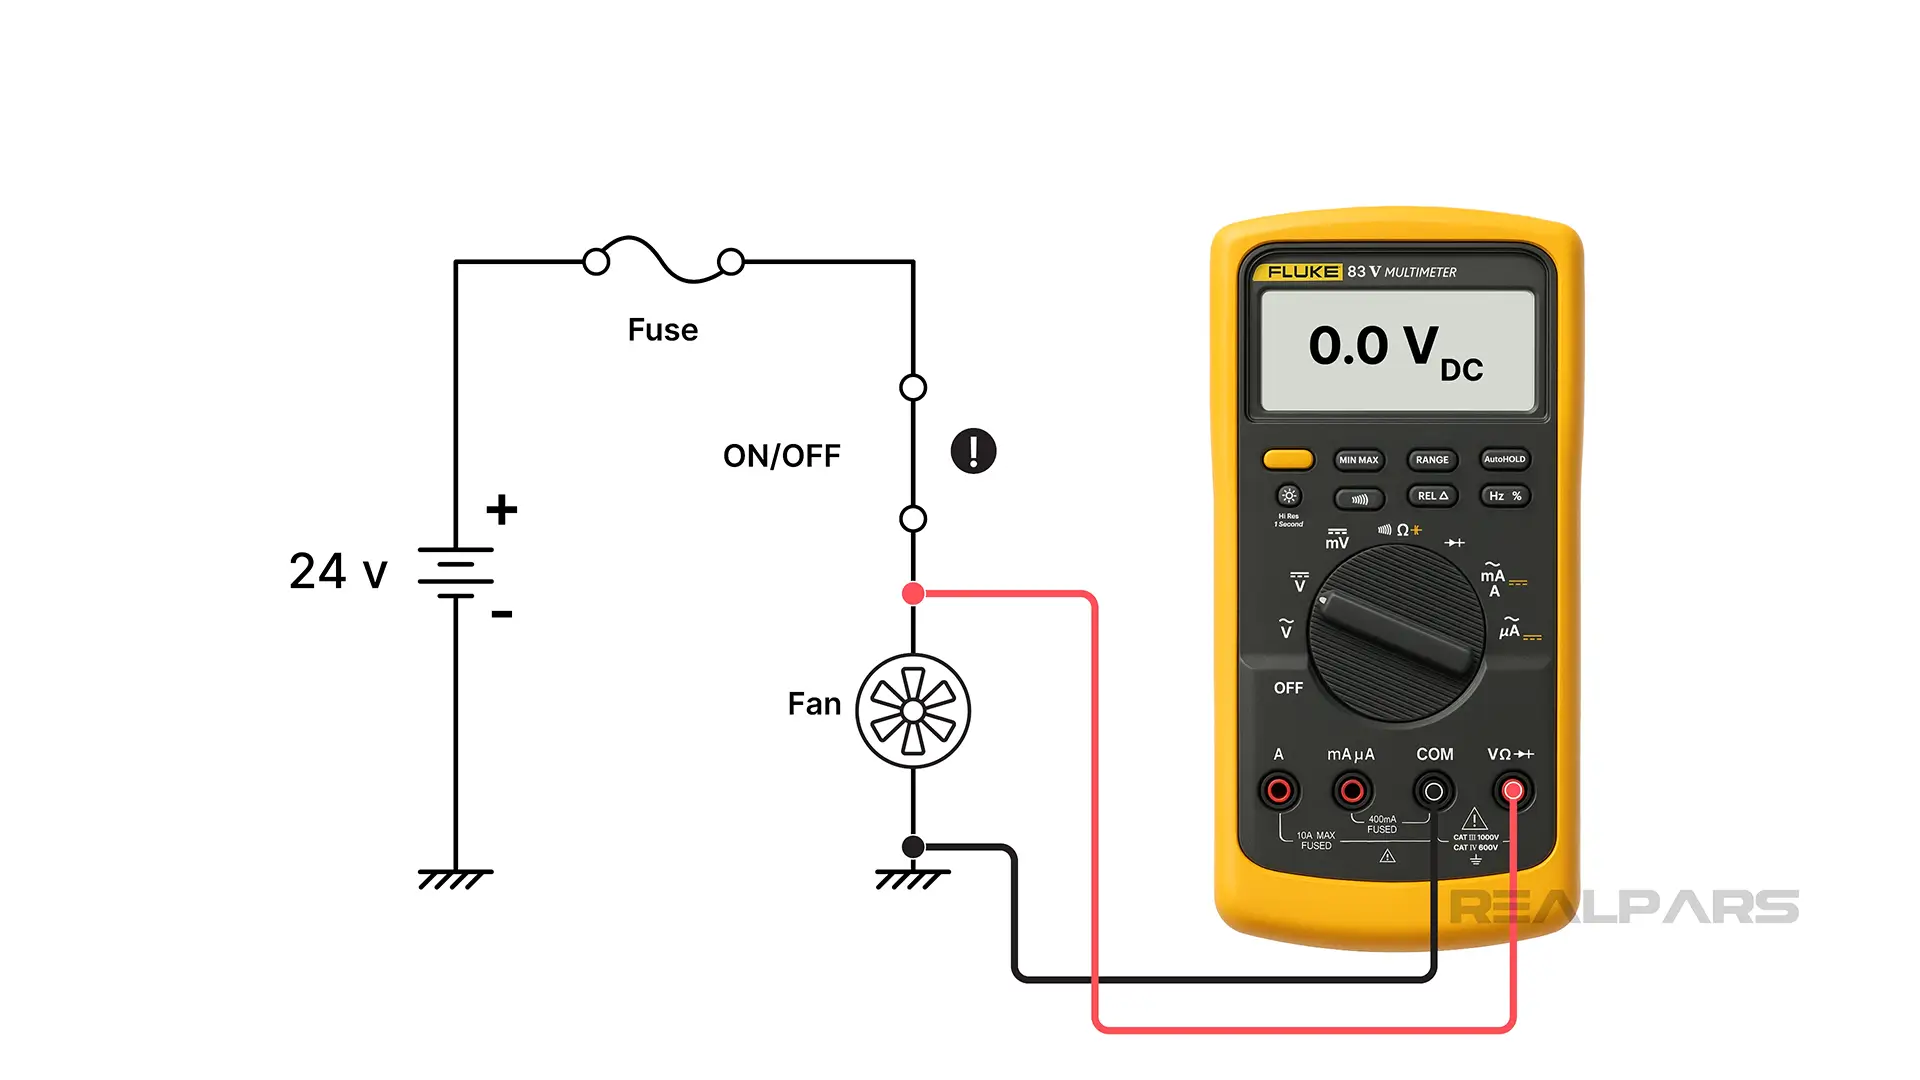
If the reading reads +24V, the switch is functioning properly. It might be the fan causing the issue, but it could also be a broken wire or a corroded connection between the fan and the chassis ground.
One more measurement will give definitive proof of the fan's condition. Place the red meter lead on the ground side of the fan. If the reading is +24V, the fan is good. If the reading is zero volts, the fan is faulty. No more voltage or resistance testing is needed. You can safely replace the fan.

Conclusion
Ok, that’s a wrap for this article. We hope we have convinced you that live testing is probably the better choice than resistance testing when you are troubleshooting.