
In this article, I’m going to explain how a 3-phase motor electrical wiring diagram works in a simple and easy-to-follow way.
Prefer watching instead? Check out the video below, or keep reading for the full step-by-step explanation.
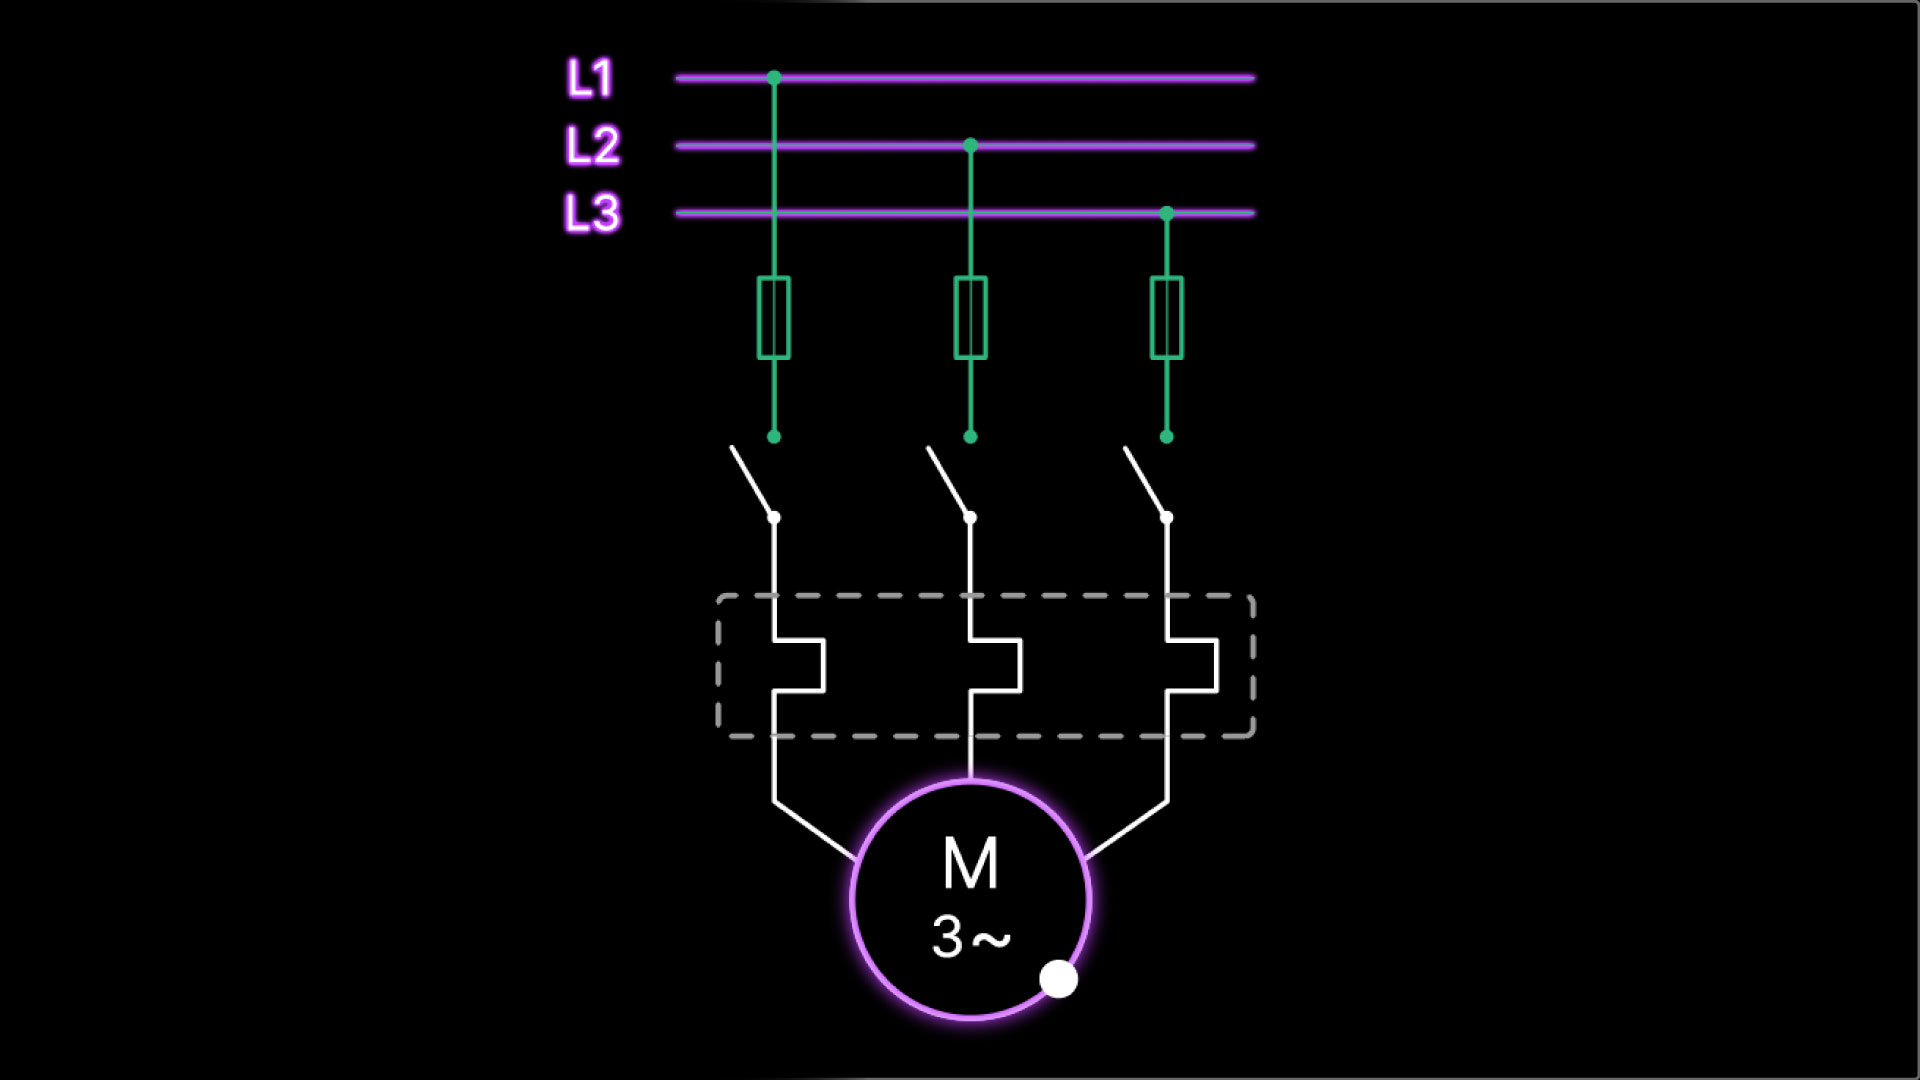
Okay, this is a very basic and common wiring diagram to turn on an electric motor.
Why do we use 3-phase power?
If I zoom in here, you see that this is a three-phase electric motor, which means this is a big, powerful, heavy electric motor.
Now, if I go to the top, as you can see, I have L1, L2, and L3 here. These are the power wires that we use to power the electric motor and turn it on.

The reason we have three wires here, instead of only one wire, is simply because, as I mentioned, this is a big, heavy industrial motor, so we need more power to turn it on.
So, that is why we need three lines of power instead of one.
For example, for a TV you have at home, it is okay to use only one power line because it is a small device compared to a heavy electric motor.
So, you can only use one power line to turn it on, but for big electrical equipment like this motor, we need more power, so we need to use three lines of power instead of one.
So, when we want to turn on small things at home like a TV or a washing machine, only one power line is enough.
That is why, on the back of your TV at home, you only see one cable, but when we need to turn on bigger things, we need three lines of power.
Why do we use fuses?
Okay, after the power wires, as you can see, we have some fuses here.

These fuses are here to protect all the wires and devices we have installed after them against too much electricity.
So, if for any reason, too much electricity wants to enter this electric circuit and damage the equipment, these fuses block it right here and won't let it damage the circuit.
And the way that they do it is by burning themselves and sacrificing their lives.
That means when there is too much electricity wanting to enter the circuit from here, they burn themselves, and by doing this, they cut off the circuit so that huge amount of electricity cannot enter the circuit and damage the equipment.
So, these are like brave soldiers that sacrifice their lives at the border of this circuit so everything else can stay safe.
How does a fuse work?
Now, how does this exactly happen?
Inside each of these fuses, there is a very thin metal wire.
When there is too much electricity passing through these metal wires, they burn and cut off the circuit, and that is how they stop that overload of electricity to the circuit.

Now, when this happens, we need to do two things.
Number one, we obviously need to find out what caused the overflow of electricity coming to the circuit so we can possibly fix it so it never happens again.
And number two, we need to replace the dead fuses with new ones so that if this ever happens again, they can protect the circuit again.
And by replacing, I mean we need to simply open up each fuse by hand, take out the dead fuse, and replace it with a new one.
What is a contactor?
Okay, after the fuses, we have the contactor. As you can see, this is a simple switch. But instead of one contact, it has three contacts.
The switches you have at home that you use to turn on and off the lights, they have only one contact, but this one has three contacts.
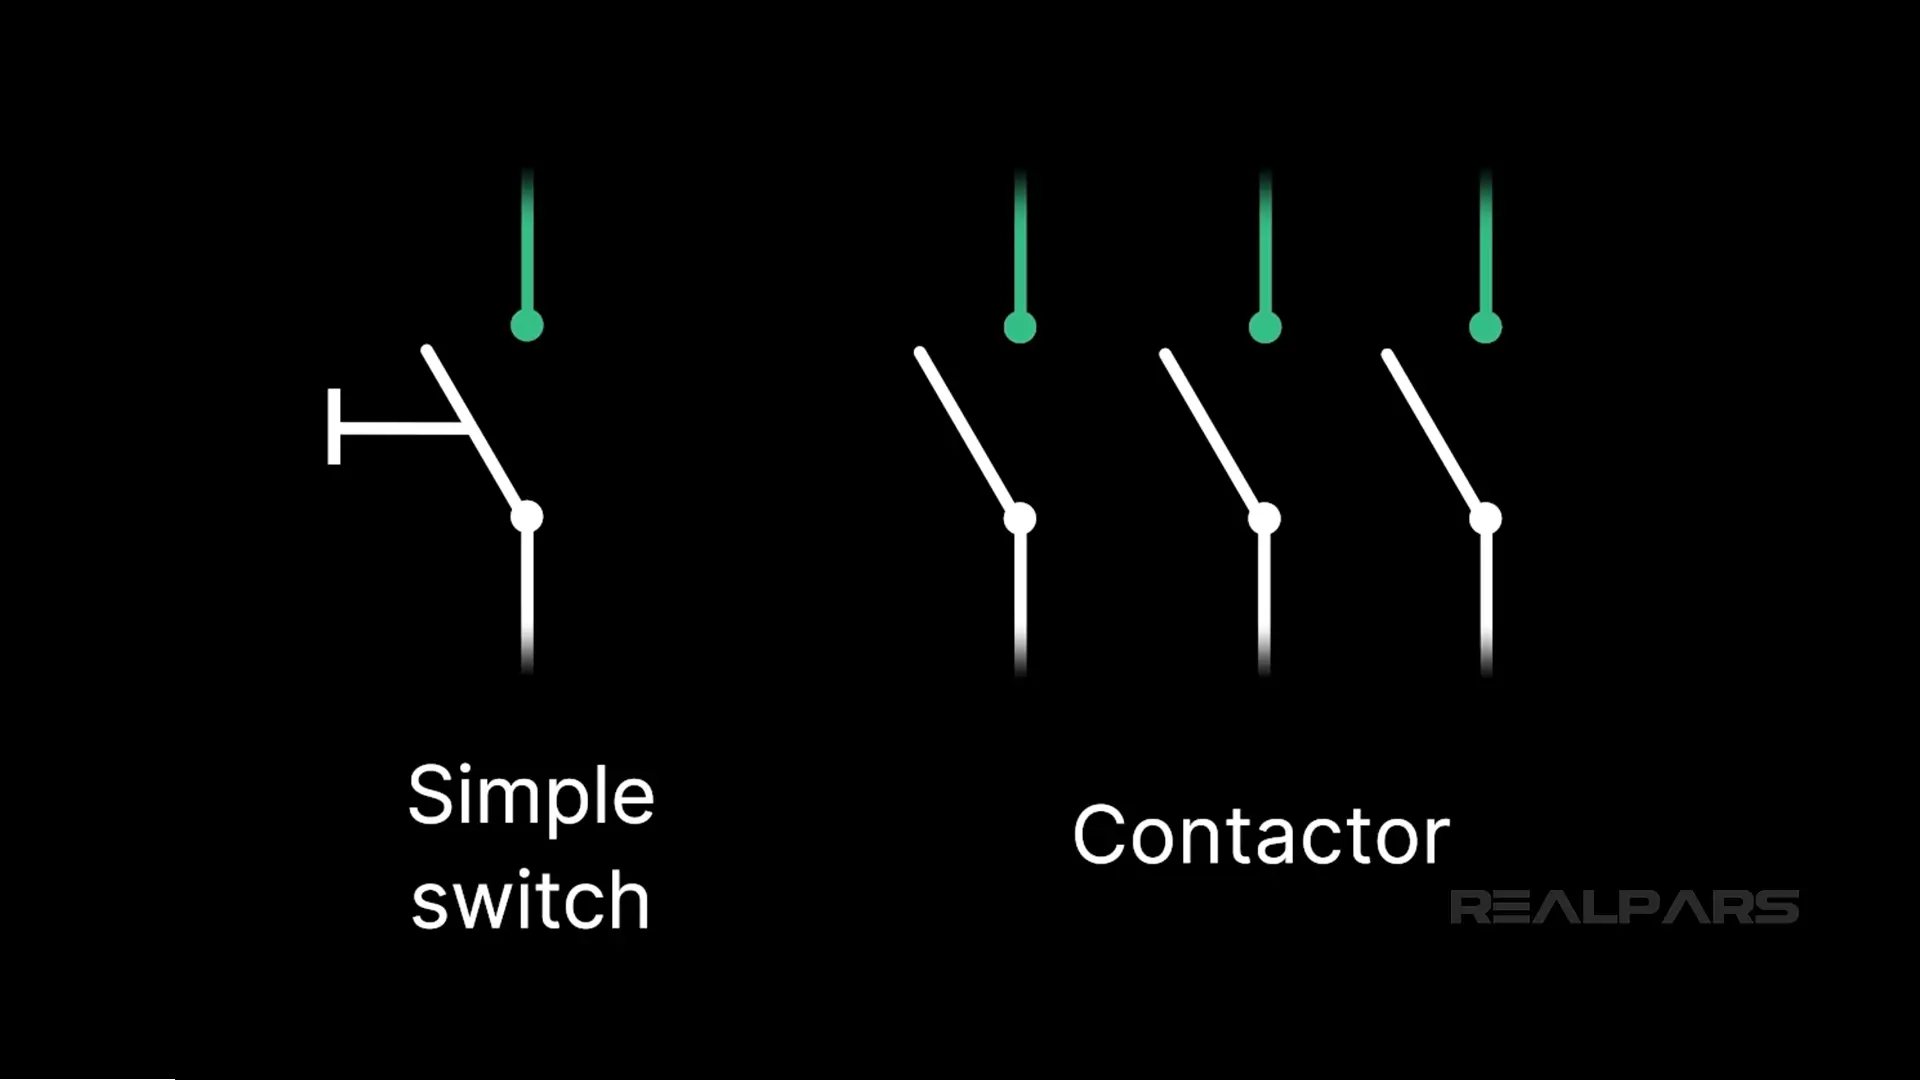
And the reason for that is simply because at home you have only one line of power, so a switch with only one contact can do the job for you, but here we have three lines of power, so we need a switch with three contacts.
Now, just like any other switch, using this switch we can cut off the electricity, and by doing that we can turn off the motor or we can let the electricity pass and turn the motor back on.
As I mentioned, the main difference between this switch and a simple switch you have at home that you use to turn on and off the lights is that this one has three contacts and those you have at home, they only have one contact.
But another difference between this switch and a simple switch you have at home is that you cannot just come close to this switch and simply push it and turn it on and off. Why?
Because it is not safe. This is three-phase power.
Now you may ask, if we cannot come close to it, how can we turn this switch on and off here?
Well, we do that indirectly and from a distance.
How does a contactor work?
So, the way that a contactor works is that each contactor, in addition to these three contacts, also has a coil.
Now, what is a coil?
A coil is just a very long wire that is wrapped in loops.
So, if you take a very long wire and then wrap it into many loops, you can build a coil.
Now, the interesting thing is that if you connect electricity to a coil, it turns into a magnet.
So, you take a very long wire.
You wrap it into loops, and it becomes a coil.
Now, if you take that coil and connect electricity to it, it turns into a magnet.
So, from wire to a coil to a magnet.
Now, let’s go back to the contactor.
In a contactor, we have three contacts and a coil.
If we connect electricity to the coil, even a tiny 24-volt power, it turns the coil into a magnet.
Now, this magnet can pull in the contacts and close them.
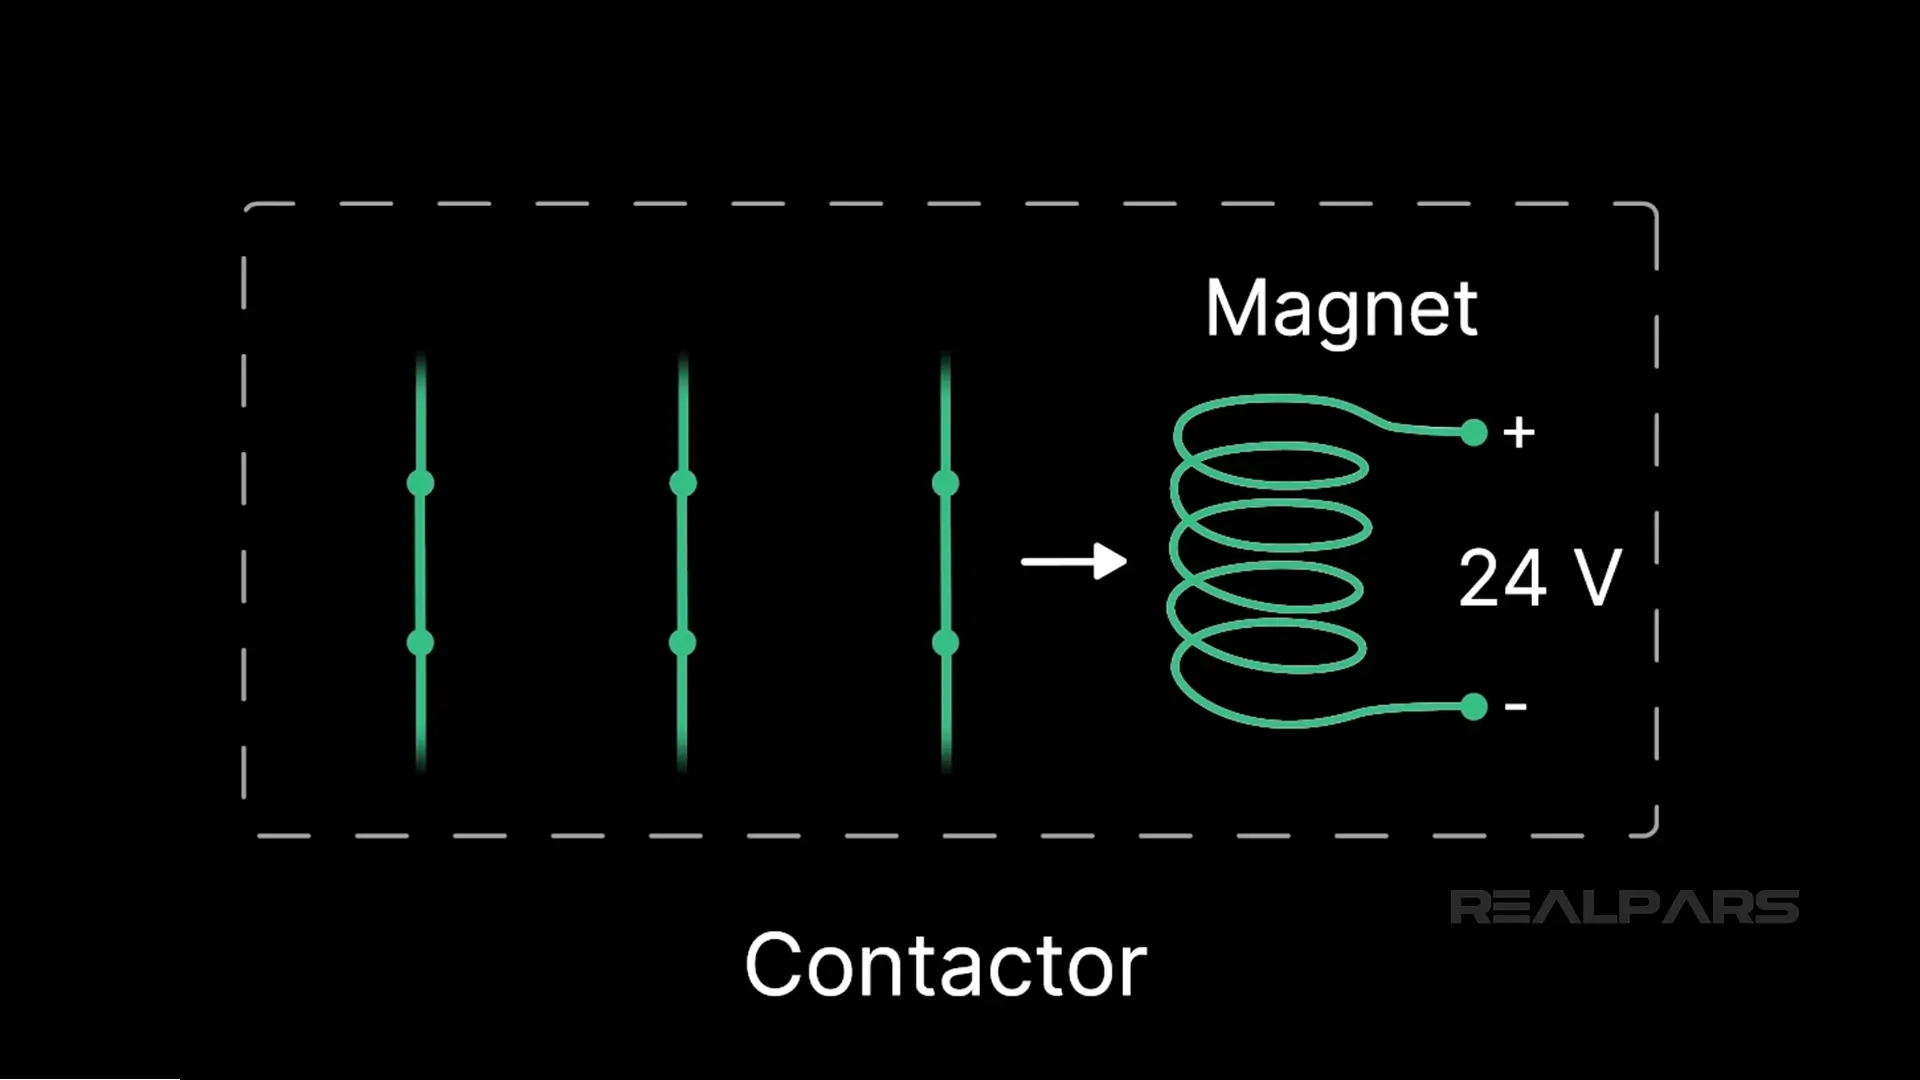
And when the contacts are closed, the electricity can flow and turn the motor on.
Now, if I stop powering the coil, it stops behaving like a magnet and lets the contacts go back to their previous position.
And when this happens, the electricity cannot flow to the motor anymore, and the motor stops.
So, you see, what happened here?
We used a coil to indirectly open and close these contacts, and by doing that, we could turn on and off the motor.
Again, why do we bother to do this?
Because a three-line power is simply too dangerous to get close to, so we as humans have figured out a way to turn it on and off from a distance.
So, inside every contactor, there are three main contacts and a coil.
The coil can work with a small 24-volt power, and this 24-volt power can be controlled using a switch we can touch.
So, we push this switch, it gets the tiny 24-volt power to the coil, which is enough to turn it on.
When the coil is turned on, it turns into a magnet and pulls the contacts in and closes them.
So, instead of putting a switch here and directly interacting with these contacts, which is too dangerous, we put it behind a safe coil, turn it into a magnet, and open and close these switches indirectly and without getting too close to them.
So, now I hope you understand how a contactor works.
And if you want to learn more about different methods for starting an electric motor, check out our Motor Control article.
Why is a contactor labeled with “K”?
Now, the first time that I saw a contactor in an electric wiring diagram like this one, I asked if we write the contactor with a C like this, why do we show it with K, like this one that you see here?
For example, if we write the contactor like this, here we should have C1 instead of K1.
When I dug deeper, I found out that we use the word C when we have a Capacitor in our wiring diagram, so we cannot use that for a contactor.
But why do we use K instead?
The word K here stands for Kontakt, which is German for Contact. So, that is why we use K here.
Of course, there is another word for a contactor in German which is more common, and that is Schütz. So, the word contactor in German is Kontakt or Schütz.
So, if you ever happen to work with a German colleague and you want to impress them, you can use the words Kontakt or Schütz instead of contactor.
What is an overload relay?
Okay, so far you understand why we use three-phase power, why we have these fuses here and how they work, and what is this switch here and how it exactly works.
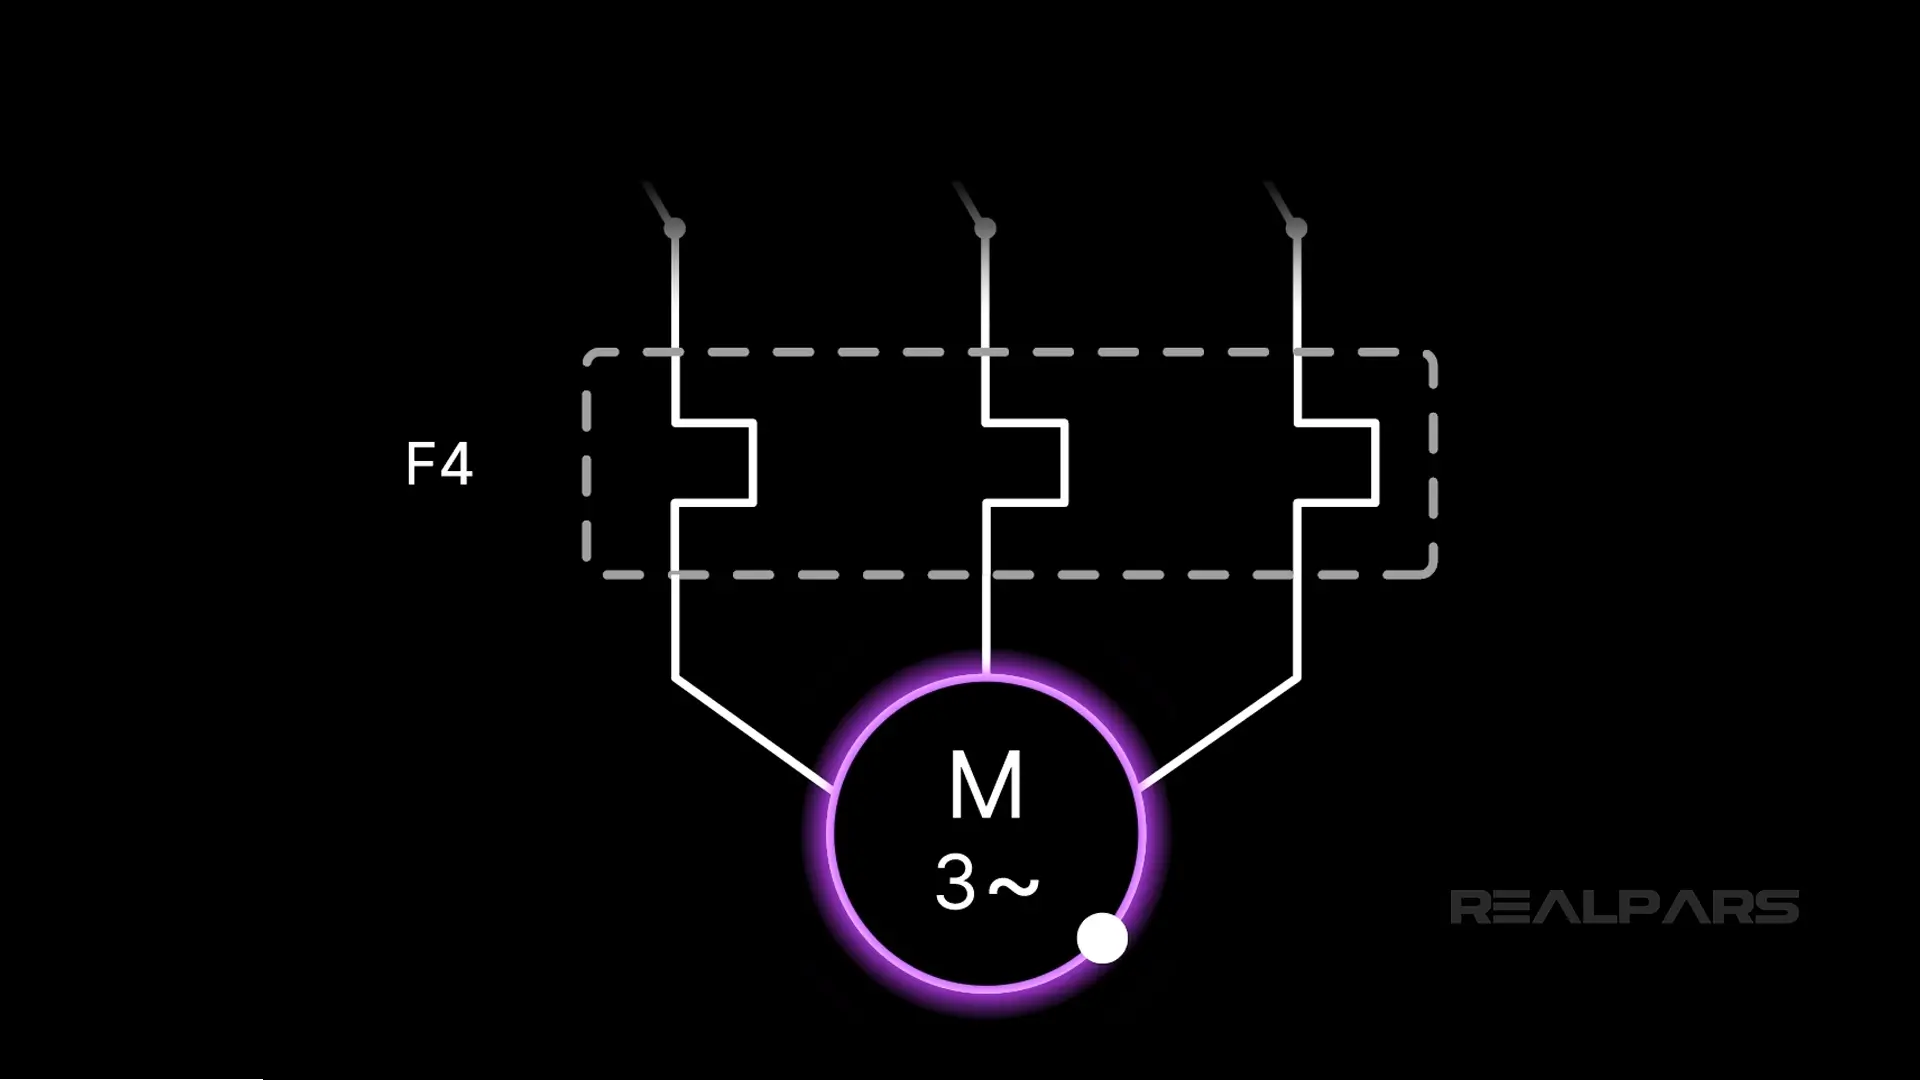
Now, let’s go a little bit down and look at this F4 here.
What is this? What is this F4 here?
This is not a fuse; instead, this is an overload relay. The job of this overload relay is to protect the motor against a slow increase of current.
For example, let’s say that this 3-phase motor that we have here is connected to a conveyor belt and it is used to run that conveyor belt.
Now, if for any reason something blocks the conveyor belt and at the same time the motor keeps pushing the conveyor belt while it is not moving, the motor uses more power and more electricity because it wants to move the conveyor belt.
And when that happens, the motor temperature goes high, and if that goes on for a long time, it can damage the motor.
So, to prevent this, we put an overload relay right before the motor.
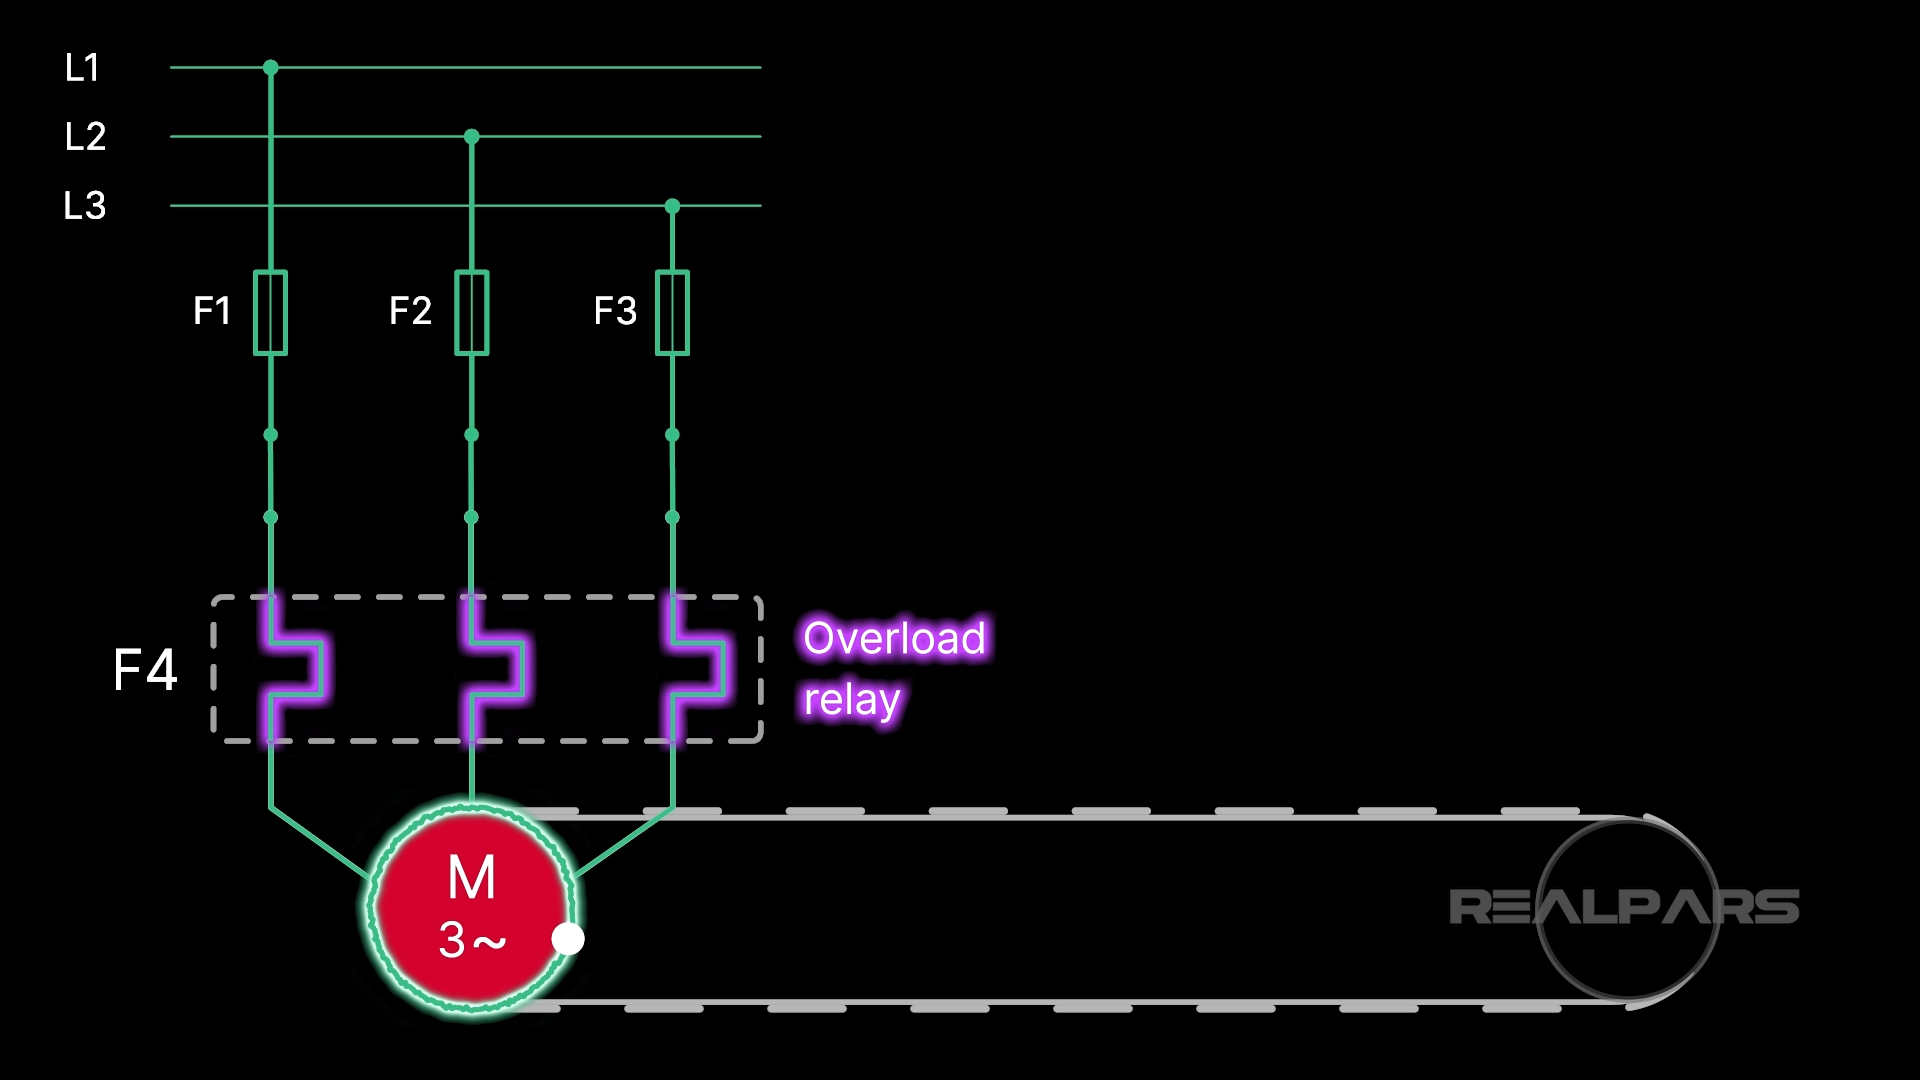
If the motor starts to get a lot of current from the circuit and that continues for a long time, then this overload relay can cut off the power and protect the motor.
Fuse vs overload relay
Now, you may ask what the difference is between this overload relay and the fuses we have up here.
The fuses that we have here protect the circuit against a sudden increase of current.
For example, if two wires touch each other and there is a short circuit, all of a sudden, a huge amount of current flows into the circuit.
But since we have these fuses here, on each line of the power line, this huge amount of current cannot pass from here and will be blocked by the fuses.
However, if the current increases slowly, let’s say over 5 minutes, these fuses cannot detect that, but instead, the overload relay can sense that and cut off the circuit.
So, a fuse is good when the current increase is fast and sudden, like a short circuit, but an overload relay is good when the current increase is slow.
So, fuses are here to act fast, but the overload relay acts slowly.
The other difference between a fuse and an overload relay is, when a fuse acts and cuts the circuit, we need to replace it.
This is because, as I mentioned before, when there is a sudden increase of current, the fuse burns and dies to cut off the circuit.
That is why we need to replace it.
However, this is not the same for an overload relay.
When an overload relay acts and cuts the circuit, we usually need to reset it, and then we are good to go again.
Summary
Okay, to recap, this is a wiring diagram of a 3-phase motor.
The reason we have three lines of power instead of one is simply because we have a big motor here and we need more power.
We have three fuses on each line of power. These are here to protect the circuit against a sudden increase of electricity or current. As a rule of thumb, we usually need to have our fuses as close as possible to the source of power.
After the fuses, we have our contactor. This works like a simple switch to turn on and off the circuit. Inside this contactor, there is a coil. When the coil is powered, it turns into a magnet and pulls in these contacts, and that is how we can close and open these contacts.
After the contactor, we have our overload relay. This is here to protect the motor against a slow increase of current.
Okay, there you have it. Now you understand the wiring diagram of a 3-phase motor, and hopefully, you can explain it to a friend or a colleague at work if you need to.

