
Hello and welcome back to another free article from RealPars, the world’s largest online platform for learning about cutting-edge industrial automation technologies.
In my previous IO-Link article, I explained how IO-Link can be used for sensor-to-controller communication to collect more data from sensors using a plant’s existing infrastructure. If you missed that article, you can find it here.
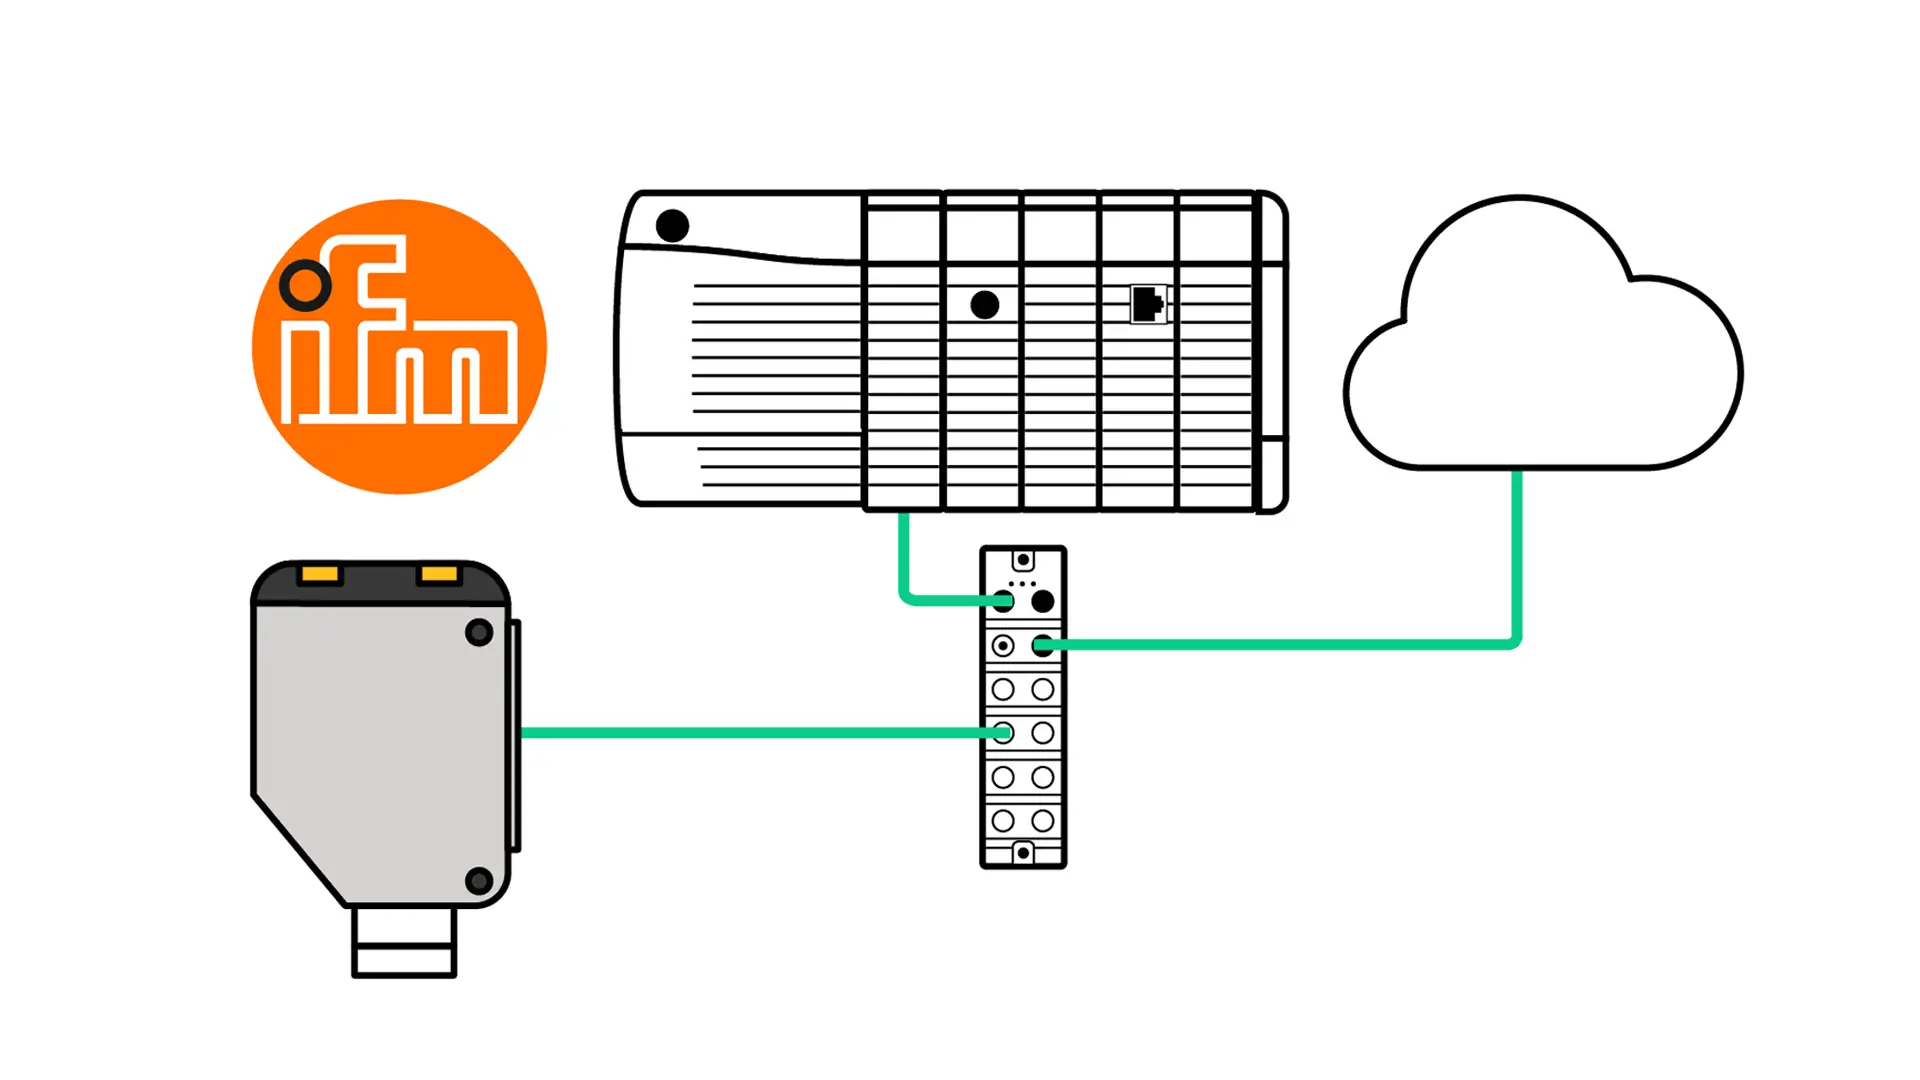
In today’s article, I’m going to show you how you can use ifm’s DataLine IO-Link Master modules to send data from sensors on the shopfloor to the cloud without modifying the control system. This is a really useful feature of ifm DataLine IO-Link Masters for two reasons.
First, it means that manufacturing companies can adjust the data that they are collecting without interrupting a running process.
Second, it means that companies can collect large amounts of data for analysis without affecting their PLC cycle time. Since data is sent directly from sensors to the cloud, there is no need for the PLC to do any data collection, aggregation, manipulation, or forwarding.
In this article, you will see a quick demonstration of how ifm DataLine IO-Link Masters can be used to send data directly to the cloud.
If you want to get hands-on experience with configuring and commissioning IO-Link products then check out our course IO-Link Essentials: Accelerating Towards Industry 4.0.
In this course, you will learn how to set up and commission an IO-Link Master and get an introduction to integrating IO-Link devices with PLC projects.
Let’s get started by reviewing the Y-Path of data in ifm DataLine IO-Link Masters.
The Y-Path of data in ifm DataLine IO-Link Masters
Industrial sensors generate a lot of data.
According to ifm, about 5% of the data generated by a typical sensor is process data that is used by the PLC to control the process.
The remaining 95% of the data generated by a sensor is additional information such as diagnostic information and alarms. Until recently, that information remained trapped in the sensor where it could not be used to improve process performance.
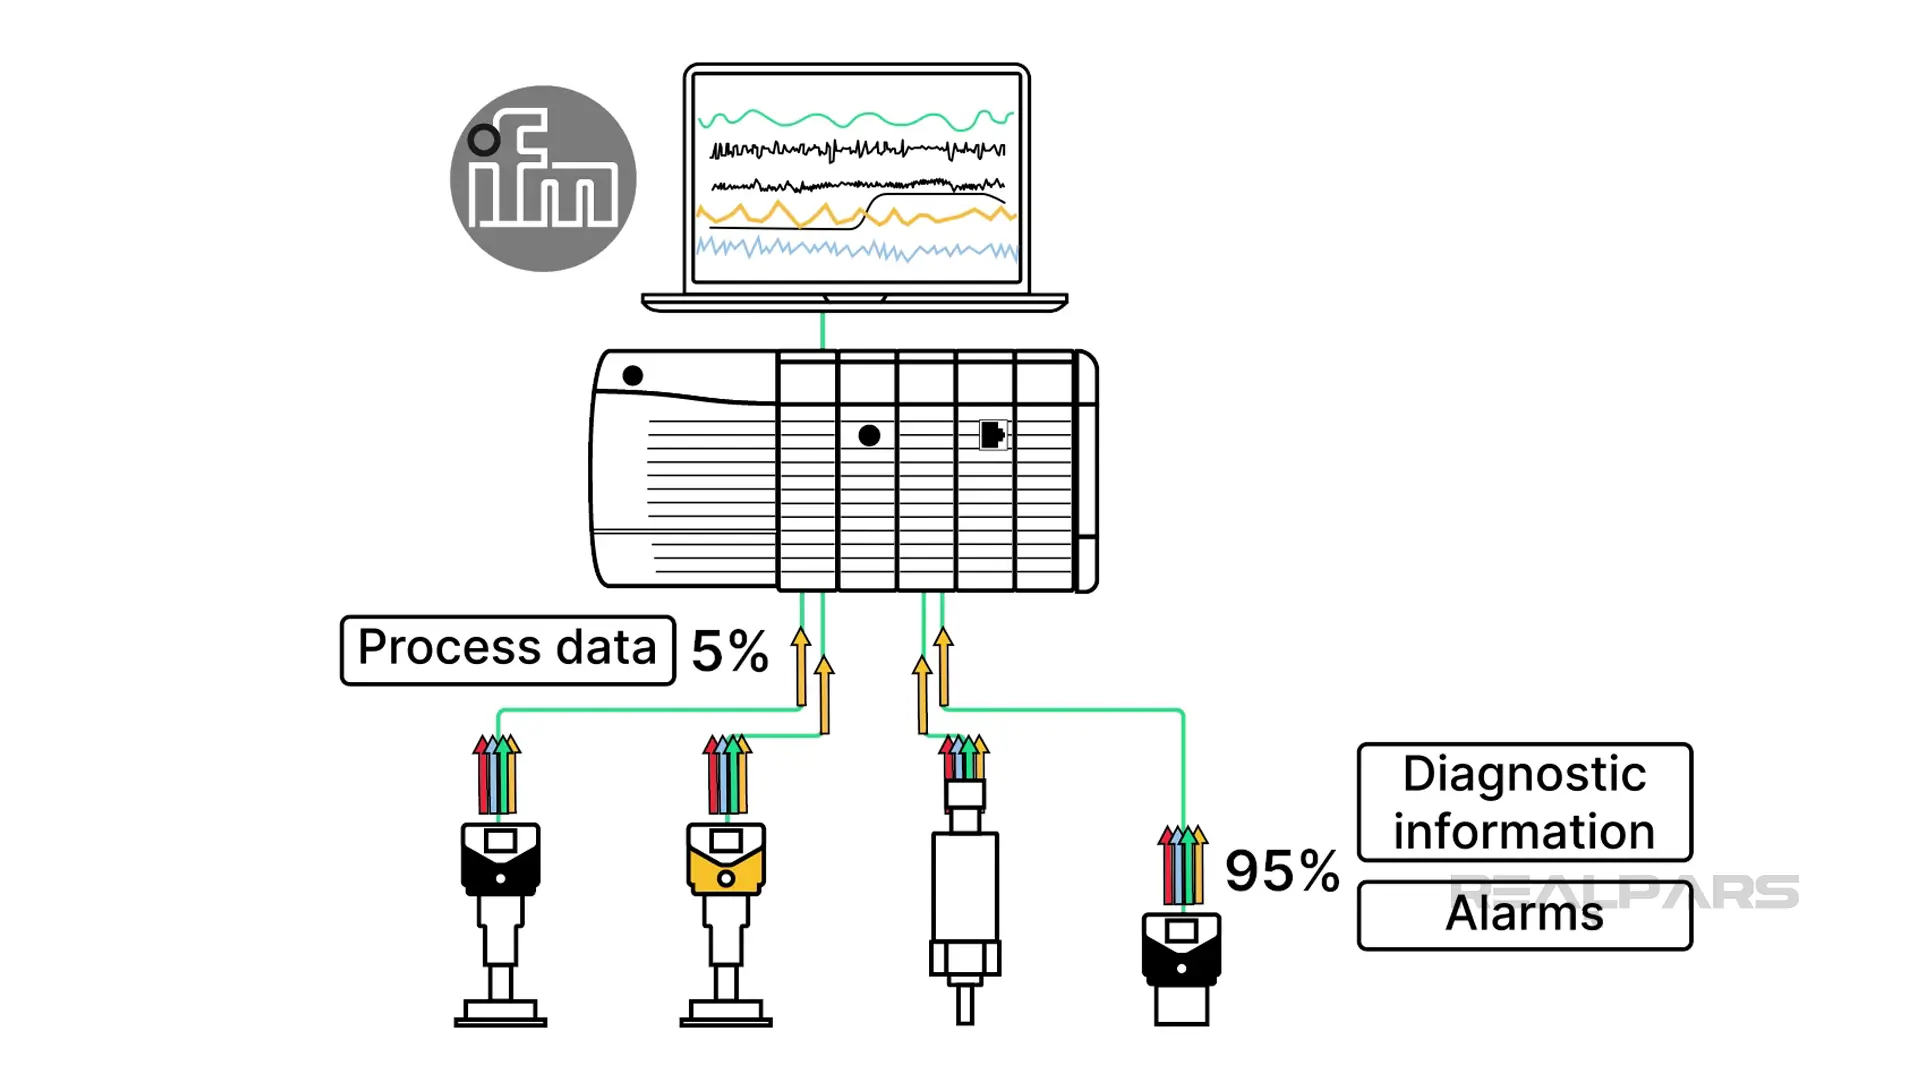
With ifm DataLine IO-Link masters, this additional information can be transmitted directly from the IO-Link Master to a higher-level software system without going through a PLC.
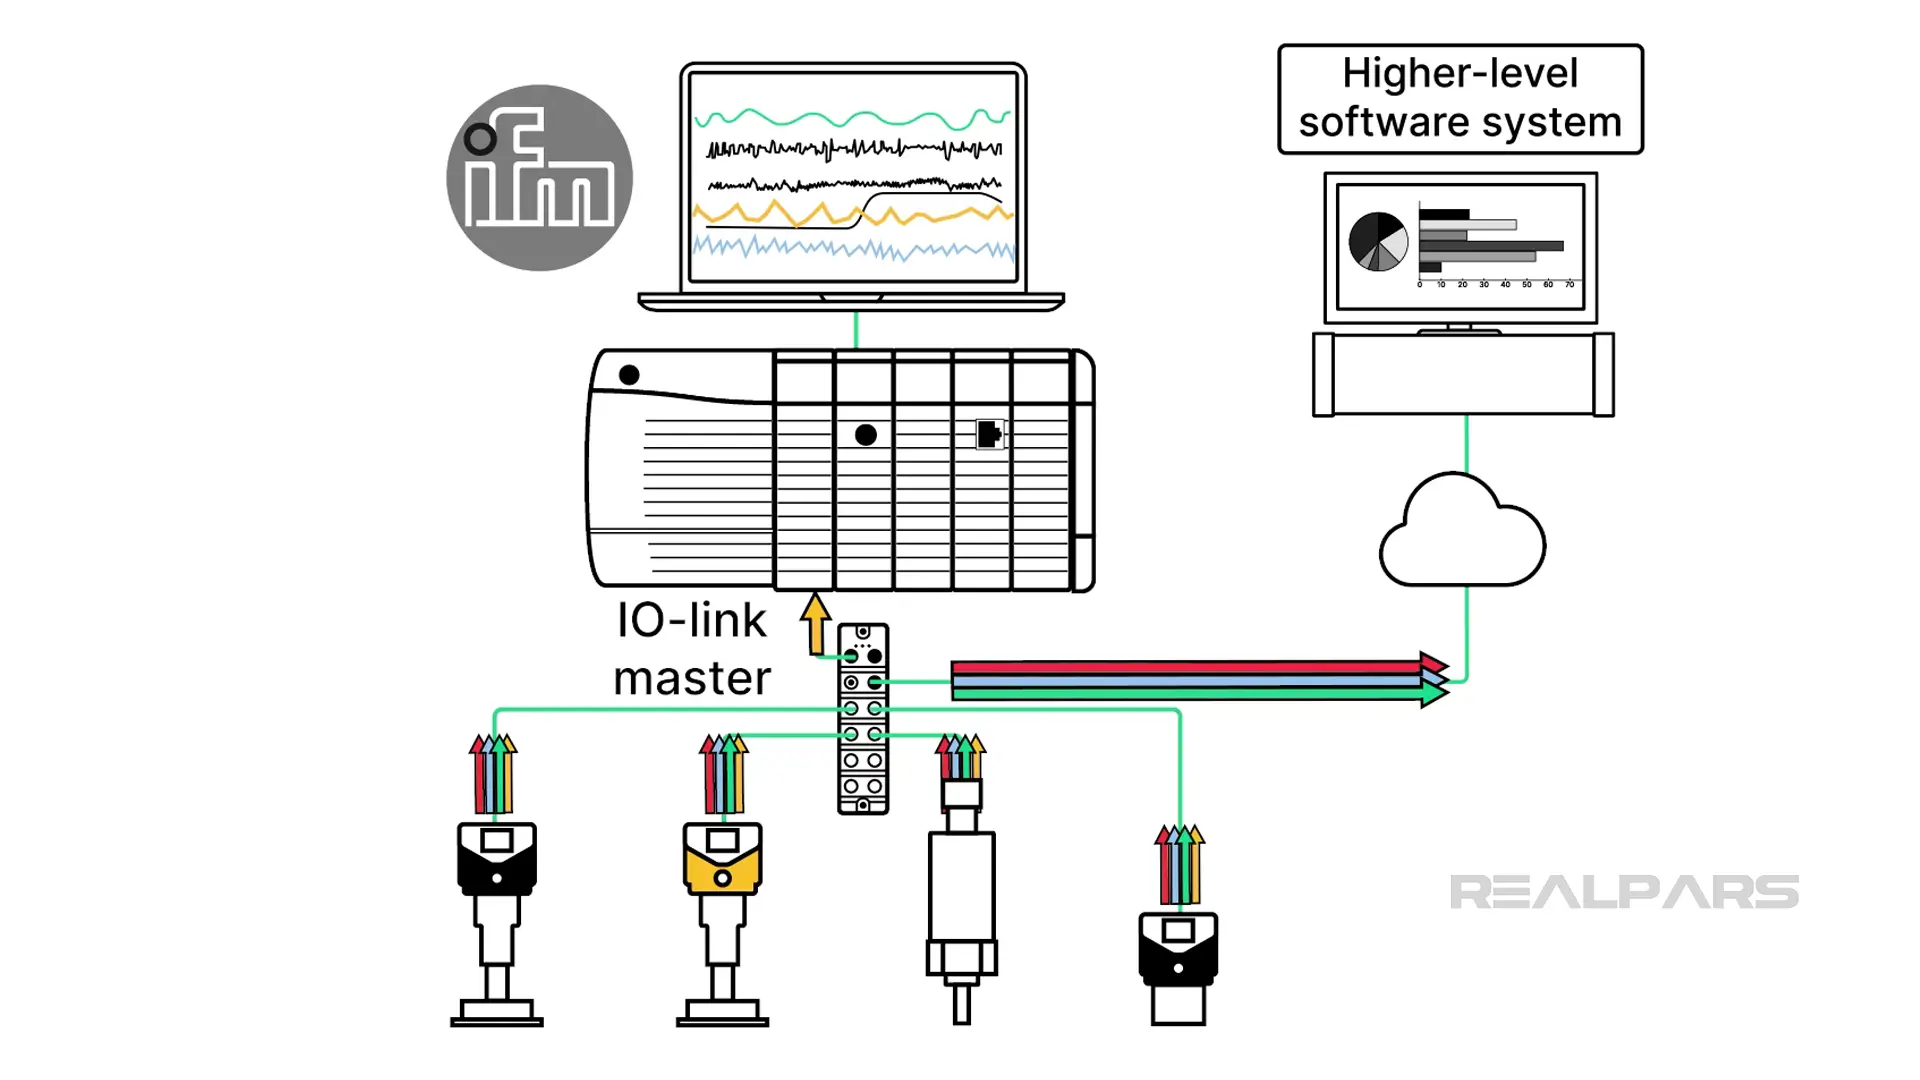
By using the IoT side of the Y Path, manufacturing companies can make full use of their sensor data for condition monitoring, energy monitoring, quality monitoring, and remote support services.
Manufacturing companies can send data directly from an IO-Link master to higher-level software systems using modern communication protocols such as MQTT, JSON, and HTTPS for storage and analysis.
Basically, companies can unlock their machines’ data to create value that was previously unimaginable.
Let’s see how we can use the Y Path to send data to a higher-level software system using MQTT.
Configure an MQTT connection
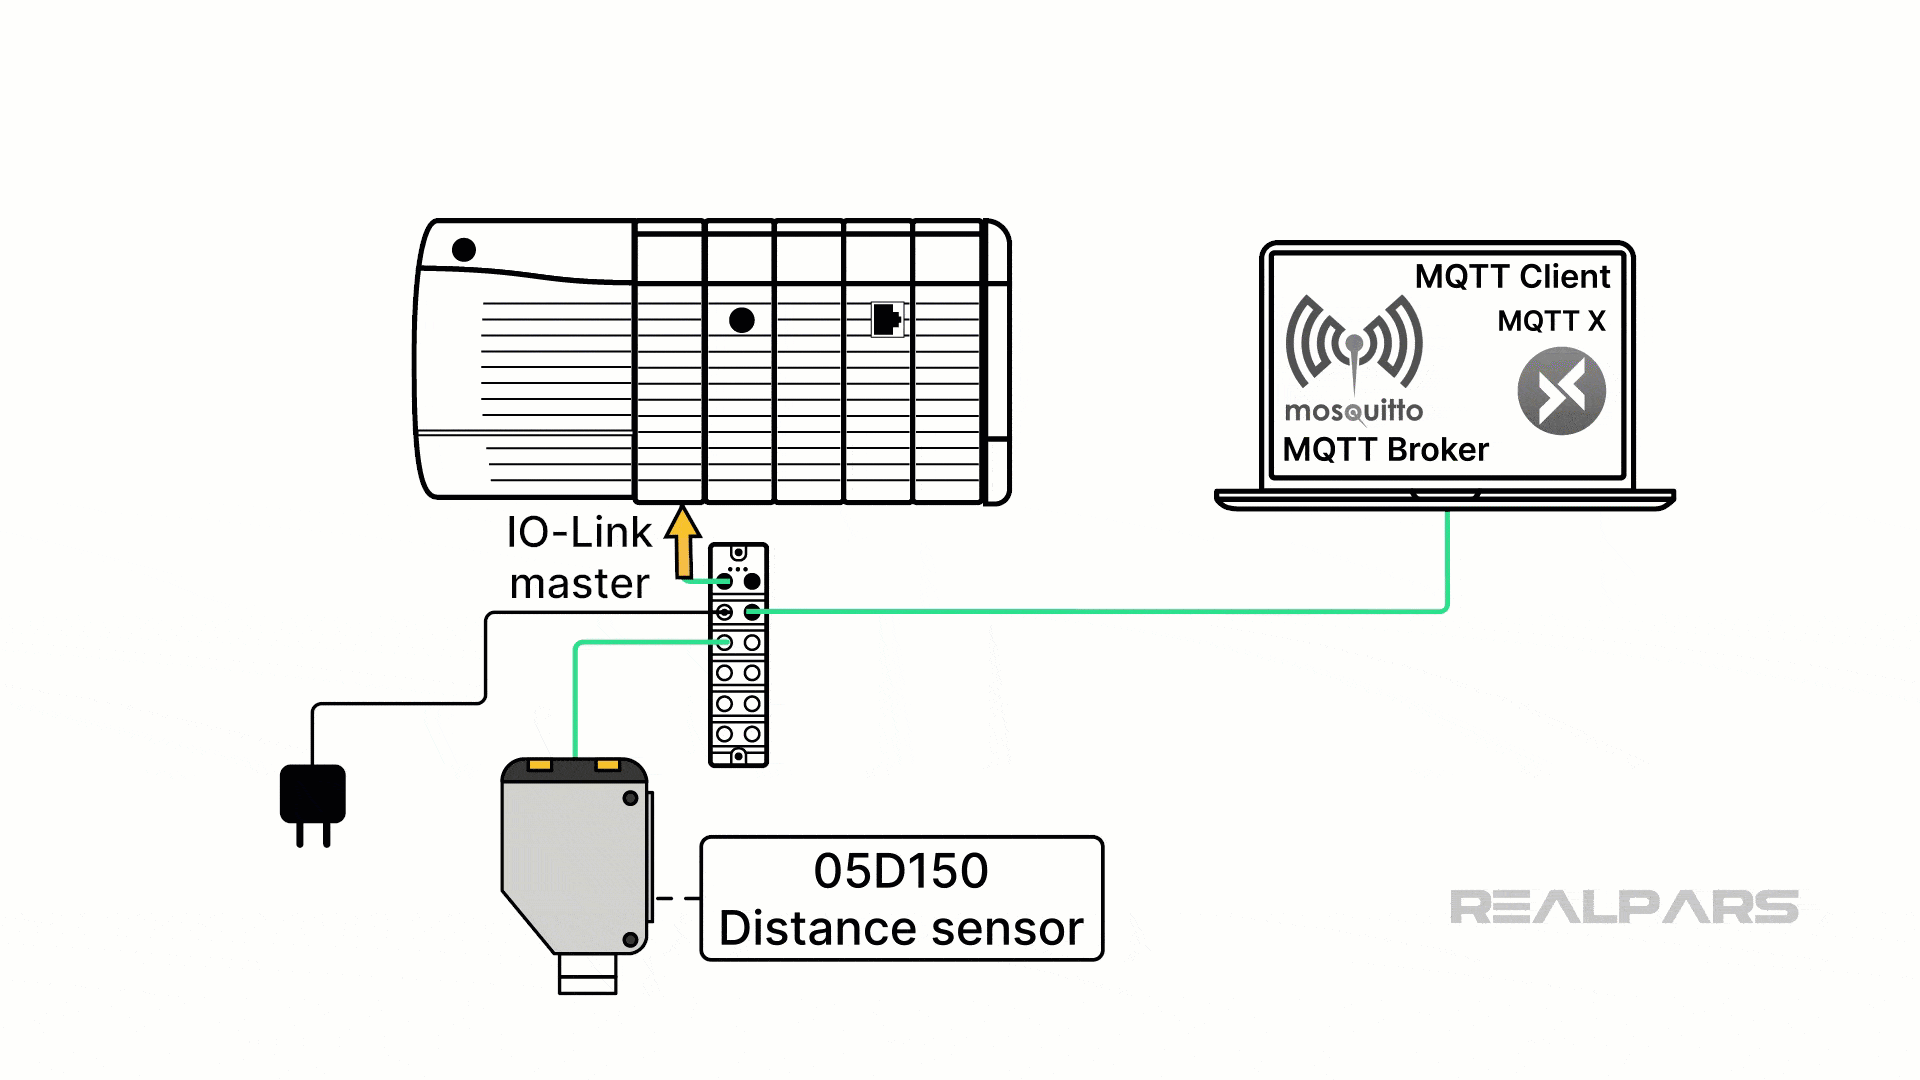
In this article, I’ll show you how to send data from a 05D150 distance sensor to the cloud via an AL1326 ifm DataLine IO-Link master using the MQTT protocol.
In case you haven’t heard of it, MQTT is a lightweight publish-and-subscribe communication protocol that is being adopted for IIoT communications.
To start, I connect the sensor to the IO-Link Master and the IO-Link Master to my PC. It is very important that I connect the IO-Link Master’s IoT Port to the PC and not the regular EtherNet/IP ports.
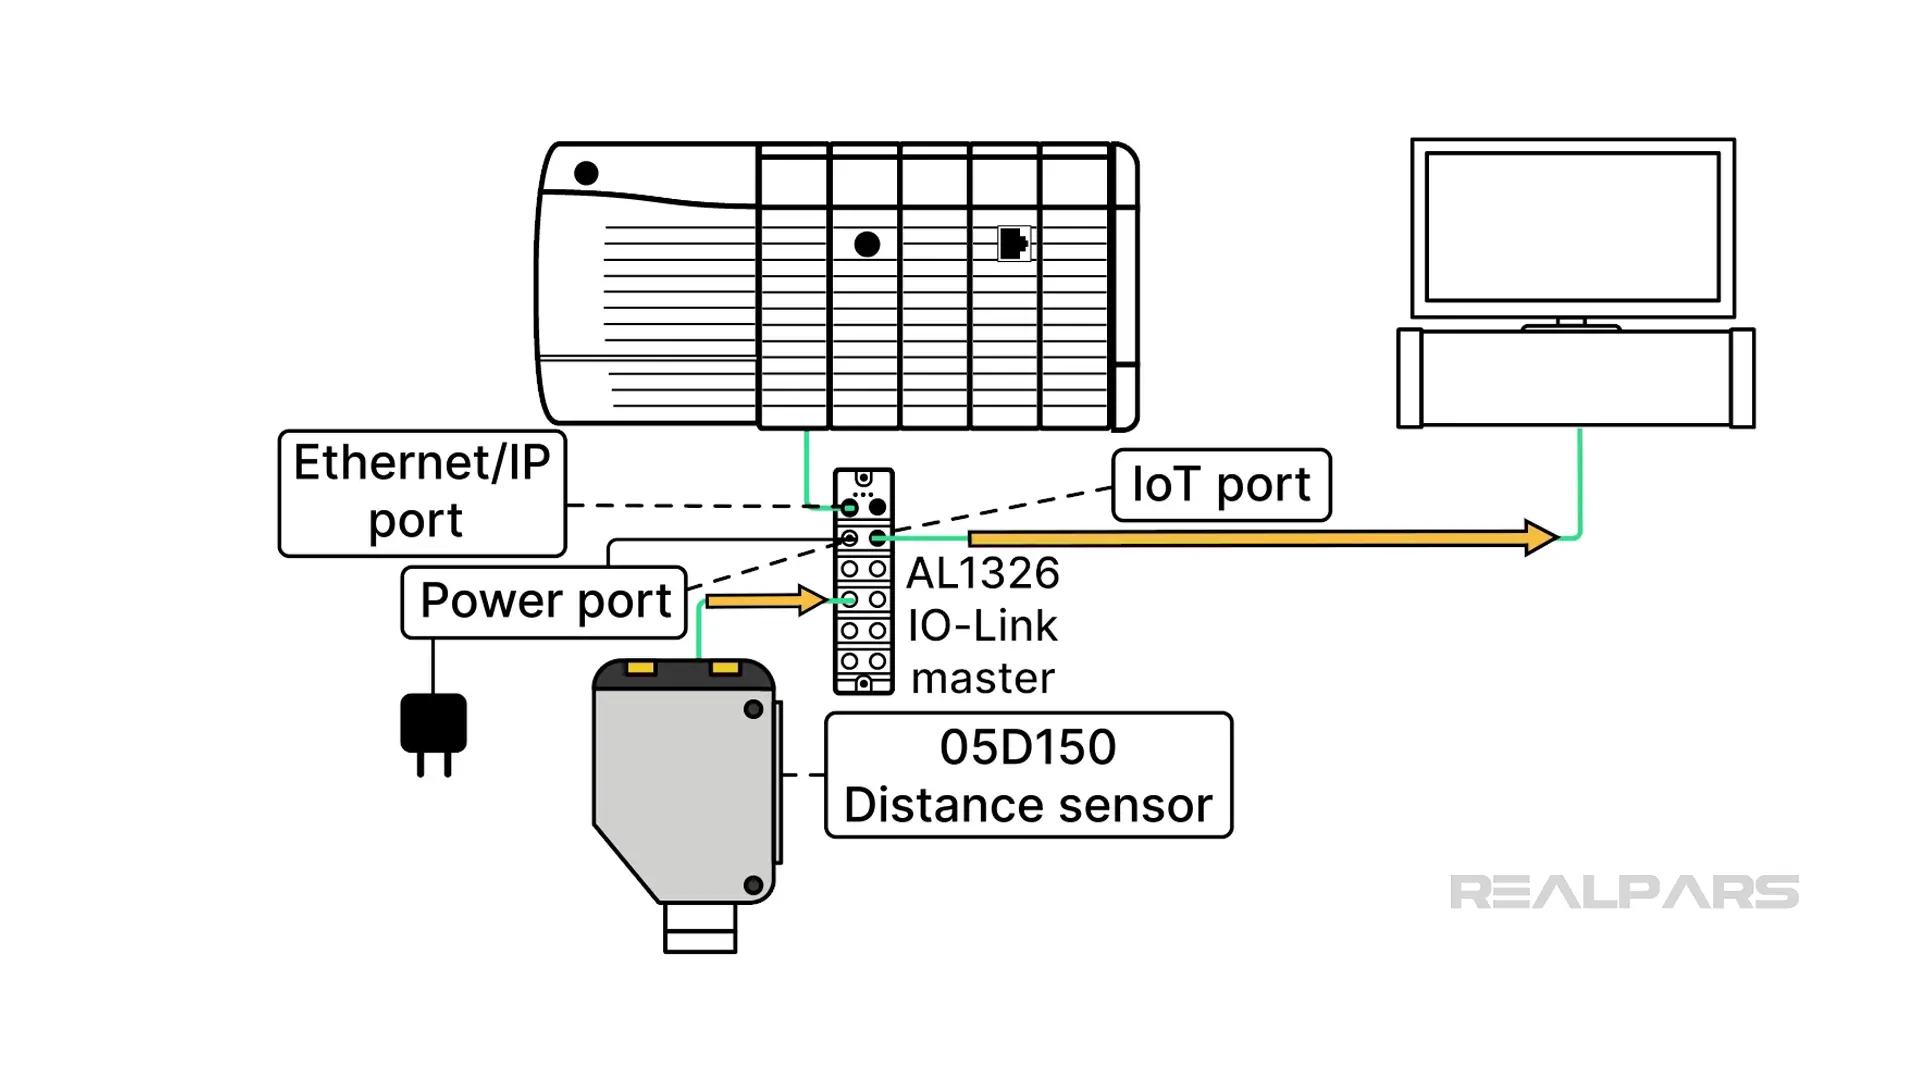
Once the hardware is connected, I power up the IO-Link Master by providing power to the Power port.
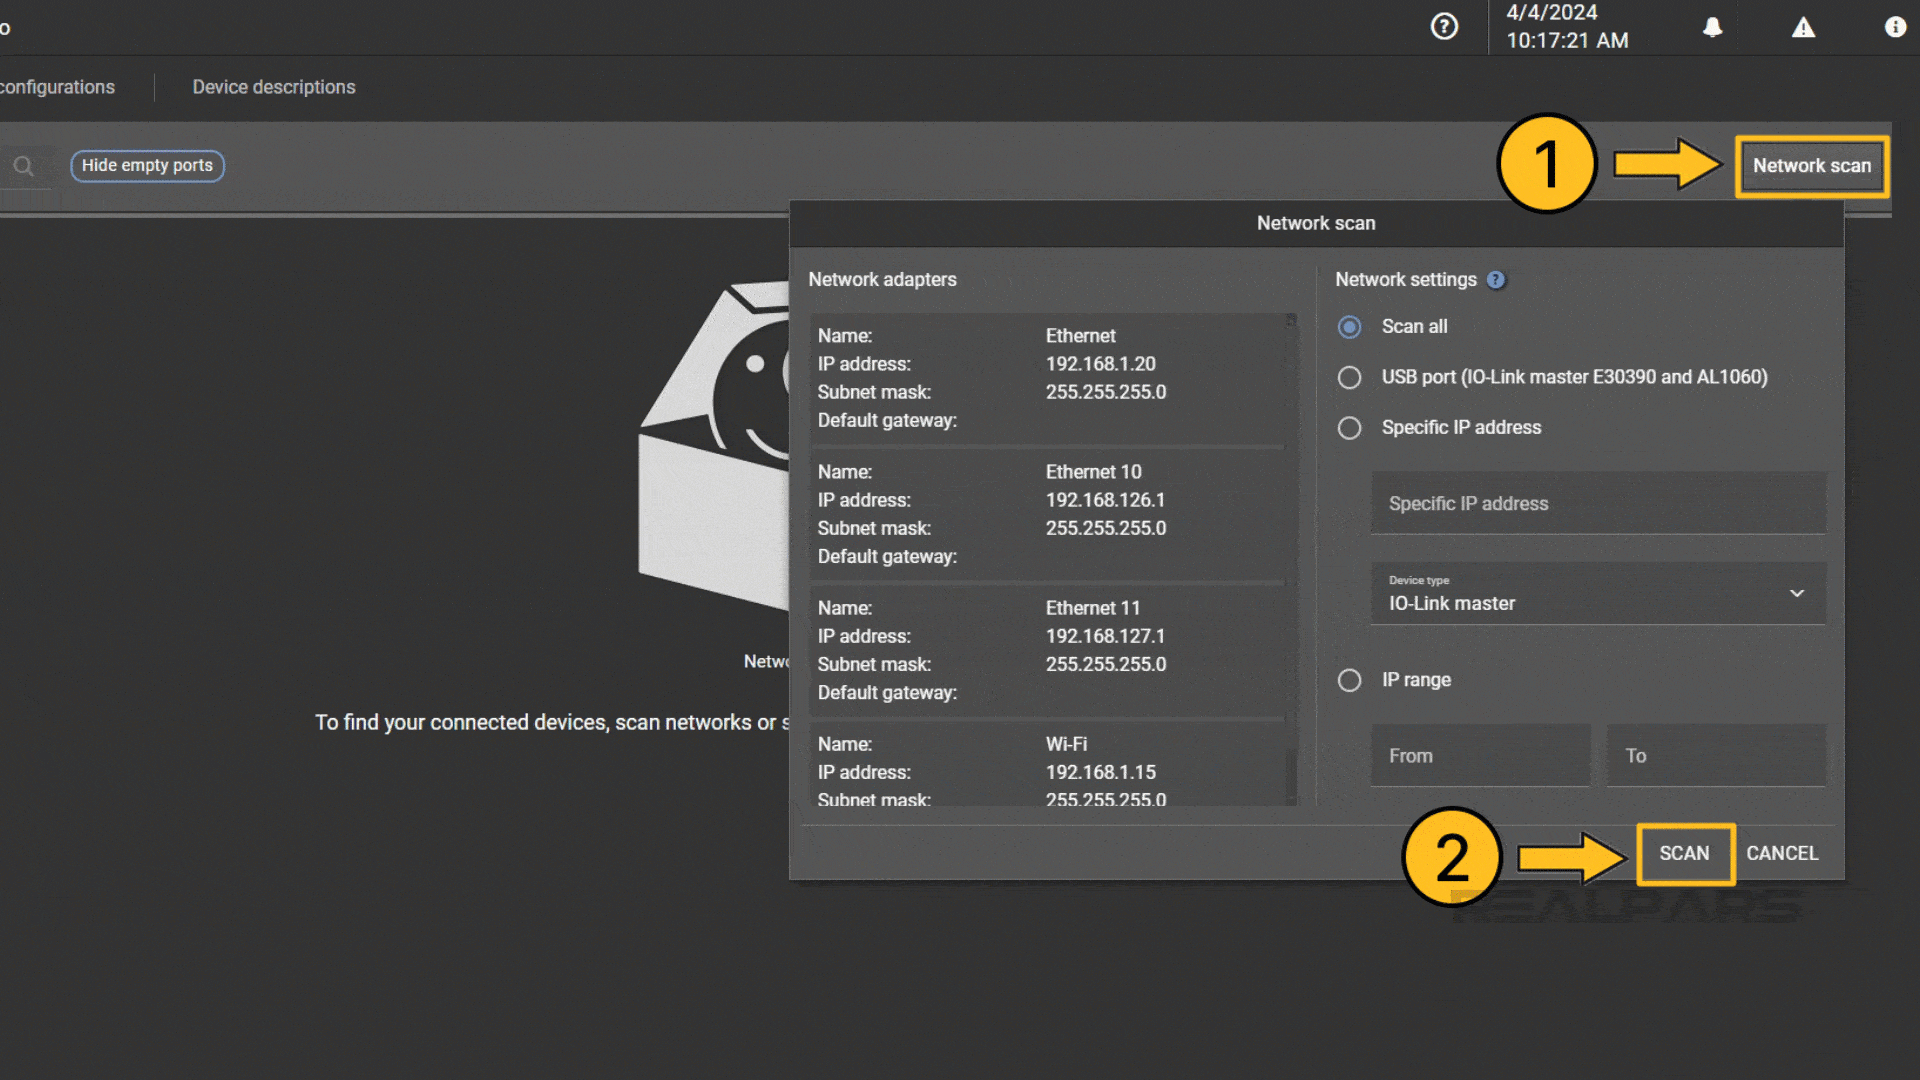
Next, I open moneo configure and scan my network for my IO-Link Master. I can see the details of the IO-Link Master and the sensor connected to it.
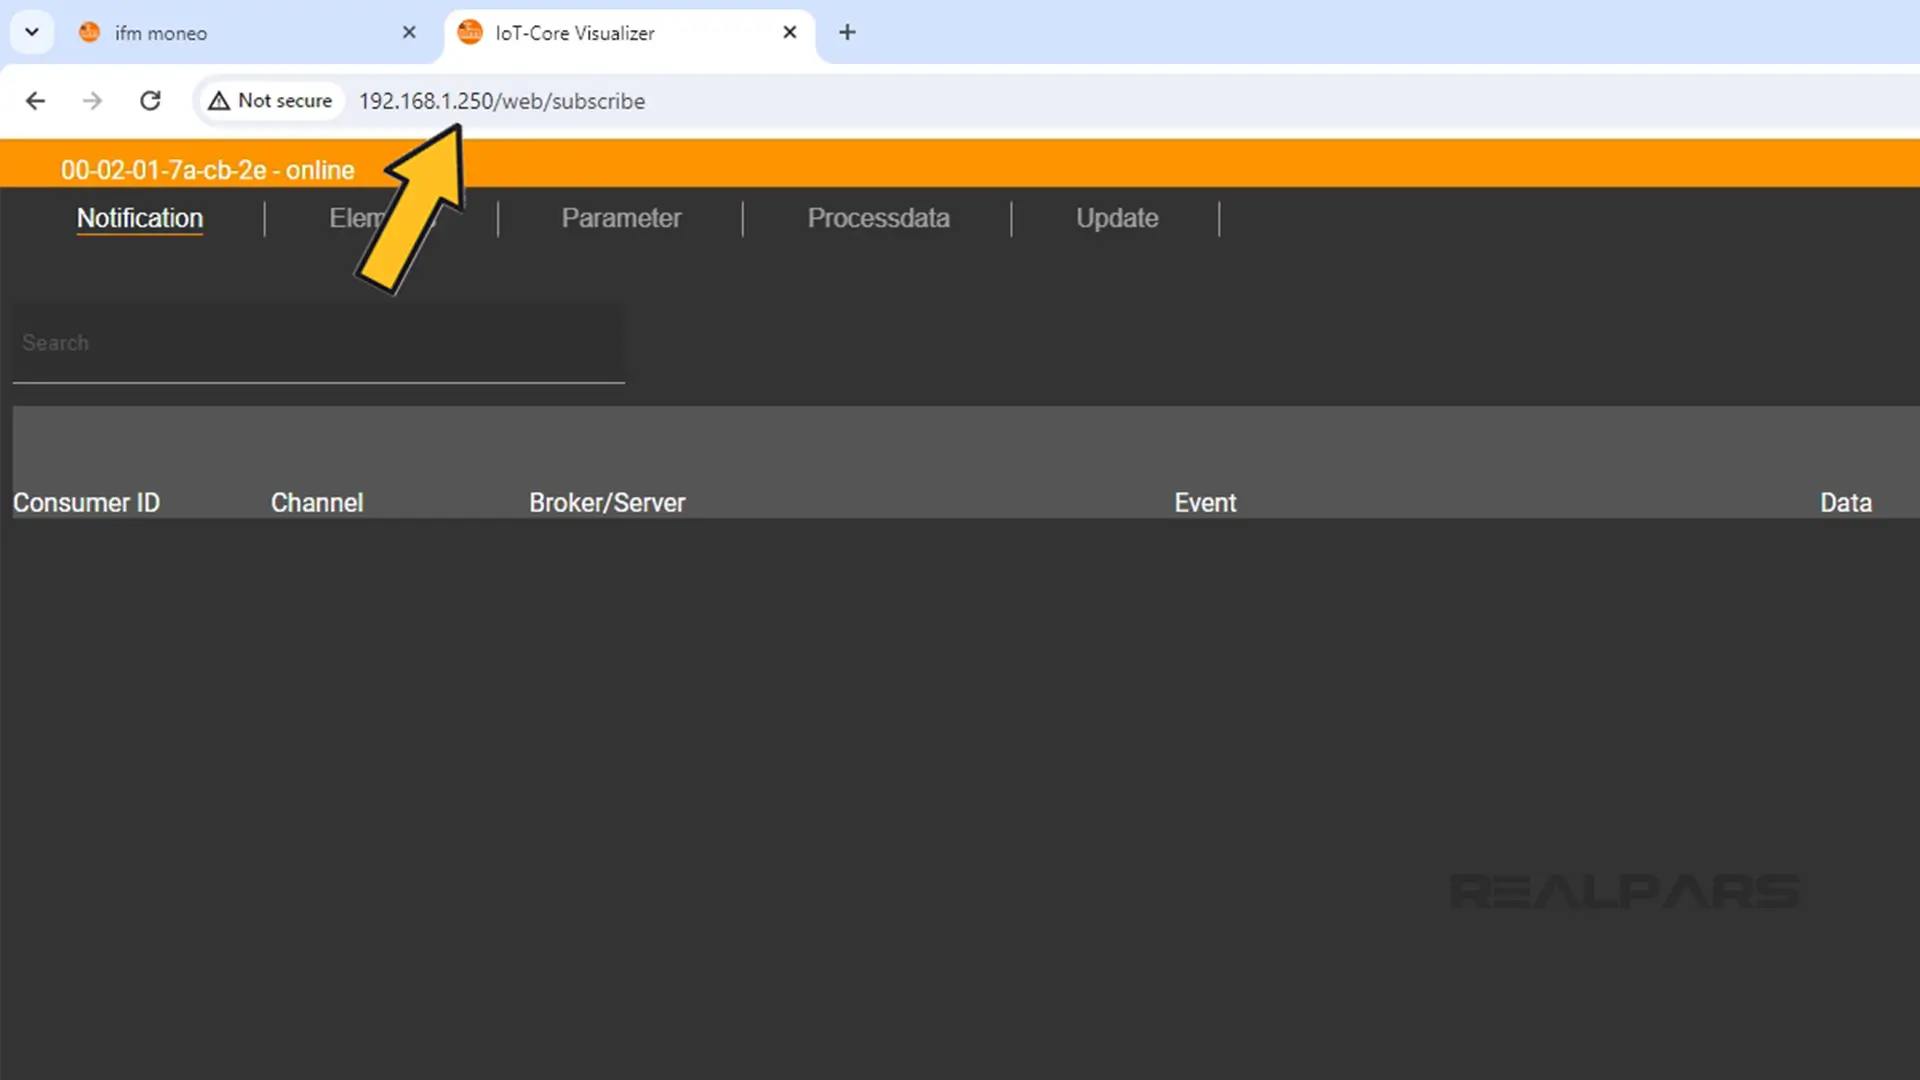
Once I know the IP address of the IO-Link Master, I can navigate to the device’s IoT-Core visualizer web page. The address of the IoT-Core Visualizer web page is the IP address of the device followed by /web/subscribe.
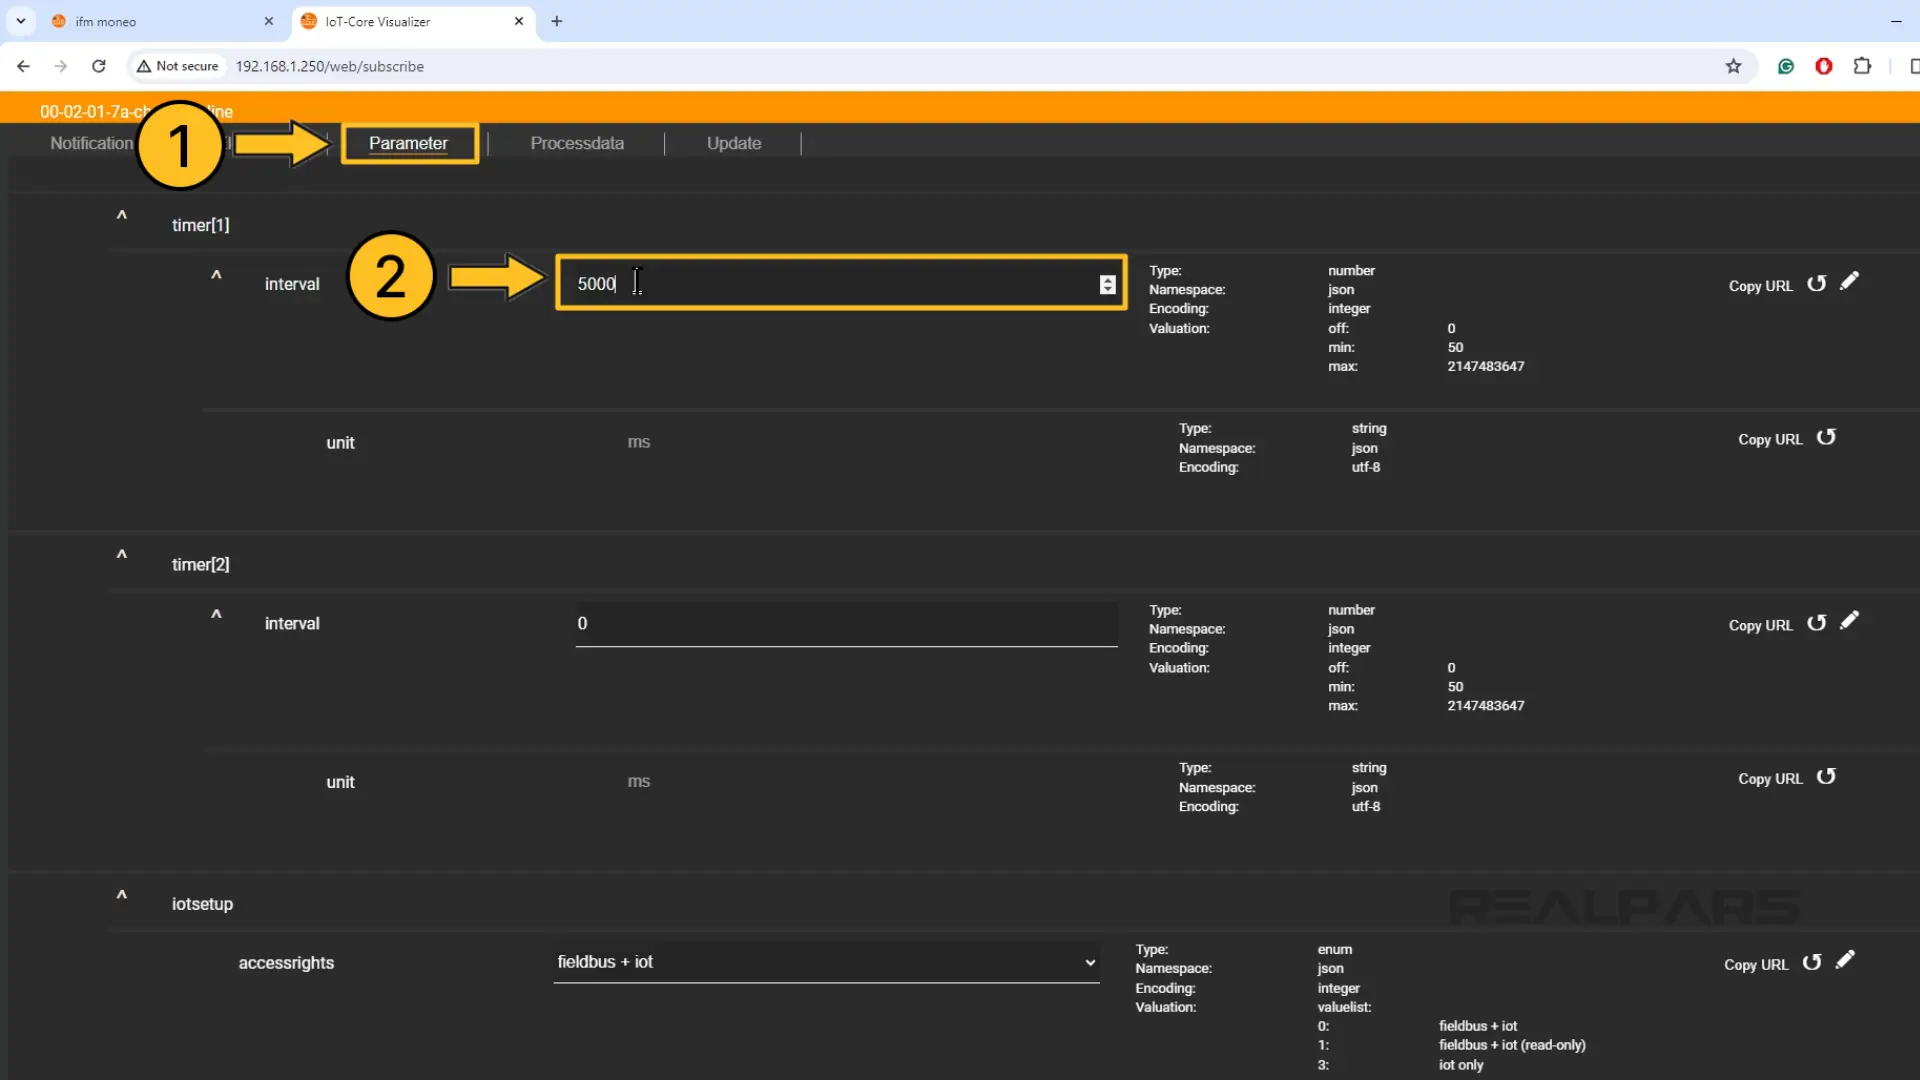
The first thing that I will do is switch to the Parameter tab and update the value of Timer[1] to 5000. This means that the value of the timer will change every 5 seconds. We’ll see why that’s important in a minute.
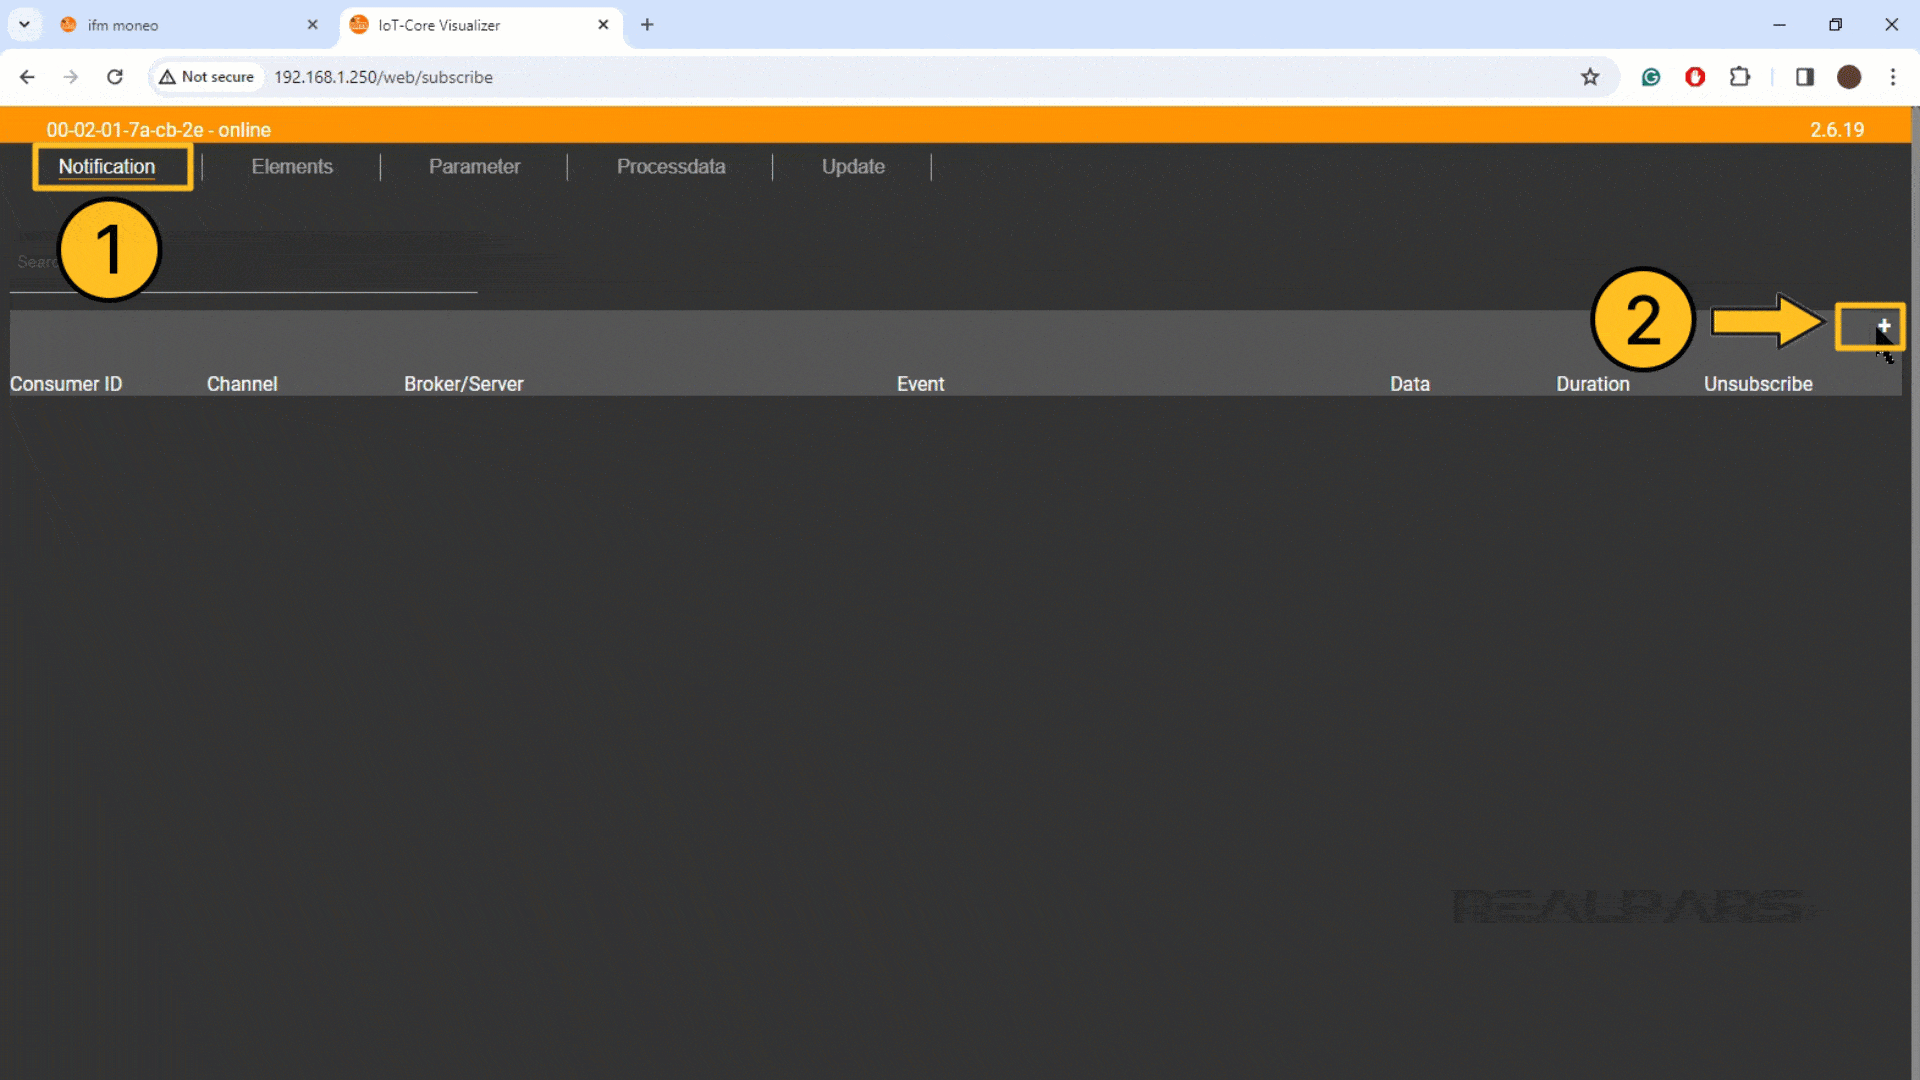
In the IoT-Core Visualizer web page, I can specify what data I want to send to the cloud and the method that is used to send the data.
To do that, I click on the + icon in the Notification tab to open the Add Subscription Configuration dialog.
In the first step of the process, we can configure an event that triggers the sending of data from the IO-Link Master to the cloud.
Here, I specify that the data changed event of the IO-Link Master’s internal counter will trigger the sending of data. We have already set up this Counter to change value every 5 seconds.
After selecting the event, I click Next.
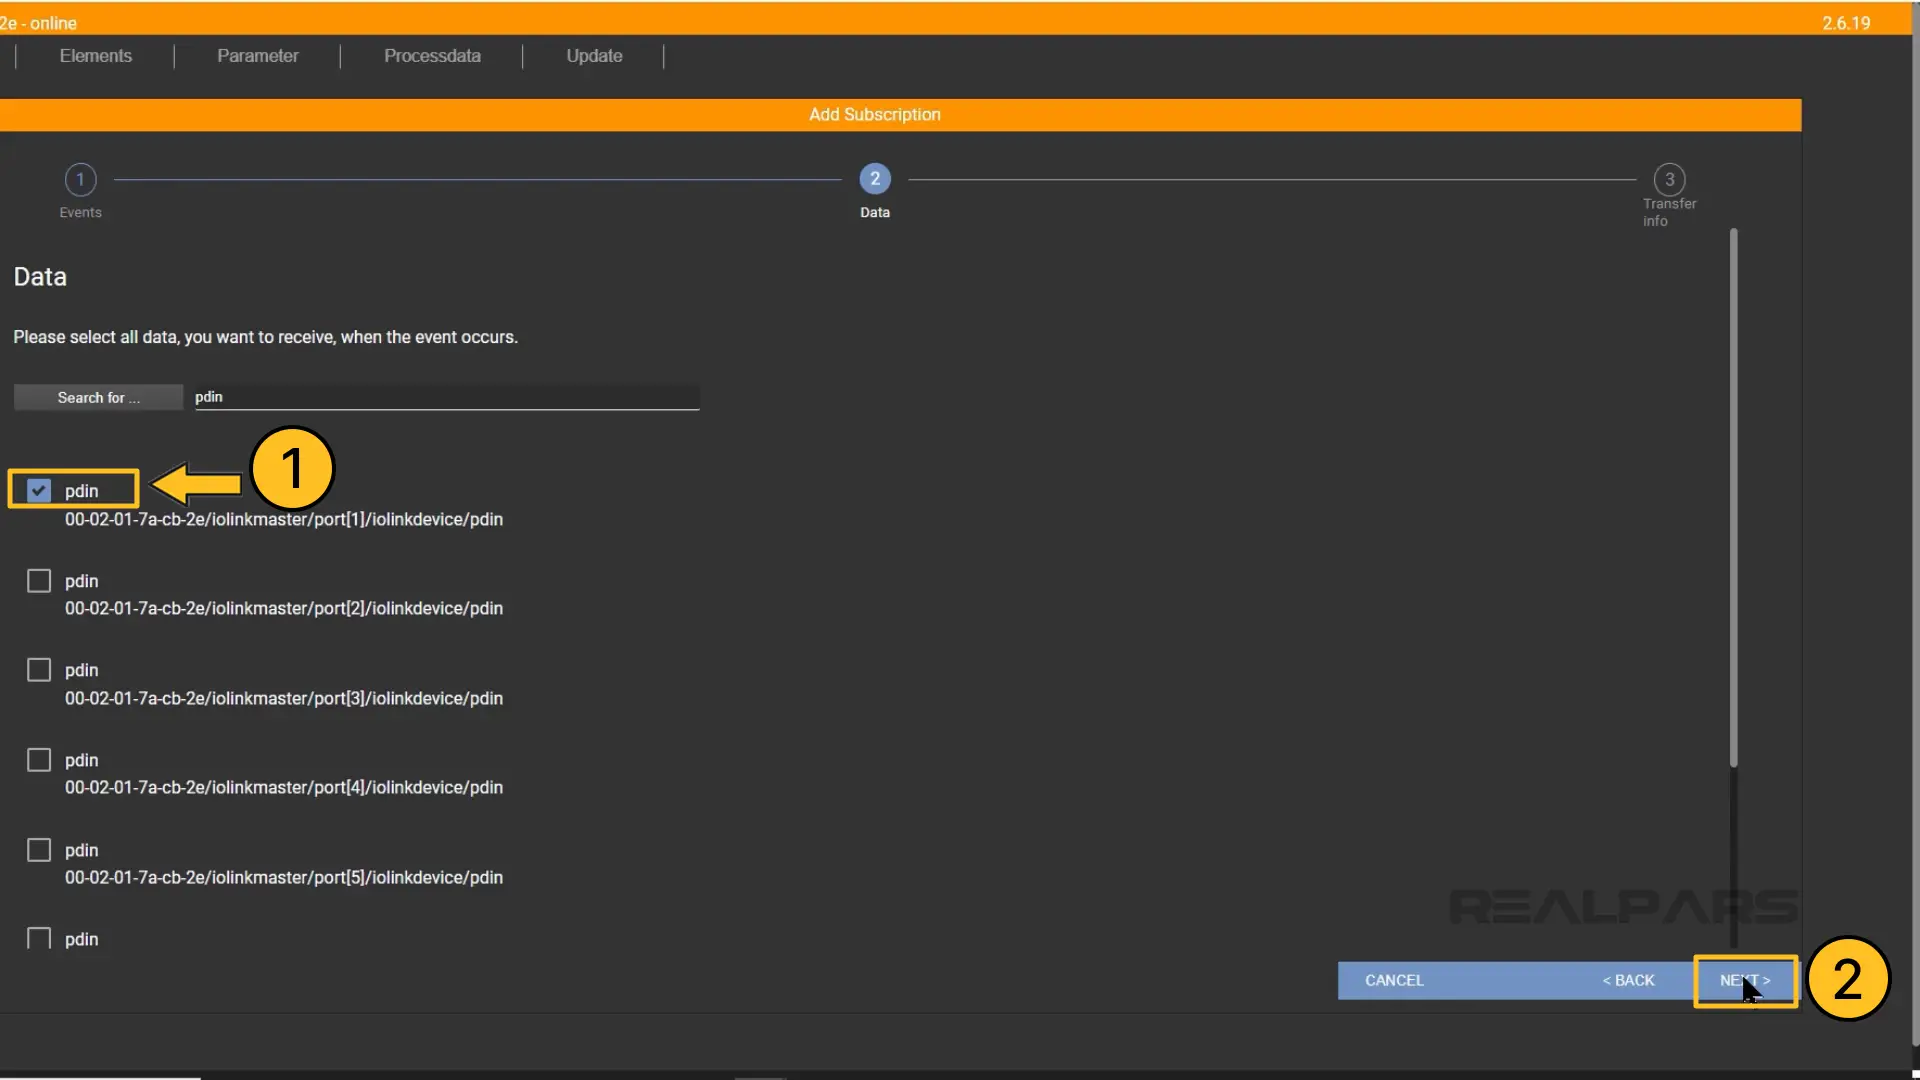
In the next step of the process, I specify the data that should be sent. As you can see, there is a lot of data that can be sent including diagnostic data about the sensor and master.
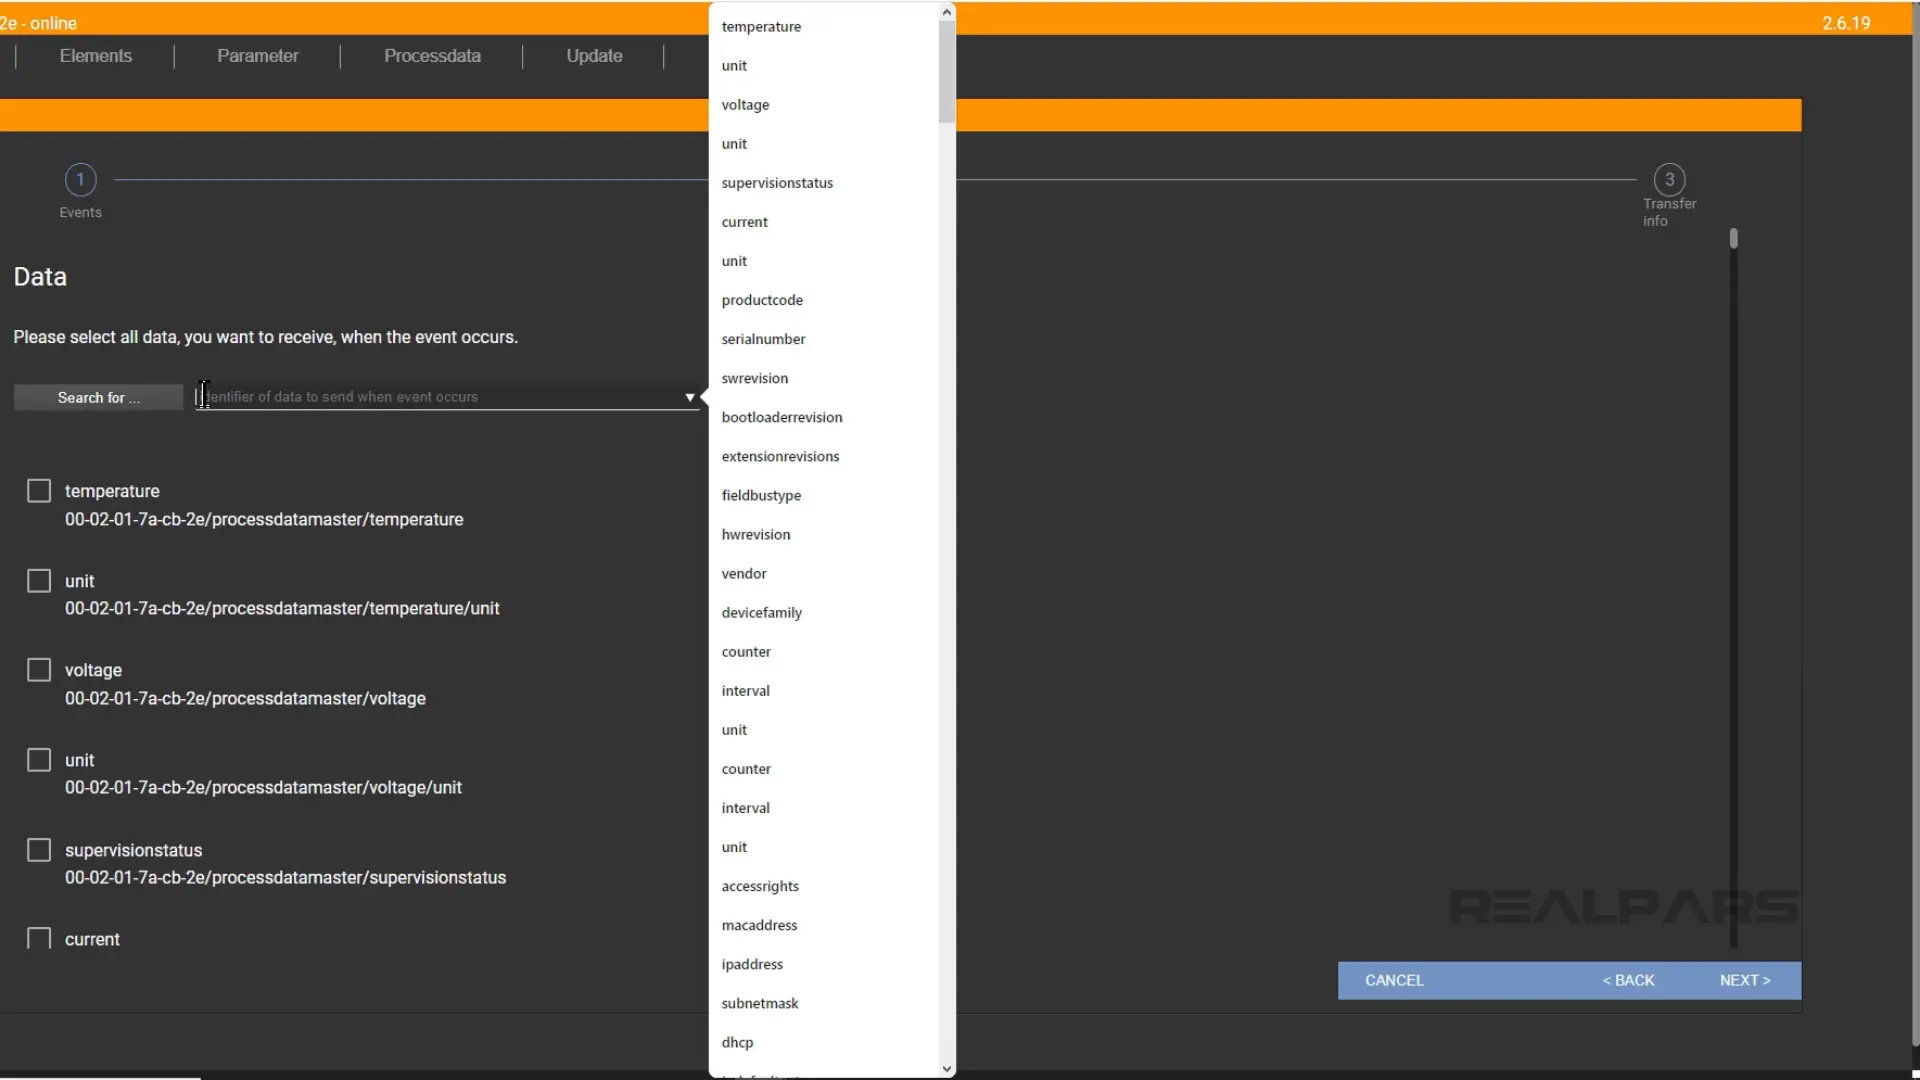
For now, I will only select the pdin data, which is the process data being sent from the sensor to the IO-Link Master.
I click Next to confirm the data being sent.
MQTT broker setup
In the final step of the process, I specify the details of the MQTT broker which the data will be published to. For Consumer ID, I can use any unique number.
For IP address and port, I use the IP Address of my computer and the default MQTT port 1883. Finally, I set an arbitrary topic which is used to view the data in the MQTT client.
Finally, I click Finish to finalize the configuration.

Now the IO Link Master is configured to send data to an MQTT broker running on my laptop.
In my case, I am using Mosquitto as an MQTT broker. In my mosquitto configuration file, mosquitto.conf, I have added a listener to allow remote devices to connect to the broker and allowed anonymous connections to the broker.
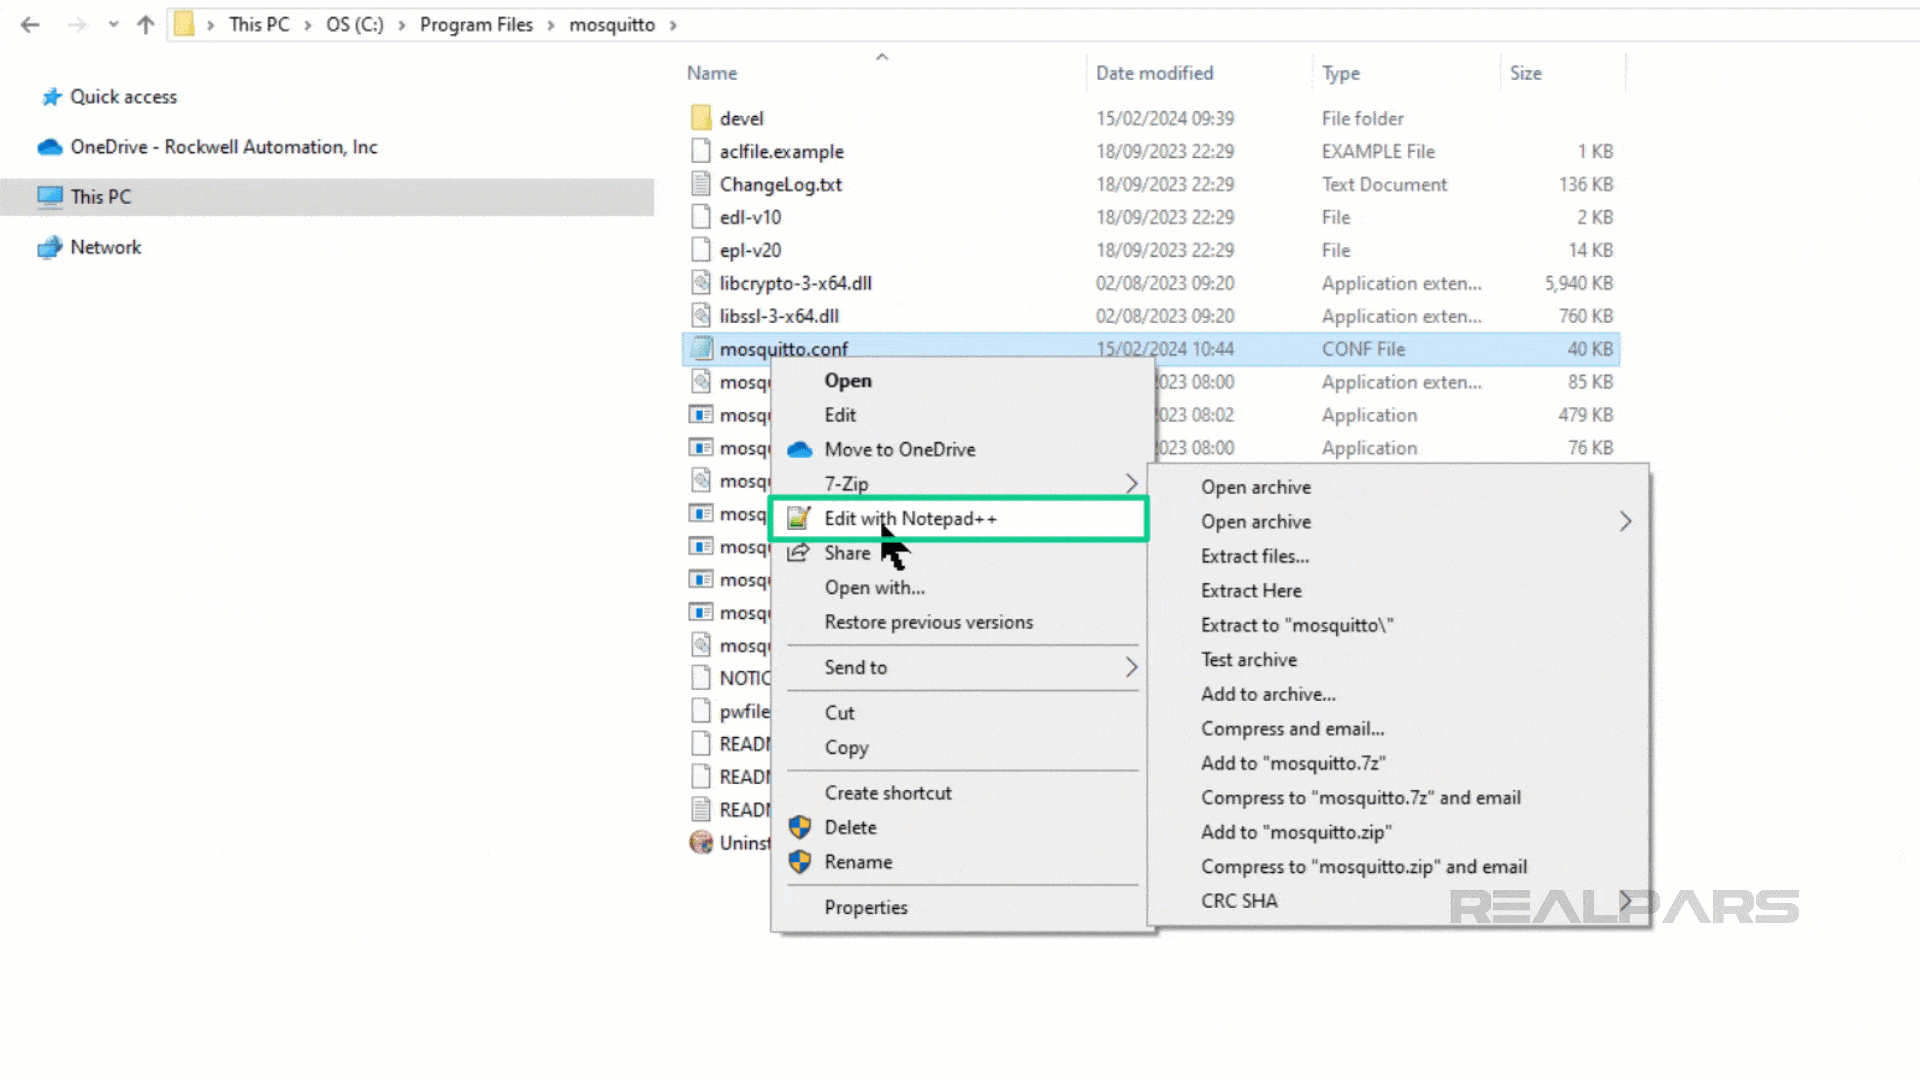
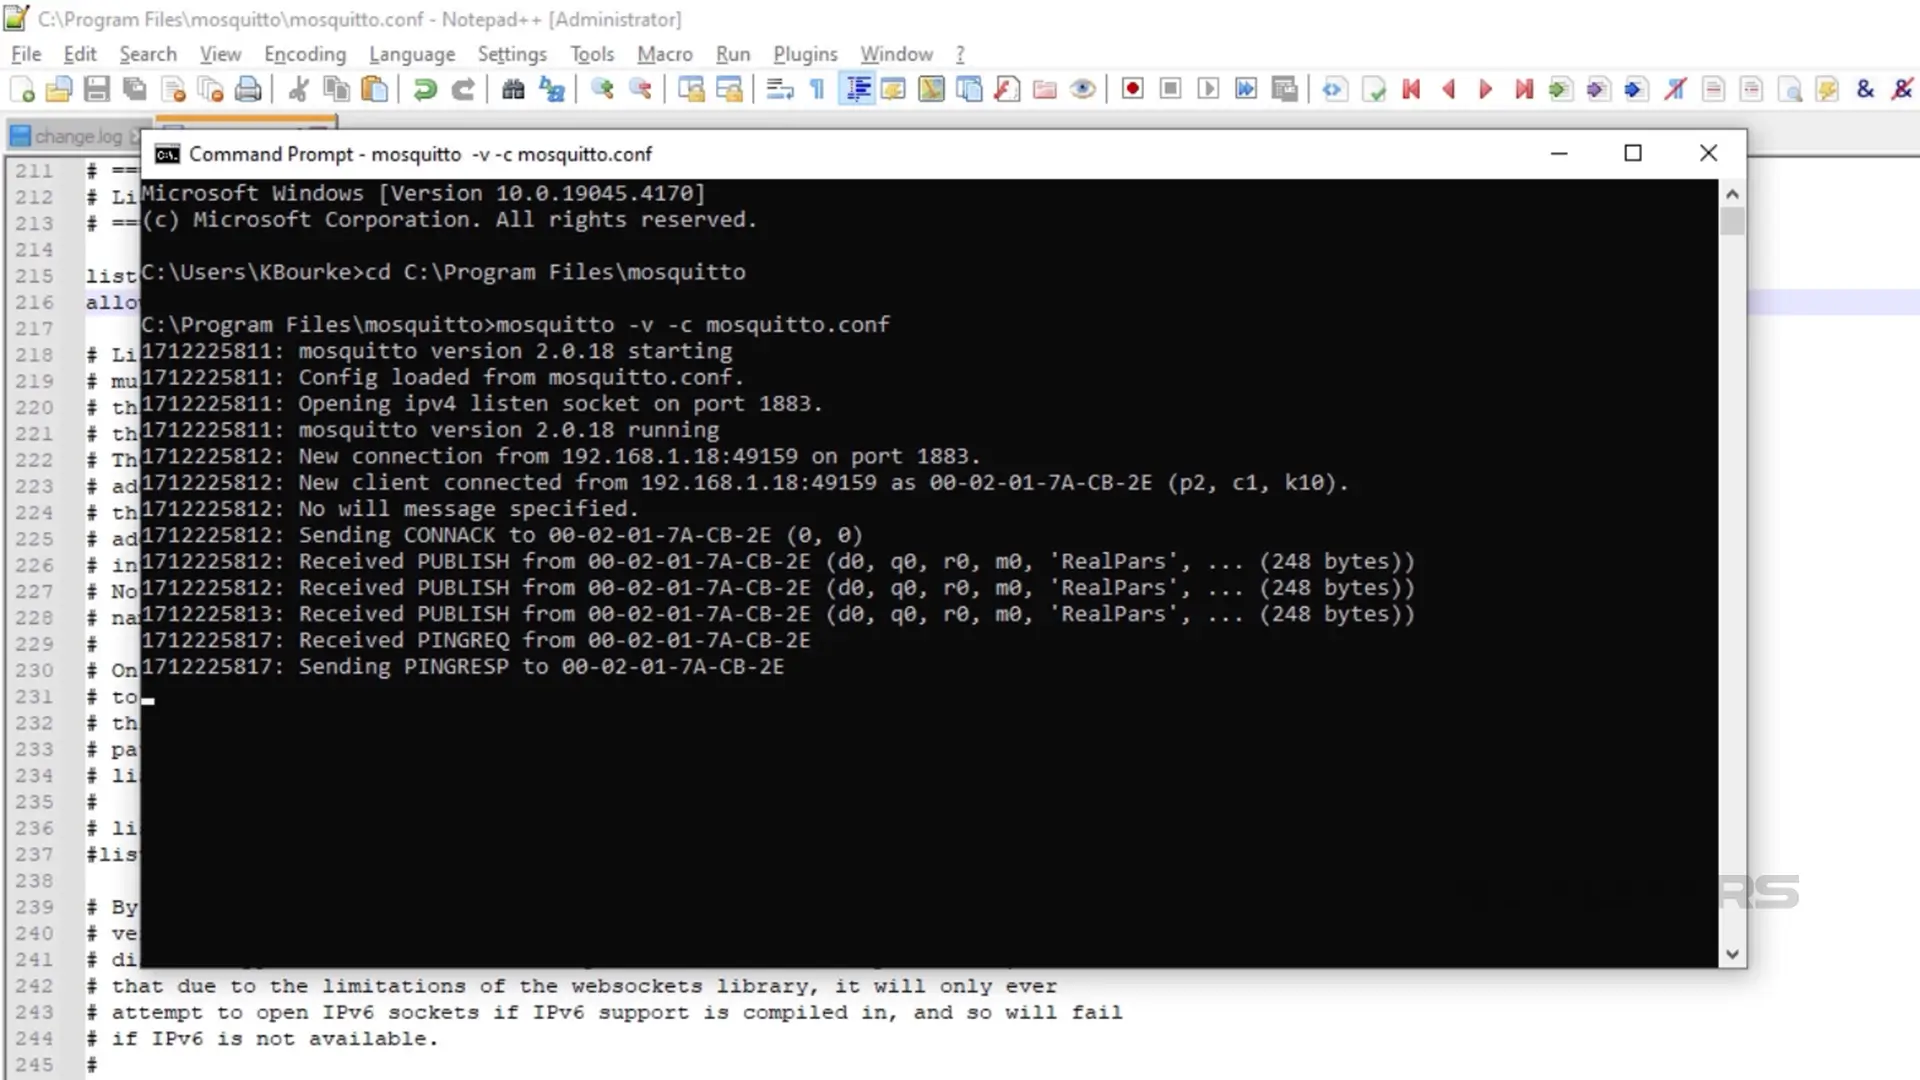
After updating my configuration file, I switch to a Command Prompt window and run the Mosquitto broker. In the command prompt window, I use the cd command to switch to the mosquitto directory and use the command: mosquitto -v -c mosquitto.conf.

This command tells my computer to run mosquitto using the mosquitto configuration file mosquitto.conf with verbose data logging to the command prompt.
The mosquitto broker starts running and I can already see messages coming from the IO-Link Master.
If you don’t see messages here, you may have to update the Firewall rules on your PC to allow traffic through port 1883.
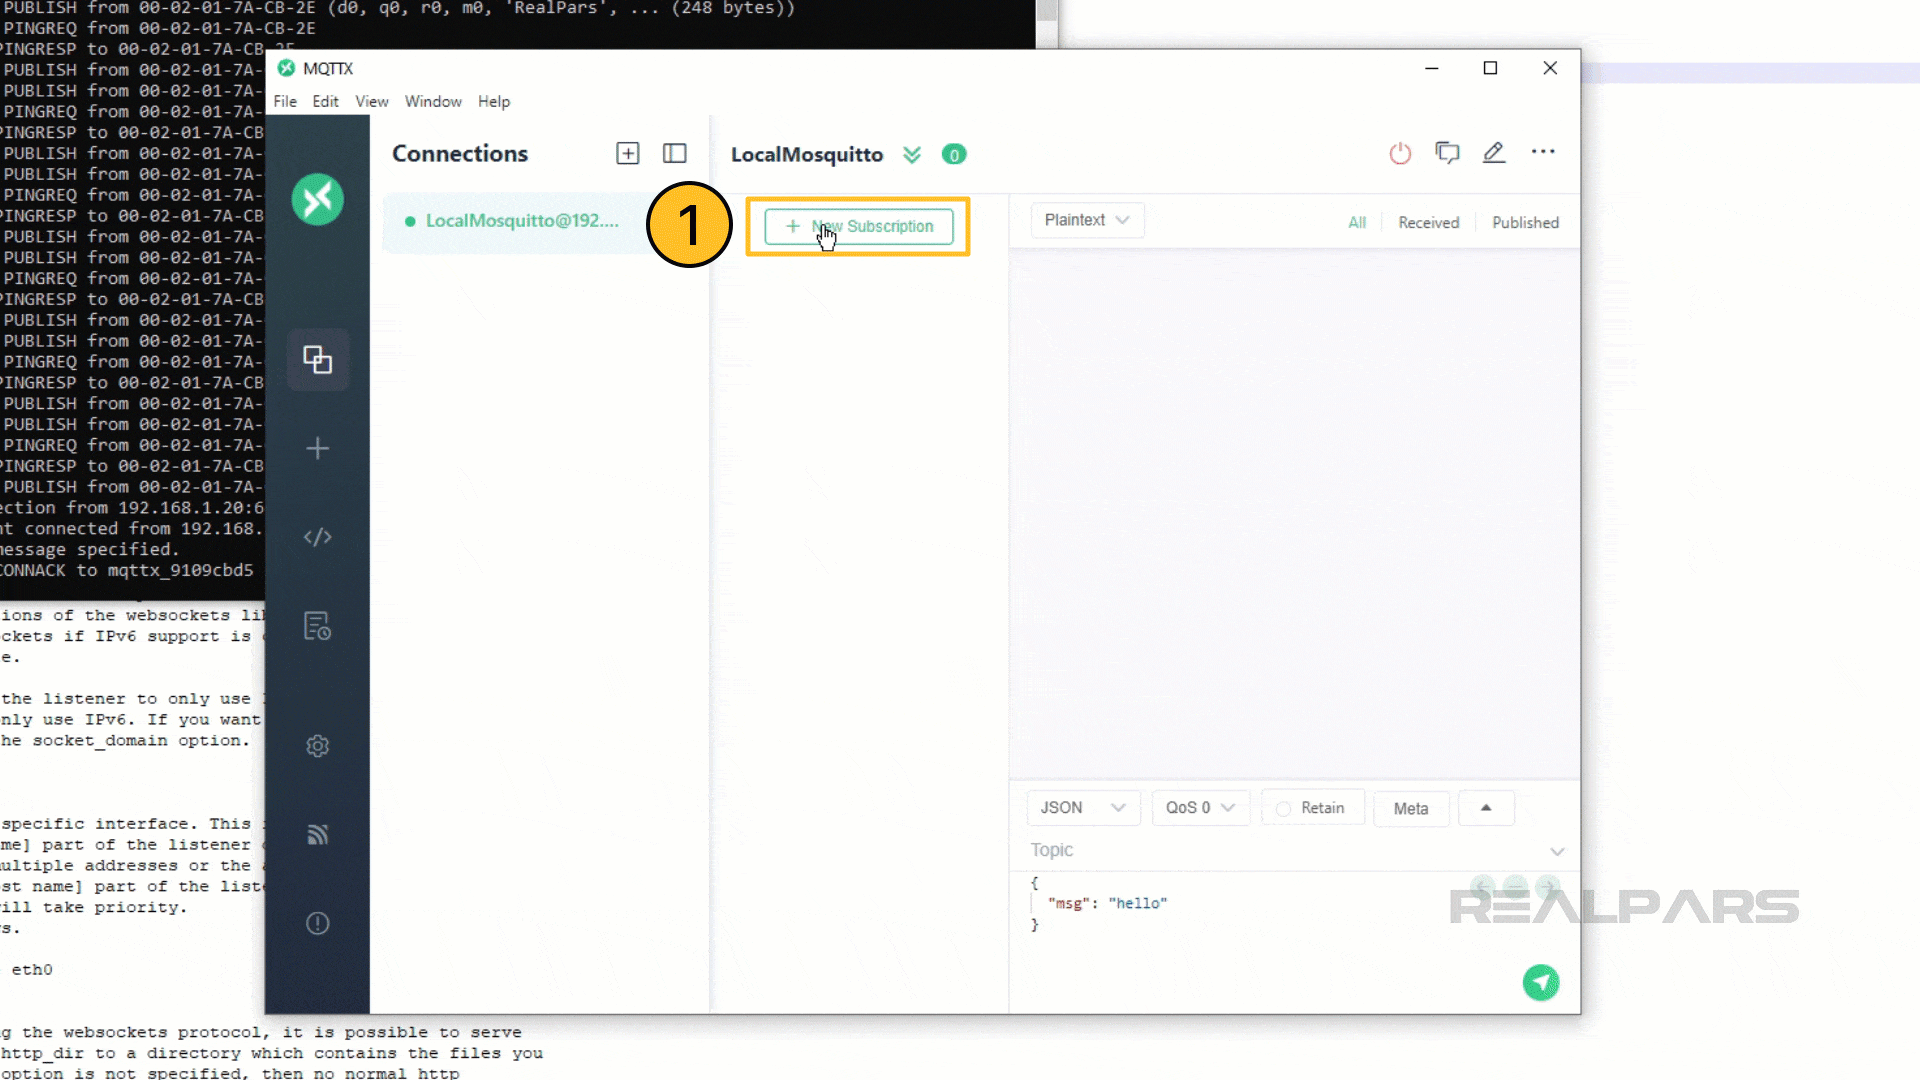
Now, I can use an MQTT client like MQTTX to view the data being sent from the device.
To do that, I open MQTTX, set up a new connection to a broker running on my local machine, and click Connect as shown here.
.gif)
Next, I subscribe to the topic that I previously configured called RealPars by clicking on New Subscription.
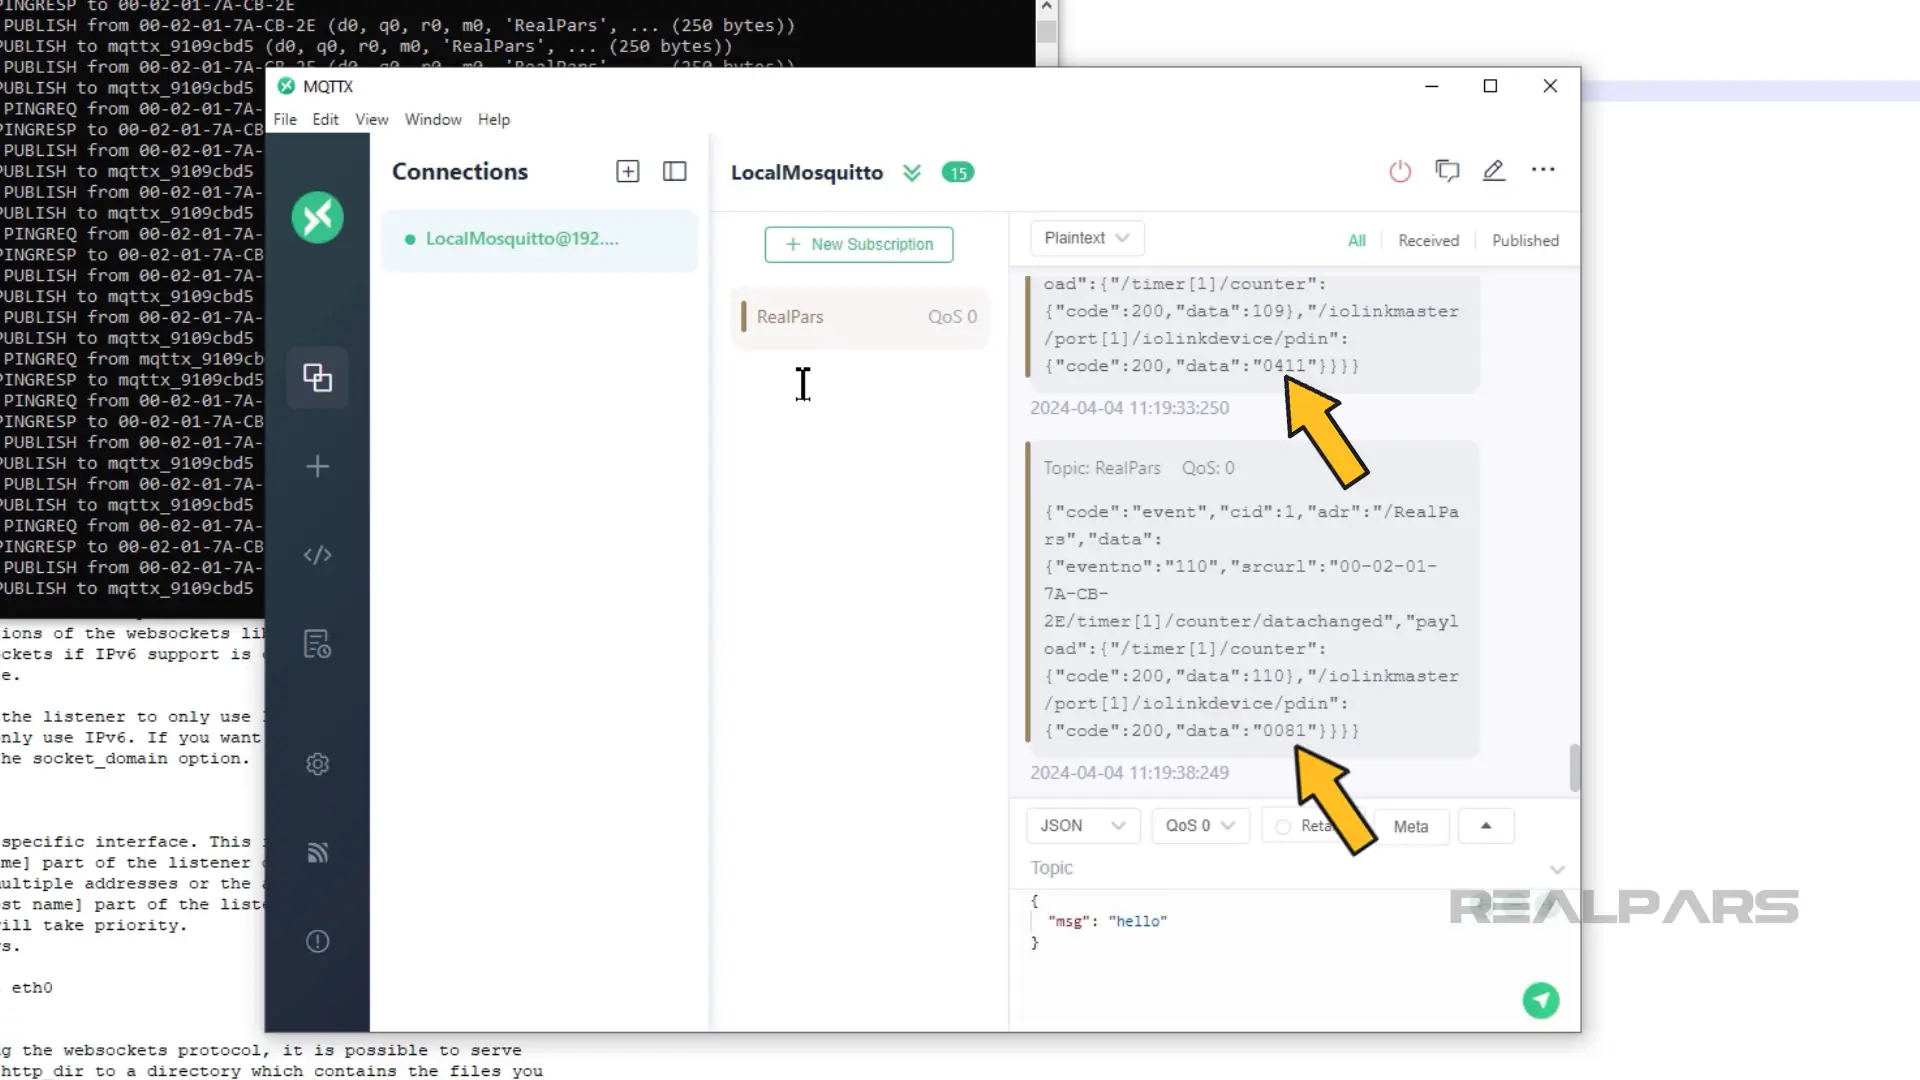
After confirming the subscription, I see the data from the IO-Link Master coming in.
As I move the sensor, I can see the data changing.
In this case, the MQTT Broker and Client are running on my machine, but I could easily switch out the local broker for a cloud-based broker like HiveMQ and use it to push data to cloud storage.
Wrap-Up
In this article, we saw how easy it is to connect an ifm DataLine IO-Link Master to the cloud using the built-in IoT port on the IO-Link Master.
By using DataLine IO-Link masters, manufacturing companies can collect, store, and analyze more data from their sensors without increasing the cycle time or even modifying their PLC programs.
If you would like to learn more about how IO-Link and ifm IO-Link products can accelerate your journey to digitalization and Industry 4.0 and get hands-on experience with IO-Link technology, then check out our IO-Link course which is certified by ifm.